My Garage
My Account
Cart
Genuine Dodge Challenger Crankshaft
Crank Shaft- Select Vehicle by Model
- Select Vehicle by VIN
Select Vehicle by Model
orMake
Model
Year
Select Vehicle by VIN
For the most accurate results, select vehicle by your VIN (Vehicle Identification Number).
21 Crankshafts found


Dodge Challenger Engine Crankshaft
Part Number: 53010932AB$1723.25 MSRP: $2575.00You Save: $851.75 (34%)

Dodge Challenger Engine Crankshaft
Part Number: 53010906AB$1666.75 MSRP: $2490.00You Save: $823.25 (34%)


Dodge Challenger Engine Crankshaft
Part Number: 68498568AA$1666.75 MSRP: $2490.00You Save: $823.25 (34%)


Dodge Challenger Engine Crankshaft
Part Number: 68498570AA$1723.25 MSRP: $2575.00You Save: $851.75 (34%)
| Page 1 of 2 |Next >
1-20 of 21 Results
Dodge Challenger Crankshaft
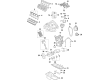
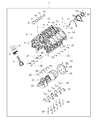
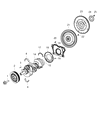
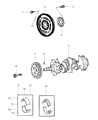
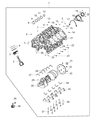
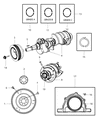
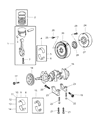
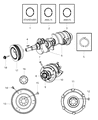
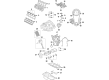
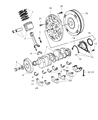
The Crankshaft transfers the power generated by the pistons to the wheels to make the Dodge Challenger a fine vehicle. A balanced Crankshaft rests upon sturdy journals deep in the block. Connecting rods that grasp the cranks' offset throws change the straight line motion into spin that feeds the gears, axles, and wheels. Over the years, Dodge engineers applied a cast iron Crankshaft for the everyday Challenger engines and a forged steel unit for the high horsepower editions. The cast variety helps you save money and handle normal loads, while the forged version is capable of withstanding higher stress and greater rpm that a performance Dodge model can unleash due to its tighter grain and superior strength. No matter the design, every Crankshaft must be perpetually bathed in clean oil. Dirt and low flow will score the journals and widen clearances, which gives rise to engine knock. Any Challenger is all too familiar with this threat. Maintenance protects the Crankshaft from junk, allowing every Dodge Challenger to keep roaring mile after mile.
Looking for affordable and high-quality auto parts? Then you have already arrived at the proper online shop. We offer all Dodge Challenger Crankshaft at great affordable prices. Moreover, all genuine Dodge Challenger Crankshaft come with a manufacturer's warranty. In the long run, you would realize you have saved a lot of trouble and money with OEM parts from here.
Dodge Challenger Crankshaft Parts Questions & Experts Answers
- Q: How can the crankshaft be removed and reinstalled after taking the engine out on Dodge Challenger?A:Crankshaft may be removed only after the engine has been pulled out of the car provided that other accessories including the drive plate, crankshaft pulley, timing chain/belt, oil pan, oil pump, oil filter as well as piston/connecting rod assemblies have been withdrawn. Before the crankshaft removal, clean, and place an initial dial reading on the dial indicator touching the crankshaft. Wedge the crankshaft to the rear to obtain zero on the indicator and then wedge the crankshaft to the front to read the difference; ideal measure of end-float is about 0.003- 0.010 of an inch. In case you do not have the dial indicator consider using feeler gauges to measure the clearance. Tighten the main bearing cap bolts gradually, lightly knock the caps with a light hammer gently and then remove the main bearing cap bolts including caps. Take out the crankshaft as it is rather heavy, it is best to do it in pairs, and replace the main bearing cap assembly with the arrow pointing in front. For installation, then it is required to clean the engine block and the crankshaft and examine it before fixing it. Turn the block over; also, remove the main bearing cap assembly and clean the bearing surfaces. Fit new upper and lower main bearing inserts and check that the oil holes are also in position. Measure the main bearing oil clearance with the Plastigage and adjust to the rang of 0.0015 to 0.0023 inch. If clearance is incorrect, check cleanliness to be further confident and in case there is a need, check on the bearings sizes. Once the Plastigage has been removed clean the bearing surfaces and the thrust faces and apply a coat of grease on them then fit the crankshaft and bearing caps and tighten the bolts to the recommended torque. Recheck crankshaft end play and ensure you turn the crankshaft with an appreciable amount of friction. Last but not least, I then fitted the new rear main oil seal.

Related Dodge Challenger Parts
 Dodge Challenger Rod Bearing
 Dodge Challenger Camshaft
 Dodge Challenger Oil Pan
 Dodge Challenger Crankshaft Pulley
 Dodge Challenger Piston Ring Set
 Dodge Challenger Cam Gear
 Dodge Challenger Oil Pump
 Dodge Challenger Oil Pan Gasket
 Dodge Challenger Crankshaft Thrust Washer Set
 Dodge Challenger Oil Pump Gasket