My Garage
My Account
Cart
Genuine Dodge Magnum Steering Column
Steering Column Tilt- Select Vehicle by Model
- Select Vehicle by VIN
Select Vehicle by Model
orMake
Model
Year
Select Vehicle by VIN
For the most accurate results, select vehicle by your VIN (Vehicle Identification Number).
14 Steering Columns found


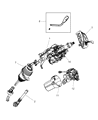

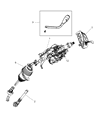


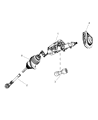

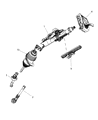


Dodge Magnum Steering Column
The Dodge Magnum's Steering Column is also another important part that incorporates the steering shaft and provides for the accurate transfer of the steering angles and torques to the car for the premier response. Apart from acting as an arm for the steering, it also play other roles such as acts as a IOU member by absorbing energy in the event of a crash and supporting other parts like switch and gauges. The telescopic effect of the steering columns is used to minimize the force impact of an accident on drivers, and there is also the steering lock as a sophisticated feature to discourage car thefts. Satisfying Federal regulations, the steering column of Dodge Magnum demonstrates all possible safety and efficiency for better handling.
Looking for affordable and high-quality auto parts? Then you have already arrived at the proper online shop. We offer all Dodge Magnum Steering Column at great affordable prices. Moreover, all genuine Dodge Magnum Steering Column come with a manufacturer's warranty. In the long run, you would realize you have saved a lot of trouble and money with OEM parts from here.
Dodge Magnum Steering Column Parts Questions & Experts Answers
- Q: How to Remove a Steering Column on Dodge Magnum?A:The manufacturer recommends using new mounting fasteners for installation. Park the vehicle with the wheels pointing straight ahead. Extend the column all the way out. Disconnect the cable(s) from the negative battery terminal(s). Wait at least two minutes before proceeding. On models equipped with electric telescoping columns, place the column in the mid-tilt position. Remove the Steering Wheel, then turn the ignition key to the LOCK position to prevent the steering shaft from turning. If this is not done, the airbag clockspring could be damaged. Loosen one of the clockspring mounting fasteners to keep the clockspring centered. Remove the knee bolster and reinforcement panel underneath it. Remove the Steering Column Control Module. Remove the mounting screws for the plastic shroud at the end of the column and detach the tilt adjuster handle, if equipped. Remove the lower steering column mounting fasteners at the firewall. Remove the instrument cluster. Detach the electrical wiring harness for the column. Raise the front of the vehicle and support it securely on jackstands. From under the vehicle, mark the steering shaft to the lower coupling shaft and remove the pinch bolt. Separate the shafts. On vehicles equipped with electric telescoping columns, remove the brace attached to dash support and the column. Remove the pivot bolt on the column. Remove the upper steering column mounting bolts and remove the column. Handle the steering column with care to avoid damaging it. Guide the steering column into position and install the top and pivot mounting fasteners, but don't tighten them yet. Make sure the lower boot is properly seated on the column before placing it into position through the firewall. Install the brace removed if equipped. The remainder of installation is the reverse of removal.


