My Garage
My Account
Cart
Genuine Dodge Neon Control Arm
Suspension Arm- Select Vehicle by Model
- Select Vehicle by VIN
Select Vehicle by Model
orMake
Model
Year
Select Vehicle by VIN
For the most accurate results, select vehicle by your VIN (Vehicle Identification Number).
10 Control Arms found


Dodge Neon Front Left Lower Suspension Wishbone Control Arms
Part Number: 4656731AH$248.65 MSRP: $376.00You Save: $127.35 (34%)


Dodge Neon Suspension Control Arm Front Left
Part Number: 4509775$195.95 MSRP: $414.00You Save: $218.05 (53%)Dodge Neon Black Suspension Control Arm
Part Number: 4509774$234.19 MSRP: $386.00You Save: $151.81 (40%)
Dodge Neon Suspension Control Arm Front Left
Part Number: 5272237AF$234.62 MSRP: $347.00You Save: $112.38 (33%)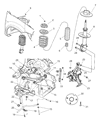

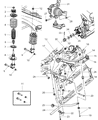
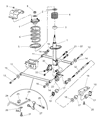
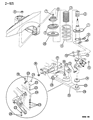
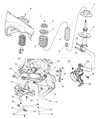
Dodge Neon Control Arm
The Control Arm of Dodge Neon vehicles play the role of translating movement of the suspension system between the vehicle's frame and its wheels. This component enables the wheels to turn in response to road interchange capability that is a quality that will enable the wheels to remain well aligned because of the turning so as to enhance safety. In the Dodge Neon models used lower control arms that may be made from metals such as stamped steel, cast iron, or even cast aluminum each of which has difference strength and mass. Today, Dodge Neon vehicle has manufactured different control arms over the years with some designed for performance use and with sturdier designs. These performance control arms are commonly fabricated from DOM tubular steel or aluminum for better capacity in terms of stress produced when driven hard. Furthermore, handling is made precise by employing enhanced bushings, materials for instance, polyurethane, or Delrin. In general the Dodge Neon control arm plays a significant role within suspension system of the vehicle to maintain stability and maneuverability on roads.
Looking for affordable and high-quality auto parts? Then you have already arrived at the proper online shop. We offer all Dodge Neon Control Arm at great affordable prices. Moreover, all genuine Dodge Neon Control Arm come with a manufacturer's warranty. In the long run, you would realize you have saved a lot of trouble and money with OEM parts from here.
Dodge Neon Control Arm Parts Questions & Experts Answers
- Q: How to remove and install a control arm on Dodge Neon?A:Loosen the wheel lug nuts on the side to be dismantled, raise the front of the vehicle, support it securely on jackstands, and remove the wheel. Remove the balljoint clamping bolt and nut, then disconnect the stabilizer bar link from the control arm. If removing the right side control arm, also remove the engine torque strut to access the front pivot bolt. Use a prybar to disconnect the control arm from the Steering Knuckle and pull the balljoint stud from the steering knuckle, taking care not to move the steering knuckle/strut assembly to avoid separating the inner CV joint. Remove the bolt and nut that attach the front of the control arm to the crossmember, ensuring to turn the bolt, not the nut, as the nut has an anti-rotation tang. Next, remove the bolt that attaches the rear of the control arm to the crossmember and then remove the control arm. Inspect the control arm for straightness; if bent, it should be replaced, and check the bushings for cracks, tears, or wear, replacing the control arm if necessary. For installation, reverse the removal steps, tightening the control arm's rear bolt first, followed by the front bolt and nut, ensuring all fasteners are tightened to the specified torque. Finally, install the wheel and lug nuts, lower the vehicle, and tighten the lug nuts to the specified torque, and consider having the front wheel alignment checked and adjusted if necessary after completing the job.


