My Garage
My Account
Cart
Genuine Dodge Neon Engine Mount
Engine Motor Mount- Select Vehicle by Model
- Select Vehicle by VIN
Select Vehicle by Model
orMake
Model
Year
Select Vehicle by VIN
For the most accurate results, select vehicle by your VIN (Vehicle Identification Number).
23 Engine Mounts found


| Page 1 of 2 |Next >
1-20 of 23 Results
Dodge Neon Engine Mount
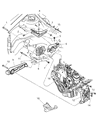
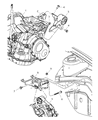
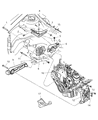
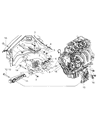
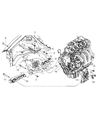
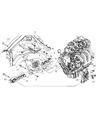
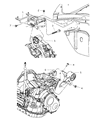
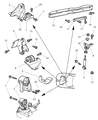
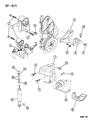
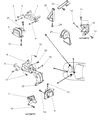
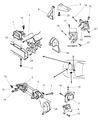
The Engine Mount in Dodge Neon vehicles serves two primary functions: it reduces noise and vibration coming from the engine while at the same time locating and supporting the engine and transaxle within the chassis. This isolation is important so as to provide comfort while operating the vehicle and ensuring that the vehicle components area does not get exposed to certain forces. Additional, Dodge Neon models have used different types of Engine Mounts depending on the Model Year, these include Rubber Mounts, Fluid Filled Hydraulic mounts, and the latest and much complex type of mounts, the Electronic Active Mounts. Conventional bearings made up of metal parts with rubber spacers are less effective whereas hydro mounts are more effective against vibrations. The latest active mounts regulate its rate of stiffness according to the revolutions per minute with the premier efficiency. These Engine Mounts can deteriorate with time, heat or when they get in contact with fluids and this will lead to noise and vibrations thus require inspection for replacement.
Looking for affordable and high-quality auto parts? Then you have already arrived at the proper online shop. We offer all Dodge Neon Engine Mount at great affordable prices. Moreover, all genuine Dodge Neon Engine Mount come with a manufacturer's warranty. In the long run, you would realize you have saved a lot of trouble and money with OEM parts from here.
Dodge Neon Engine Mount Parts Questions & Experts Answers
- Q: What are the steps involved in adjusting and replacing the engine mount on Dodge Neon?A:These vehicles have two load carrying mounts and two torque struts and any change in the two will need adjustment. Torque struts both upper and lower have to be adjusted concurrently so as to get the right positioning of the engine, and this is required if at all a torque strut bolt has been loosened. Engine mounts generally do not require any attention but any damaged or badly worn mounts should be replaced to avoid damage to the rest of drive line parts. While inspecting the mount, the engine must be lifted a little to free the mount from some of its weight so as to physically appear for crack in the rubber or signs of separation. Any movement between the mount plates and the engine/frame, and the engine should be lowered and the mount fasteners tightened. Antirust can be used in order to prevent or delay the rate of the deterioration of rubber. For replacement, the negative batter terminal has to be removed and the vehicle has to be properly placed and supported on jack stands. Off comes then wheels, specific to momentum, and splash; the air filter housing and battery tray is also to be removed. A floor jack should be placed under the trans axle in order to take weight off a left engine mount, which, in turn, can be unbolted from the vehicle. The right engine mount also needs the position to be marked before removal and while installing it should be done in the reverse manner with the use of the thread locking compound on the bolts. The upper part of the torque strut is removed from the shock tower bracket and the engine mount bracket while reassembly is done the reverse order, with a torque strut adjustment done as well. By the same process as earlier, the lower torque strut is also replaced with the same requiring the adjustment. For the torque strut adjustment, the connection of the negative terminal of the battery is removed while the car is raised firmly. The upper and lower torque strut attachment bolts are then slackened and a floor jack is used to jack it up to enable the engine to rotate to the rear while checking measures between two points whereby they should be 4.70 inches apart. After getting positioned correctly, the torque strut bolts are then tightened and unscrewing the floor jack, marks the end of the installation process.


