My Garage
My Account
Cart
Genuine Dodge Neon Sway Bar Bushing
Stabilizer Sway Bar Bushing- Select Vehicle by Model
- Select Vehicle by VIN
Select Vehicle by Model
orMake
Model
Year
Select Vehicle by VIN
For the most accurate results, select vehicle by your VIN (Vehicle Identification Number).
9 Sway Bar Bushings found


Dodge Neon Sway Bar Bushing
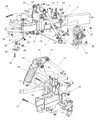
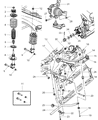
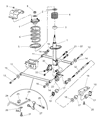
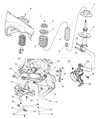
In the Dodge Neon automobiles, the Sway Bar Bushing provides the much needed boost to improve the ride quality and stability. These bushings are specifically meant to dampen all those road irregularities, reduce noise, and provide comfortable ride. The Sway Bar Bushing supports the sway bar also called the stabilizer bar this helps in controlling unwanted body roll thus enhancing handling and safety during turns. It is also common to have the front and rear sway bar bushings in the Dodge Neon models since these are useful elements for achieving its stability. After sometime these bushings wear out and make the car to produce some noises like rattles as well as slow response to commands. It is important to perform regular maintenance especially in regard to the lubrication of the Sway Bar Bushing to increase its performance and durability in Dodge Neon cars.
Looking for affordable and high-quality auto parts? Then you have already arrived at the proper online shop. We offer all Dodge Neon Sway Bar Bushing at great affordable prices. Moreover, all genuine Dodge Neon Sway Bar Bushing come with a manufacturer's warranty. In the long run, you would realize you have saved a lot of trouble and money with OEM parts from here.
Dodge Neon Sway Bar Bushing Parts Questions & Experts Answers
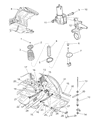
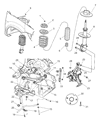
- Q: How to remove and install the rear Sway Bar Bushing and Sway Bar Kit on Dodge Neon?A:Loosen the rear wheel lug nuts, then raise the rear of the vehicle and secure it on jackstands before removing the rear wheels. Detach the sway bar links from the bar, marking the rubber bushings for reassembly. Remove the nut at the lower end of each link bolt and pull the bolt straight up, being prepared to catch the sleeve and bushings that may fall off. Rotate the sway bar down to clear the bar links, then unbolt the sway bar bushing clamps from the body by removing the two bolts from each clamp. The sway bar can now be removed; pull the clamps off using a rocking motion if they haven't already fallen off. Check the bushings for wear, hardness, distortion, cracking, and other signs of deterioration, replacing them if necessary, and also inspect the link bushings. Clean the areas of the bar where the bushings ride using a wire brush. For installation, follow the reverse of the removal procedure, ensuring the new bushings have the split facing toward the front of the vehicle, and if needed, use a light coat of vegetable oil to ease installation, avoiding petroleum-based products or brake fluid that could damage the rubber.


