My Garage
My Account
Cart
Genuine Dodge Ram 3500 Control Arm
Suspension Arm- Select Vehicle by Model
- Select Vehicle by VIN
Select Vehicle by Model
orMake
Model
Year
Select Vehicle by VIN
For the most accurate results, select vehicle by your VIN (Vehicle Identification Number).
38 Control Arms found


Dodge Ram 3500 Suspension Control Arm Front Lower
Part Number: 52122411AA$182.88 MSRP: $403.00You Save: $220.12 (55%)


Dodge Ram 3500 Front Lower Control Arm
Part Number: 4670383AB$239.73 MSRP: $361.00You Save: $121.27 (34%)


Dodge Ram 3500 Control Arm Front Lower 4Wd
Part Number: 4670383AA$239.73 MSRP: $361.00You Save: $121.27 (34%)


Dodge Ram 3500 Front Upper Control Arm
Part Number: 52013797AC$257.57 MSRP: $389.00You Save: $131.43 (34%)


Dodge Ram 3500 Front Lower Control Arm
Part Number: 52106767AE$263.14 MSRP: $394.00You Save: $130.86 (34%)


Dodge Ram 3500 Front Upper Control Arm
Part Number: 52013797AB$257.57 MSRP: $389.00You Save: $131.43 (34%)

Dodge Ram 3500 Front Upper Control Arm
Part Number: 52106784AD$257.57 MSRP: $389.00You Save: $131.43 (34%)

Dodge Ram 3500 Suspension Control Arm
Part Number: 52106799AA$212.22 MSRP: $270.05You Save: $57.83 (22%)


Dodge Ram 3500 Front Lower Control Arm
Part Number: 52121517AA$263.14 MSRP: $394.00You Save: $130.86 (34%)

Dodge Ram 3500 Control Arm Replaces
Part Number: 52121517AD$263.14 MSRP: $394.00You Save: $130.86 (34%)
Dodge Ram 3500 Front Lower Control Arm
Part Number: 52121517AB$263.14 MSRP: $394.00You Save: $130.86 (34%)

Dodge Ram 3500 Front Lower Control Arm
Part Number: 52106767AH$263.14 MSRP: $394.00You Save: $130.86 (34%)

Dodge Ram 3500 Control Arm Replaces
Part Number: 52106767AC$263.14 MSRP: $394.00You Save: $130.86 (34%)Dodge Ram 3500 Front Lower Control Arm
Part Number: 52121516AA$263.95 MSRP: $390.00You Save: $126.05 (33%)

Dodge Ram 3500 Control Arm Replaces
Part Number: 52121516AD$263.95 MSRP: $390.00You Save: $126.05 (33%)
| Page 1 of 2 |Next >
1-20 of 38 Results
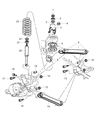
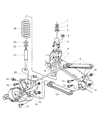
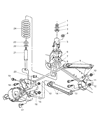
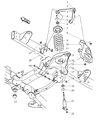
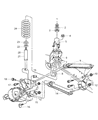
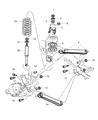
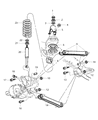
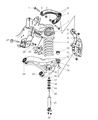
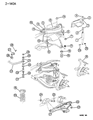
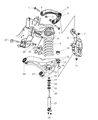
Dodge Ram 3500 Control Arm
The Control Arm is located in Dodge Ram 3500 vehicles and connects the frame with the wheels facilitating suspension pieces such as shocks and springs. These arms turn in accordance to road conditions and provide the function of movement of the wheels up and down. The control arms come in different types, while all of them bear the bushing at the point of contact with the frame, and ball joints at the connection with the knuckle or axle. Newer Ram 3500 models might be having sturdier control arm made of cast iron or aluminum for more efficient performance. The control arms serves the very critical role of ensuring right orientation of the wheels, balance and traction of the car and how its tires wears therefore are critical components of a car.
Looking for affordable and high-quality auto parts? Then you have already arrived at the proper online shop. We offer all Dodge Ram 3500 Control Arm at great affordable prices. Moreover, all genuine Dodge Ram 3500 Control Arm come with a manufacturer's warranty. In the long run, you would realize you have saved a lot of trouble and money with OEM parts from here.
Dodge Ram 3500 Control Arm Parts Questions & Experts Answers
- Q: How to Remove and Install a Control Arm on Dodge Ram 3500?A:This procedure is for models with independent front suspension. To remove the control arm, start by loosening the wheel lug nuts and raising the vehicle on jackstands. Remove the wheel and then loosen the nut on the upper balljoint stud. Use a balljoint removal tool to disconnect the balljoint from the steering knuckle. If you don't have the proper tool, a picklefork type balljoint separator can be used, but it may damage the balljoint boot. If necessary, remove the brake disc for clearance. Detach the wiring harness from the control arm. Remove the nuts and pivot bolts that attach the control arm to the frame. Pull the upper arm from its frame brackets. To install the control arm, reverse the removal steps. Tighten all fasteners, but don't tighten the pivot bolt nuts until the vehicle is at normal ride height. If needed, simulate normal ride height by raising the outer end of the lower control arm with a floor jack. Install the wheel and lug nuts, lower the vehicle, and tighten the lug nuts. Finally, have the front end alignment checked and adjusted if necessary.

Related Dodge Ram 3500 Parts
 Dodge Ram 3500 Shift Cable
 Dodge Ram 3500 Leaf Spring
 Dodge Ram 3500 Coil Spring Insulator
 Dodge Ram 3500 Axle Beam
 Dodge Ram 3500 Control Arm Bushing
 Dodge Ram 3500 Ball Joint
 Dodge Ram 3500 Front Cross-Member
 Dodge Ram 3500 Leaf Spring Bushing
 Dodge Ram 3500 Bump Stop
 Dodge Ram 3500 Rear Crossmember