My Garage
My Account
Cart
Genuine Jeep Compass Automatic Transmission Filter
AT Filter- Select Vehicle by Model
- Select Vehicle by VIN
Select Vehicle by Model
orMake
Model
Year
Select Vehicle by VIN
For the most accurate results, select vehicle by your VIN (Vehicle Identification Number).
2 Automatic Transmission Filters found


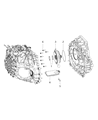
Jeep Compass Transmission Oil Filter
Part Number: 68192984AA$43.12 MSRP: $63.15You Save: $20.03 (32%)

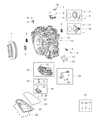
Jeep Compass Transmission Oil Filter
Part Number: 5191890AA$50.10 MSRP: $71.70You Save: $21.60 (31%)
Jeep Compass Automatic Transmission Filter
The Automatic Transmission Filter mainly located in Jeep Compass vehicles is essential in enhancing the performance and save the life of the transmission system. Its main purpose is to act as filter where in it can capture dirt and contaminants in the transmission fluid which might obstruct the consumption of fluids in the transmission and thus hinders moving parts' functioning. This filtration is critical in the proper lubrication and cooling hence enhancing the durability of the transmission. Across Jeep Compass models, different types of Automatic Transmission Filters have been used, particularly internal filters placed at the rear of the transmission fluid pan and external spin-on or a cartridge-type filters. While internal filter may be easily replaced while changing other components, there are designs where accessing the filter involves considerable disassembly. External filters that are in place help with gaining easier access and with their changes more often. Furthermore, there are some Performance Automatic Transmission Filters that have better filtration capacity and also able to provide better flow rates, resulting to better fuel economy and efficiency of the transmission. Hence it is recommended that Automatic Transmission Filter be serviced on a regular basis to avoid expensive repairs of Jeep Compass.
Looking for affordable and high-quality auto parts? Then you have already arrived at the proper online shop. We offer all Jeep Compass Automatic Transmission Filter at great affordable prices. Moreover, all genuine Jeep Compass Automatic Transmission Filter come with a manufacturer's warranty. In the long run, you would realize you have saved a lot of trouble and money with OEM parts from here.
Jeep Compass Automatic Transmission Filter Parts Questions & Experts Answers
- Q: What Steps Should You Follow for Routine Maintenance of the Automatic Transmission Filter on Jeep Compass?A:To perform routine maintenance on the automatic transaxle fluid and filters, follow these steps, Begin by raising the front of the vehicle and securing it with jackstands while engaging the parking brake. Remove the under-vehicle splash shield. For CVT transaxles, use a specialized scan tool to check fluid temperature and tool #9336A (or equivalent) to measure fluid level, and if lacking these tools, it is not recommended to proceed. Drain the fluid by loosening and removing the pan bolts, leaving the rear bolts to prevent full separation. Remove the pan, gasket, and oil strainer, then replace the strainer O-ring and strainer, tightening fasteners. Clean the pan, transaxle body, and pan magnet meticulously. Install a new transaxle oil pan gasket, reattach the pan, and tighten bolts in a criss-cross pattern. Lower the vehicle and add four quarts of the specified transaxle fluid. Start the engine, let it idle, shift through all gear positions, and check the fluid level as per the procedure. For the 6F24 6-speed transaxle, which also requires specialized tools for fluid temperature and level, remove the drain plug to drain the fluid and then reinstall it. Remove the battery and tray, take out the fill plug from the vent pod at the transaxle's upper front, and the check plug from the rear of the transaxle case. Add 4.3 quarts of specified transaxle fluid through the vent pod hole using a long funnel, reinstall the fill plug, and replace the battery and tray. Remove the vent cap from the vent pod hose to allow venting while adding the remaining fluid. Start the engine, shift through all gear positions twice, and add one more quart of ATF through the check plug hole at the rear of the transaxle case. Check and adjust the fluid level as needed, turn off the engine, install the vent cap, and reinstall the fresh air inlet duct before finishing by installing the check plug.

Related Jeep Compass Parts
 Jeep Compass Automatic Transmission Shifter
 Jeep Compass Automatic Transmission Shift Position Sensor Switch
Browse by Year
2017 Automatic Transmission Filter 2016 Automatic Transmission Filter 2015 Automatic Transmission Filter 2014 Automatic Transmission Filter 2013 Automatic Transmission Filter 2012 Automatic Transmission Filter 2011 Automatic Transmission Filter 2010 Automatic Transmission Filter 2009 Automatic Transmission Filter 2008 Automatic Transmission Filter 2007 Automatic Transmission Filter