My Garage
My Account
Cart
Genuine Jeep Grand Cherokee Crankshaft
Crank Shaft- Select Vehicle by Model
- Select Vehicle by VIN
Select Vehicle by Model
orMake
Model
Year
Select Vehicle by VIN
For the most accurate results, select vehicle by your VIN (Vehicle Identification Number).
33 Crankshafts found


Jeep Grand Cherokee Engine Crankshaft
Part Number: 4893950AB$643.50 MSRP: $975.00You Save: $331.50 (34%)


Jeep Grand Cherokee Engine Crankshaft
Part Number: 68253313AA$643.50 MSRP: $975.00You Save: $331.50 (34%)

Jeep Grand Cherokee Engine Crankshaft
Part Number: 53010906AB$1666.75 MSRP: $2490.00You Save: $823.25 (34%)
Jeep Grand Cherokee Engine Crankshaft
Part Number: 68161320AB$950.33 MSRP: $1405.00You Save: $454.67 (33%)


Jeep Grand Cherokee Crankshaft
Part Number: 68018731AA$1904.05 MSRP: $2810.00You Save: $905.95 (33%)


Jeep Grand Cherokee Engine Crankshaft
Part Number: 68498568AA$1666.75 MSRP: $2490.00You Save: $823.25 (34%)

| Page 1 of 2 |Next >
1-20 of 33 Results
Jeep Grand Cherokee Crankshaft
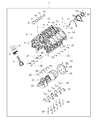
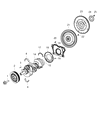
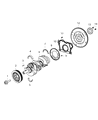
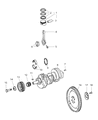
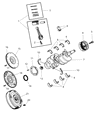
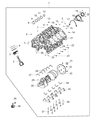
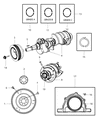
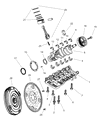
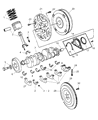
The Crankshaft of the Jeep Grand Cherokee transforms a piston's up-and-down thrust into smooth rotary power to keep the drivetrain gears and wheels turning. The Crankshaft contains offset crank throws to which the connecting rods are attached, spinning inside the engine block and converting every combustion stroke into a rotation. Since the launch of the Grand Cherokee, every model has relied upon it. Engines produced by Jeep over the years have employed two main Crankshaft configurations. The durable cast iron Crankshaft is for everyday power outputs. Conversely, the forged steel Crankshaft is for high horsepower demands. The latter design is far better at shrugging off flex and fatigue when the cylinders hit hard. Both designs are precision balanced and, with clean oil, should last as long as the Jeep itself. Insufficient lubrication allows grit to wear down journals, loosen clearances, and cause the knock or shudder warning the driver that the Grand Cherokee requires servicing. In the event of failure, swapping the Crankshaft is carried out by lifting the engine, removing bearing caps sequentially, applying grease to new journals, appropriately torquing the caps, and reinstalling everything to get the Jeep Grand Cherokee cruising smoothly again.
Looking for affordable and high-quality auto parts? Then you have already arrived at the proper online shop. We offer all Jeep Grand Cherokee Crankshaft at great affordable prices. Moreover, all genuine Jeep Grand Cherokee Crankshaft come with a manufacturer's warranty. In the long run, you would realize you have saved a lot of trouble and money with OEM parts from here.
Jeep Grand Cherokee Crankshaft Parts Questions & Experts Answers
- Q: How is the crankshaft removed and reinstalled on Jeep Grand Cherokee?A:The crankshaft can only be removed if the engine has been pulled out of the vehicle; again, providing that the driveplate, crankshaft pulley, timing chain, oil pan, oil pump, oil filter, and Piston/connecting rod assemblies have been removed. Before removal crank shaft endplay can be measured with a dial indicator pointing with the crankshaft on the plane of the crankshaft pulley. Place the face of a dial indicator against the crank, pry the crankshaft to the rear until zero is shown on the dial indicator and then pry the crankshaft to the front and read the number which should normally stand between 0.003 to 0.010 inch. Grooving is often caused by two faces not parallel to within .002 of each other and or the surfaces of the thrust washer/by bearing assembly face are worn. In case of absence of dial indicator, the amount of clearance can be measured with the help of feeler gauges. Turn the main bearing cap/bedplate bolts at least a few turns so that they can be removed by hand; then injecting some soft face hammer lightly on the main bearing cap/bedplate and lifting it from the cylinder block must be done carefully not to Damage the bearing inserts. Convey the crankshaft out of the engine, and it is advisable to do it with assistance because of the weight. Some of the critical pieces of advice that the manufacturer gives include the following Replace the main bearing cap assembly back on the engine block and put it in its proper place. For installation, it is imperative to make sure that the engine block and the crankshaft must be clean ad checked. Place the block with the bottom turned up, unscrew the main bearing cap assembly and clean the bearing faces. New upper main bearing inserts should be fitted and aligned with the oil holes; the lower ones are also put in the main bearing cap. Inspect the main bearing oil clearance with Plastigage and see to it that it conforms to the standard measurement. If the clearance is incorrect ensure there was no debris when taking the figures and if the band is very worn the bearing inserts may have to be replaced. Before finally laying the crankshaft back in position, it is important to remove all the Plastigage deposits and apply a coat of light grade of grease or engine assembly lube to the bearing surfaces as well as the thrust faces. In case of the thrust washers, they need to be fitted properly and to the bedplate sealing area one needs to apply the RTV sealant after the main bearing cap or in case of a bedplate, one needs to fit on the crankshaft and over the cylinder block. Torque the bolts in the sequence in their corresponding tightening values then recheck crankshaft end play. Swipe the crankshaft around for a little while to feel if they protest in an attempt to turn, if yes reject them. Last but not the least, fit in the new rear main oil seal.

Related Jeep Grand Cherokee Parts
 Jeep Grand Cherokee Rod Bearing
 Jeep Grand Cherokee Camshaft
 Jeep Grand Cherokee Crankshaft Pulley
 Jeep Grand Cherokee Piston Ring Set
 Jeep Grand Cherokee Crankshaft Thrust Washer Set
 Jeep Grand Cherokee Oil Pan
 Jeep Grand Cherokee Oil Pan Gasket
 Jeep Grand Cherokee Oil Pump
 Jeep Grand Cherokee Oil Pump Gasket
 Jeep Grand Cherokee Cam Gear
Browse by Year
2024 Crankshaft 2023 Crankshaft 2022 Crankshaft 2021 Crankshaft 2020 Crankshaft 2019 Crankshaft 2018 Crankshaft 2017 Crankshaft 2016 Crankshaft 2015 Crankshaft 2014 Crankshaft 2013 Crankshaft 2012 Crankshaft 2011 Crankshaft 2010 Crankshaft 2009 Crankshaft 2008 Crankshaft 2007 Crankshaft 2006 Crankshaft 2005 Crankshaft 2004 Crankshaft 2003 Crankshaft 2002 Crankshaft 2001 Crankshaft 2000 Crankshaft 1998 Crankshaft 1997 Crankshaft 1996 Crankshaft 1995 Crankshaft 1994 Crankshaft