My Garage
My Account
Cart
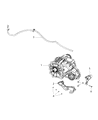
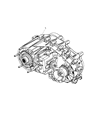
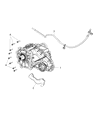
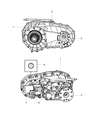
Genuine Jeep Transfer Case
Speed Transfer Case- Select Vehicle by Model
- Select Vehicle by VIN
Select Vehicle by Model
orMake
Model
Year
Select Vehicle by VIN
For the most accurate results, select vehicle by your VIN (Vehicle Identification Number).
237 Transfer Cases found


 Product Specifications
- Replaced by: R8454628AB


 Product Specifications
- Other Name: Transfer Case Np241
- Replaces: RL853311AE, 52853311AD


 Product Specifications
- Other Name: Transfer Case
- Replaced by: 5038879AC


 Product Specifications
- Other Name: Transfer Case Nvg245
- Replaced by: R2105904AF
 Product Specifications
- Replaced by: R2853665AI

 Product Specifications
- Other Name: Case-Front
- Position: Front
- Replaced by: 68391474AB

 Product Specifications
- Other Name: Transfer Case Np241; Transfer Case
- Replaced by: 52853412AD

 Product Specifications
- Other Name: Case-Transfer Case Rear
- Position: Rear

 Product Specifications
- Replaces: 68071840AA, 68071840AB
 Product Specifications
- Other Name: Case-Front
- Replaced by: 68071840AC

 Product Specifications
- Other Name: Case-Transfer Case Rear
- Position: Rear

 Product Specifications
- Other Name: Case-Transfer Case Rear
- Position: Rear

 Product Specifications
- Other Name: Case-Transfer Case Rear

 Product Specifications
- Other Name: Transfer Case Np241
- Replaced by: 52853400AD

 Product Specifications
- Other Name: Transfer Case
- Replaced by: 52853665AG
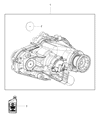
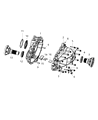
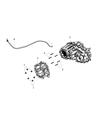
Jeep Internal Gear Transfer Case Assembly
Part Number: 52853665AB$2826.00 MSRP: $4270.00You Save: $1444.00 (34%)Product Specifications- Other Name: Transfer Case
- Replaced by: 52853665AG

 Product Specifications
- Other Name: Transfer Case Np241
- Replaced by: 52111013AJ
 Product Specifications
- Other Name: Transfer Case Np241
- Replaced by: 52123497AB


 Product Specifications
- Other Name: Case-Front
| Page 1 of 12 |Next >
1-20 of 237 Results
Jeep Transfer Case
Welcome to your ultimate destination for affordable OEM Jeep Transfer Cases. Here at our website, we not only provide genuine Jeep Transfer Cases at unbeatable prices, but also guarantee their quality with the manufacturer's warranty. Coupled with our dedicated customer service and swift delivery, we're confident you won't find a better deal anywhere else.
Jeep Transfer Case Parts Questions & Experts Answers
- Q: Is overhauling a transfer case a challenging task for a do-it-yourselfer on Jeep Comanche?A:A do-it-yourselfer can spend a lot of time with an overhaul of a transfer case in the way, that it demands great attention to detail when packing with many small parts taken apart and reassembled with precise clearances to be adjusted with select fit spacers and snap-rings. Although any capable mechanic can replace a transfer case or remove and install an overhaul assembly, an overhaul is typically done from a transmission repair shop since the time and cost is usually more than that of getting a rebuilt assembly which is available from dealer parts departments or from auto parts stores. What a novice mechanic can do is, given that special tools and proper instructions accompanied by a checklist to be sure that no step was missed during the rebuild procedure. As is the case in most automobile industries, basic tools that are necessary for the job may include internal and external snap ring pliers, bearing puller, slide hammer, a set of pin punches, a dial indicator and in some cases a hydraulic press, a strong working table, a vise or transmission stand. In disassembly, one should make sketches regarding the position and interconnection of certain components besides what holds them together while the explosion view can help to explain the assembly. At least it provides knowledge of which area of the transfer case is not functioning correctly to examine and replace the components; some problems are associated with certain locations.
- Q: What steps should be taken before starting the transfer case removal and installation procedure on Jeep Grand Cherokee?A:Before starting this procedure, shift the transfer case into Neutral. Disconnect the cable from the negative battery terminal, then raise the vehicle and support it securely on jackstands. Remove the skid plate if equipped, and drain the transfer case lubricant. Detach all vacuum/vent lines and electrical connectors from the transfer case, then disconnect the transfer case shift motor and sensor connectors. Remove the front and rear driveshafts, and on some models, it may be necessary to remove the rear crossmember. Support the transmission and transfer case with transmission jacks, securing the transfer case with safety chains. Remove the transfer case-to-transmission bolts/nuts, ensuring all wires and hoses are disconnected before moving the transfer case and jack toward the rear of the vehicle, keeping it level. Once the input shaft is clear, lower the transfer case and remove it from under the vehicle. For installation, remove all gasket material from the rear of the transmission, apply RTV sealant to both sides of the transfer-case-to-transmission gasket, and position it on the mating surface. With the transfer case secured to the jack, raise it into position behind the transmission and carefully slide it forward, engaging the input shaft with the transmission output shaft. Install the transfer case-to-transmission bolts/nuts, tightening them to the specified torque, then remove the safety chains and the jack supporting the transfer case. If removed, install the rear crossmember, then remove the transmission jack from under the transmission. Install the driveshafts, reattach all vacuum or vent lines, and plug in all electrical connectors. Connect the transfer case shift motor and sensor electrical connectors, refill the transfer case with lubricant, and if the vehicle has a manual transmission, check the lubricant level. Install the skid plate if equipped, remove the jackstands, lower the vehicle, connect the negative battery cable, and road test the vehicle for proper operation while checking for leakage.
- Q: How to remove and install a transfer case on Jeep Wrangler?A:Shift the transfer case to the neutral (N) position, then raise and support the vehicle. Place reference marks on the yokes and driveshafts for installation, and disconnect the front and rear driveshafts from the transfer case yokes. Drain the transfer case lubricant and support the transmission using a jack or similar device. Remove the skid plate, noting that on some automatic transmission models, the cross member may need to be removed to access the transfer case. Disconnect the transfer case electrical connectors, the vent tube from the transaxle, and the transfer case shift linkage or cable. Support the transfer case with another jack and secure it to the jack. Remove the nuts that secure the transmission to the transfer case, then separate the two components and remove the transfer case from the vehicle. Installation follows the reverse order of removal, ensuring to tighten the transfer case-to-transmission nuts to the specified torque. For 2006 and earlier models, adjust the shift linkage as necessary.


Related Jeep Parts
 Jeep Transfer Case Seal
 Jeep Transfer Case Shim
 Jeep Transfer Case Cover
 Jeep Transfer Case Output Shaft Snap Ring
Browse by Model
Cherokee Transfer Case Comanche Transfer Case Commander Transfer Case Compass Transfer Case Gladiator Transfer Case Grand Cherokee L Transfer Case Grand Cherokee Transfer Case Grand Wagoneer L Transfer Case Grand Wagoneer Transfer Case J10 Transfer Case J20 Transfer Case Liberty Transfer Case Renegade Transfer Case Wagoneer Transfer Case Wrangler Transfer Case