My Garage
My Account
Cart
Genuine Jeep Wrangler Rack And Pinion
Steering Rack And Pinion- Select Vehicle by Model
- Select Vehicle by VIN
Select Vehicle by Model
orMake
Model
Year
Select Vehicle by VIN
For the most accurate results, select vehicle by your VIN (Vehicle Identification Number).
49 Rack And Pinions found


Jeep Wrangler Power Steering Gear
Part Number: 68052897AD$1037.78 MSRP: $1595.00You Save: $557.22 (35%)


Jeep Wrangler Power Steering Gear
Part Number: 52126348AE$1037.78 MSRP: $1595.00You Save: $557.22 (35%)


Jeep Wrangler Power Steering Gear
Part Number: 68250506AE$407.48 MSRP: $620.00You Save: $212.52 (35%)


Jeep Wrangler Power Steering Gear
Part Number: 52126348AD$1037.78 MSRP: $1595.00You Save: $557.22 (35%)


Jeep Wrangler Power Steering Gear
Part Number: 52126348AA$1037.78 MSRP: $1595.00You Save: $557.22 (35%)


Jeep Wrangler Power Steering Gear
Part Number: 68052897AE$1037.78 MSRP: $1595.00You Save: $557.22 (35%)


Jeep Wrangler Power Steering Gear
Part Number: 52059897AD$1037.78 MSRP: $1595.00You Save: $557.22 (35%)


Jeep Wrangler Power Steering Gear
Part Number: 52126349AD$810.08 MSRP: $1250.00You Save: $439.92 (36%)


Jeep Wrangler Power Steering Gear
Part Number: 68250508AE$407.48 MSRP: $620.00You Save: $212.52 (35%)


Jeep Wrangler Power Steering Gear
Part Number: 52126349AE$810.08 MSRP: $1250.00You Save: $439.92 (36%)


Jeep Wrangler Power Steering Gear
Part Number: 68052897AC$1037.78 MSRP: $1595.00You Save: $557.22 (35%)


Jeep Wrangler Power Steering Gear
Part Number: 68507570AA$516.38 MSRP: $781.00You Save: $264.62 (34%)
Jeep Wrangler Power Steering Gear
Part Number: 68507571AA$407.48 MSRP: $620.00You Save: $212.52 (35%)


Jeep Wrangler Power Steering Gear
Part Number: 52126348AC$1037.78 MSRP: $1595.00You Save: $557.22 (35%)


Jeep Wrangler Power Steering Gear
Part Number: 68250508AC$407.48 MSRP: $620.00You Save: $212.52 (35%)


Jeep Wrangler Power Steering Gear
Part Number: 68250506AD$407.48 MSRP: $620.00You Save: $212.52 (35%)Jeep Wrangler Power Steering Gear
Part Number: 68507569AA$407.48 MSRP: $620.00You Save: $212.52 (35%)
| Page 1 of 3 |Next >
1-20 of 49 Results
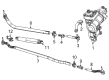
Jeep Wrangler Rack And Pinion
The Steering Rack in Jeep Wrangler cars is one of the most important systems, which convert the rotational energy of the steering wheel and the front wheels' lateral movement. This is called rack and pinion mechanism where pinion is connected to the steering column while rack which is inside a metallic tube helps to move the wheels through the turning of the steering wheel. Power assisted and rack and pinion steering is used mainly in Jeep Wrangler models and it provides ease of operation to the steering mechanism through hydraulic or electrical mechanisms. Previous models of cars may had manual racks, however, present day Wranglers mostly have hydraulic systems which use fluid pressures to help in turning the wheel. Changes in the kind of the gears like the straight and the helical gears impact on the way it performs, the straight ones being the optimal as they operate better with temperatures that are close to the ground. In general, the Steering Rack is critical for offering the control input as well as feedback in Jeep Wrangler automobiles.
Looking for affordable and high-quality auto parts? Then you have already arrived at the proper online shop. We offer all Jeep Wrangler Rack And Pinion at great affordable prices. Moreover, all genuine Jeep Wrangler Rack And Pinion come with a manufacturer's warranty. In the long run, you would realize you have saved a lot of trouble and money with OEM parts from here.
Jeep Wrangler Rack And Pinion Parts Questions & Experts Answers
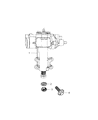
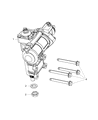
- Q: How to Remove and Install a Rack and Pinion Steering Gear on Jeep Wrangler?A:Before dismantling the car Rack And Pinion make sure to find the front part of a car and raise it by jacks while applying the parking brake. Put drain pan under the power steering Rack And Pinion, removed the hoses and sealed the ends with caps to avoid fluid dropping and getting dirty by any chance; it is better to use a flare-nut wrench when available. Locate the position of the intermediate shaft lower universal joint to the Rack And Pinion input shaft and finally remove the pinch bolt for the lower end of the intermediate shaft. After that, turn the Pitman arm nut and washer, and note the position for the further assembly process. It is necessary to use two-jaw puller to remove the Pitman arm from the shaft, for the support of the Rack And Pinion, and to remove the mounting bolts. Lower the unit, disconnect the intermediate shaft from the Rack And Pinion input shaft and take the Rack And Pinion out of the car. For installation, lift the Rack And Pinion into position, joint the interconnecting shaft with its corresponding marked surface and secure with the connecting bolts and washers and tighten with the required torque values. Place the Pitman arm onto the shaft with the similar marks, then fit the washer & nut then proceed to tighten the nut, but to the manufacturers recommended torque. Place the intermediate shaft lower pinch bolt and torque it, join the power steering connectors to the Rack And Pinion, and fill the power steering pump tank with the right grade of the fluid. Last but not the least, lower the vehicle and bleed the steering system.

Related Jeep Wrangler Parts
 Jeep Wrangler Steering Wheel
 Jeep Wrangler Steering Knuckle
 Jeep Wrangler Power Steering Pump
 Jeep Wrangler Coil Spring Insulator
 Jeep Wrangler Control Arm
 Jeep Wrangler Tie Rod End
 Jeep Wrangler Wheel Bearing
 Jeep Wrangler Sway Bar Link
 Jeep Wrangler Sway Bar Bushing
 Jeep Wrangler Ball Joint
 Jeep Wrangler Wheel Hub
 Jeep Wrangler Wheel Stud
Browse by Year
2025 Rack And Pinion 2024 Rack And Pinion 2023 Rack And Pinion 2022 Rack And Pinion 2021 Rack And Pinion 2020 Rack And Pinion 2019 Rack And Pinion 2018 Rack And Pinion 2017 Rack And Pinion 2016 Rack And Pinion 2015 Rack And Pinion 2014 Rack And Pinion 2013 Rack And Pinion 2012 Rack And Pinion 2011 Rack And Pinion 2010 Rack And Pinion 2009 Rack And Pinion 2008 Rack And Pinion 2007 Rack And Pinion 2006 Rack And Pinion 2005 Rack And Pinion 2004 Rack And Pinion 2003 Rack And Pinion 2002 Rack And Pinion 2001 Rack And Pinion 2000 Rack And Pinion 1998 Rack And Pinion 1997 Rack And Pinion 1995 Rack And Pinion 1994 Rack And Pinion 1993 Rack And Pinion 1992 Rack And Pinion 1991 Rack And Pinion 1990 Rack And Pinion 1989 Rack And Pinion 1988 Rack And Pinion 1987 Rack And Pinion