Make sure this part fits

Chrysler 4792973AC Engine Oil Pan

2005-2012 Chrysler 300 4792973AC

Customer Questions & Expert Answers (5)
4792973AC Mopar Engine Oil Pan Product Photo 1 of 4
  • Part Description
    Pan Engine Oil
  • Replaced By
    4792973AD
  • Manufacturer
    Mopar
Make sure this part fits
$165.38 MSRP: $245.00
You Save: $79.62 (33%)
1
ADD TO CART
  • Related Parts
  • Specifications
  • Fitment
  • Q&A
  • Product Specifications

    BrandGenuine Chrysler
    Manufacturer Part Number4792973AC
    Part DescriptionPan Engine Oil
    Item Dimensions26.0 x 13.5 x 8.2 inches
    Item Weight16.30 Pounds
    ConditionNew
    Fitment TypeDirect Replacement
    ManufacturerMopar
    SKU4792973AC
    WarrantyThis genuine Mopar part is guaranteed by Mopar's factory warranty.
    Shipping & ReturnShipping Policy Return Policy
    Warning: California's Proposition 65
  • Vehicle Fitment

    Year Make Model Engine Important vehicle option details
    2005-2012 Chrysler 3008 Cyl 5.7LC AWD, C Luxury Series AWD, S V8 AWD
  • Customer Questions & Expert Answers

    Q:
    Is this part guaranteed to fit my truck ? Posted by MoparPartsGiant Specialist
    A:
    You can Select Your Vehicle to check if 4792973AC fits your vehicle.
    Posted by MoparPartsGiant Specialist
    Installation and Repair Tips
    Q:
    How to remove and install an oil pan in 2.7L V6 engine on Chrysler 300? Posted by Customer
    A:
    Disconnect the cable from the negative terminal of the battery. Remove the engine oil dipstick. Apply the parking brake and block the rear wheels. Raise the front of the vehicle and place it securely on jackstands. Remove the engine middle splash shield. Drain the engine oil and remove the oil filter. Remove the intermediate shaft coupler at the steering gear and separate the steering gear input shaft from the coupler. Disconnect the power steering pressure switch and remove the power steering gear mounting bolts. Remove the power steering fluid line bracket and position the power steering gear off to the side. Remove the transmission-to-oil pan support brace at the rear of the pan. Detach any clips securing the transmission oil cooler lines that would interfere with removal of the oil pan. Also remove the lower bolt securing the air conditioning compressor to the oil pan and the bolt securing the alternator bracket to the oil pan. Remove the bolts and nuts, then carefully separate the oil pan from the block. Clean the pan with solvent and remove all old sealant and gasket material from the block and pan mating surfaces. Clean the mating surfaces with lacquer thinner or acetone and make sure the bolt holes in the block are clear. Check the oil pan flange for distortion, particularly around the bolt holes. Apply a bead of ATV sealant to the oil pan rail parting lines at the front cover and at the rear main oil seal retainer. Install the gasket on the block. Place the oil pan in position on the block and install the nuts/bolts. After the fasteners are installed, tighten them to the torque. Starting at the center, follow a crisscross pattern and work up to the final torque in three steps. Place the transmission-to-oil pan support brace in position and install the support brace-to-oil pan bolts. Torque the bolts. Install the support brace-to-transmission bolts. Torque the bolts. Install the power steering gear. The remaining steps are the reverse of the removal procedure. Refill the engine with oil, replace the filter, run it until normal operating temperature is reached and check for leaks.
    Posted by MoparPartsGiant Specialist
    Q:
    How to remove and install an oil pan in V8 engine on Chrysler 300? Posted by Customer
    A:
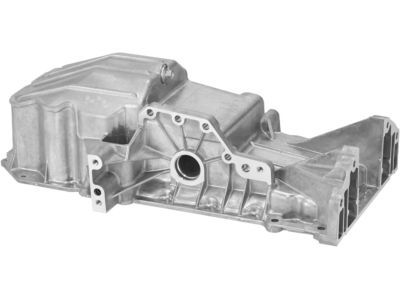
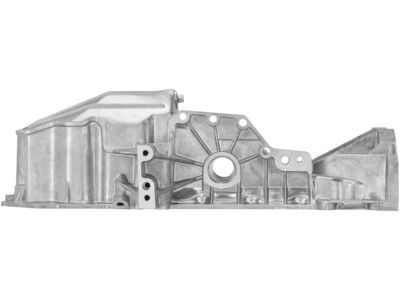
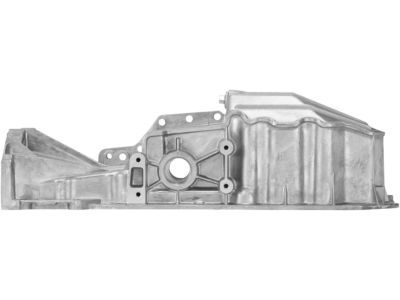
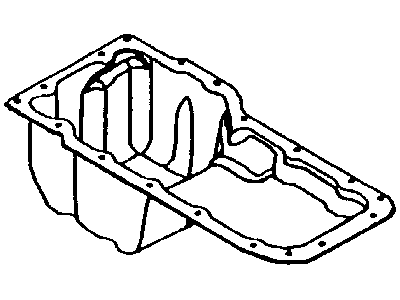
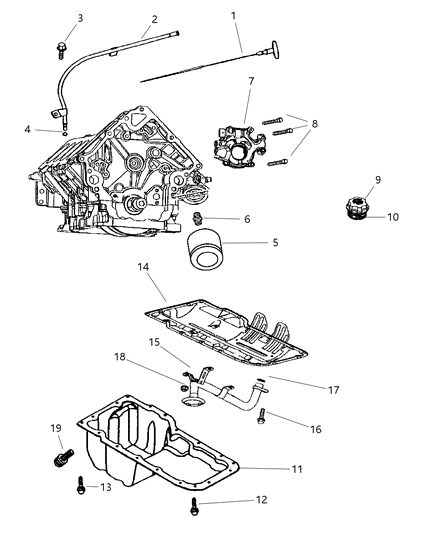
    The first step is to remove the battery's negative cable. This can be done by draining the coolant and supporting the vehicle using jack stands. To drain the engine oil, replace an oil filter and unscrew the dipstick for engine oil. Following this, take away the engine splash shield and separate exhaust pipes from manifold outlets. Thereafter, do away with cooling fans, shroud of same as well as cross member power steering gear taking care not to disconnect intermediate shaft coupler, tie rod ends or power steering fluid lines. The use of your automotive crane will facilitate easy lifting of the engine in question whereby removal of left-hand side and right hand side engine-to-subframe nuts plus bolts becomes possible. At first it is necessary to consider all bolts on an oil pan before you lower it from an engine; otherwise force will have to be applied. That tray must be replaced while one removes that pan since it is part of blocks' new parts when their pans are taken off. You should begin by installing a new gasket plus windage tray followed by washing out pan using solvent when preparing for reassembly or installation. In cleaning both block surfaces where pan mounts and pan's surface itself from old sealer along with gasket material resort may be had towards cleaner/ thinner lacquer materials in case there is some distortion in that device caused by straightening flange; overall gasket faces ought to be wiped clean with thinner/ acetone solvents so they are ready for assembly operations. After that, RTV sealant must be applied at specified locations through attachment of single-piece oil pan gasket via contact cement type adhesive designed for use on gaskets meant for mounting on upper surfaces of the block directly above crankcases; aside from this alignment studs should now face each other properly within a specific place called block hole having been used prior thereto only because there still remained enough room throughout entire space between cylinder heads under intake manifolds of carburetors which weren't much higher than blocks themselves but still had sufficient clearance concerning each other. You will have to lift pan into its final location making sure not to disturb gasket and put several bolts in place only finger tight while looking out for any portion extending beyond perimeter around block. Finally, install oil pan nuts onto studs by tightening fasteners as per correct torque sequence after all bolts have been placed; meanwhile the remaining reverse procedures of disassembly should be followed until you are through with installation.
    Posted by MoparPartsGiant Specialist
    Q:
    How to remove and install an oil pan in 3.5L V6 engine on Dodge Magnum? Posted by Customer
    A:
    To initiate this uninstallation process, detach the battery's negative terminal and remove the dipstick of engine oil. Securely jack up the front of your car on jackstands, apply parking brake and block rear wheels. Attach an engine hoist to the engine, take off engine splash shield, drain out engine oil and remove oil filter. Unbolt motor oil cooler and put aside it; then you should unsnap steering intermediate shaft coupler from steering gear and remove steering gear mounting bolts at subframe tying that whole assembly at side so as not to separate power steering fluid lines. Remove torque converter access cover and two Allen head bolts holding rear part of oil pan to engine block. Then get rid of the transmission-to-oil pan bolts along with motor mount nuts at subframe. Gently divide block from oil pan without prying between them; also lift an engine just enough for removing pan while guiding it through space existing between a sub frame and an engine. In order to install, scrub thoroughly a flat surface around it ensuring removal all old sealant and gasket material used before. Apply RTV sealant in designated areas, place gasket on a block then position oil pan onto it whilst screwing down bolts finger-tighten only. Drop down engine onto mounts securing its nuts tightly, after which you may fit in transmission-to-oil pan fasteners turning screws until they stop revolving further upwards or downwards respectively. Tighten first small Allen bolts near backside following criss-cross pattern within three stages among others including larger fixtures about that same region. Lastly do remaining steps backward starting with filling up oil sump with fresh one via exchanging contaminated filter; this is prior running machine until temperature becomes normal by checking any seepages.
    Posted by MoparPartsGiant Specialist
    Q:
    What additional components should be installed after the Oil Pan is in place for the 2007 Dodge Charger? Posted by Customer
    A:
    Place the transmission-to-oil pan support brace in position and install the support brace-to-oil pan bolts. Torque the bolts. Install the support brace-to-transmission bolts. Torque the bolts. Install the power steering gear.
    Posted by MoparPartsGiant Specialist
    See Complete Installation and Repair Tips

Genuine Mopar Part 4792973AC, the Right Choice

To ensure reliability, purchase Mopar part # 4792973AC Engine Oil Pan. It is sometimes referred to as Oil Pan. The OEM parts should be used when the Mopar owners want to maximize their driving experience. The high-tech factories that produce these parts utilize sophisticated technology specifically designed to meet stringent factory requirements. Additionally, they are thoroughly tested and can thus be used with reliability by Mopar owners. This part fits specific Chrysler 300 models.

MoparPartsGiant.com is a leading supplier of genuine Mopar parts and accessories such as 4792973AC Engine Oil Pan. Wondering where to find exceptional quality and affordable OEM Mopar parts? You have already come to the right place. Our website boasts a huge selection of genuine Mopar parts at attractive prices. Further, all parts come with a manufacturer's warranty. For detailed Chrysler parts information, click here.

Why choose Mopar Parts Giant

  • Dedicated Service

    Your complete satisfaction is our #1 goal

  • Lowest Prices

    Best deals on genuine OE parts from dealerships

  • Fast Delivery

    Orders are processed and delivered promptly