My Garage
My Account
Cart
Genuine Chrysler Cirrus Piston Ring Set
Piston Ring- Select Vehicle by Model
- Select Vehicle by VIN
Select Vehicle by Model
orMake
Model
Year
Select Vehicle by VIN
For the most accurate results, select vehicle by your VIN (Vehicle Identification Number).
5 Piston Ring Sets found


Chrysler Cirrus Piston Ring Set
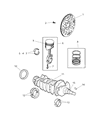
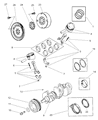
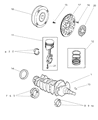
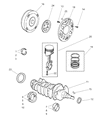
The Chrysler Cirrus Piston Ring Set seals each cylinder so that the force of combustion goes cleanly towards the wheels and oil stays where it should. The Piston Ring Set consists of pieces that are fabricated from ductile iron or steel. The set includes two compression rings and one oil ring. The uppermost is coated with either plasma moly or chromium so that it can survive extreme heat. Cirrus motors later switched to slimmer 1 mm and 2 mm rings, a Piston Ring Set profile that fits tighter against the bore, cutting friction. This update across the Chrysler range trims almost a quarter of the mechanical losses that ring drag causes. Cirrus's unique Piston Ring Set keeps gas blow-by at bay, shedding heat and wiping excess lubricant back to the oil sump. For every Cirrus year, it still uses three rings per piston and their own springiness keeps the Piston Ring Set pressed to the wall. The Chrysler design relies on the rings for continuous lubrication because the deposits might clog the rings, which causes the power to fall. Thus, the engines last longer in the Cirrus. The tradition of a trustworthy Piston Ring Set remains unchanged.
Looking for affordable and high-quality auto parts? Then you have already arrived at the proper online shop. We offer all Chrysler Cirrus Piston Ring Set at great affordable prices. Moreover, all genuine Chrysler Cirrus Piston Ring Set come with a manufacturer's warranty. In the long run, you would realize you have saved a lot of trouble and money with OEM parts from here.
Chrysler Cirrus Piston Ring Set Parts Questions & Experts Answers
- Q: How to Check and Correct Piston Ring Set End Gaps Before Installation on Chrysler Cirrus?A:When the Piston rings are to be replaced with new ones, the ring/ end gap has to be set, provided that the piston ring side clearance has been established to be correct. Position the piston/connecting rod assemblies and the new ring sets in a manner that each piston and cylinder are asigned will be matched during the end gap measurement and the engine assembling. Place the top ring into the first cylinder with the intent of aligning the ring to the cylinder wall by pushing it in by using the top of the piston while the ring is placed at the lower end of the cylinder. A method of determining the end gap is to carefully put feeler gauges between the ends of the ring and to choose the thickness of the feeler gauge of the width of the gap such that it moves with slight friction. If the gap is too small, the gap should be made larger to allow the ends of the ring separated as the engine operates; failure to do this may cause serious damage. This can be done by filing the ring ends with fine file, while seeing to it that most of the material is removed by moving the ring to the outer end of the file and the vise. Excessive end gap is not fatal in a situation it goes beyond the limit; check the ring type and specifications twice. Do the same for the first ring and the second ring in each cylinder and consequent cylinders PISTON no. 2 RINGS no. 2 CYLINDERS no. 3 RINGS no. 3 CYLINDERS no. When this is done, fit the rings onto the pistons; the oil control ring has three parts; the rail, the scraper, and the expander. Insertion of the spacer/expander into the groove can effectively be made without the need for the piston ring installation tool, and if in this type there is an anti-rotation tang, the tang ought to be fitted into the hole drilled in the ring groove. The upper side rail should be put into the groove with the help of a finger and push it and the lower side rail was done in the same way. When you have put all the three bands of oil ring, ensure that both the side rails are capable of rotating freely within the grooves. After that, set the middle ring in a correct manner and make it a point not to keep it side by side with the top ring which has a different cross-sectional view. Fit the middle elastomer ring with a piston ring installation tool placing it into the groove with the identification mark at the top of the piston and without expanding the ring too much. Next, for the final piston ring, place it in as well while having the mark facing upwards, do this for all the pistons and rings.


