My Garage
My Account
Cart
Genuine Chrysler PT Cruiser Crankshaft Seal
- Select Vehicle by Model
- Select Vehicle by VIN
Select Vehicle by Model
orMake
Model
Year
Select Vehicle by VIN
For the most accurate results, select vehicle by your VIN (Vehicle Identification Number).
4 Crankshaft Seals found


Chrysler PT Cruiser Seal-Rear Main CRANKSHAFT
Part Number: 4621939AB$27.96 MSRP: $40.20You Save: $12.24 (31%)


Chrysler PT Cruiser Crankshaft Oil Seal
Part Number: 5073675AB$55.22 MSRP: $79.25You Save: $24.03 (31%)


Chrysler PT Cruiser Seal-Front Main CRANKSHAFT
Part Number: 4667198$16.31 MSRP: $23.35You Save: $7.04 (31%)
Chrysler PT Cruiser Crankshaft Seal
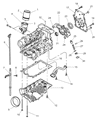
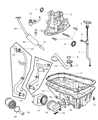
The Crankshaft Seal used in Chrysler PT Cruiser cars is an important one which is placed at the front of an engine. Assembled usually from metal and rubber, this round seal is very important to keep the crankcase from releasing the engine oil in order to lubricate some of the most important components of the engine. Crankshaft Seal is another Chrysler PT Cruiser part that could either be worn or damaged and results to oil leaks especially the high mileage models. Any Signs of failure of Crankshaft Seal should not be ignored since it needs to be replaced to get optimum performance of the car and prevent further damage of the engine. In general, the Crankshaft Seal can be regarded as one of the most important and, at the same time, the least complicated part of the Chrysler PT Cruiser engine that plays a crucial role in the car's steady performance.
Looking for affordable and high-quality auto parts? Then you have already arrived at the proper online shop. We offer all Chrysler PT Cruiser Crankshaft Seal at great affordable prices. Moreover, all genuine Chrysler PT Cruiser Crankshaft Seal come with a manufacturer's warranty. In the long run, you would realize you have saved a lot of trouble and money with OEM parts from here.
Chrysler PT Cruiser Crankshaft Seal Parts Questions & Experts Answers
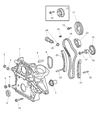
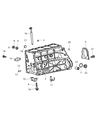
- Q: How to install a Crankshaft Seal on Chrysler PT Cruiser?A:The one-piece rear Crankshaft Seal is pressed into a bore machined into the rear main bearing cap and engine block. Begin by removing the transaxle, the clutch components if equipped, and the Flywheel or driveplate. The oil seal is installed flush with the outer surface of the block, so pry out the old seal with a 3/16-inch flat blade screwdriver. To prevent an oil leak after the new seal is installed, be very careful not to scratch or otherwise damage the crankshaft sealing surface or the bore in the engine block. Clean the crankshaft and seal bore in the block thoroughly and degrease these areas by wiping them with a rag soaked in lacquer thinner or acetone. Position the new seal onto the crankshaft, ensuring that if marked, the words THIS SIDE OUT on the seal face out, toward the rear of the engine. Using an appropriate size driver and pilot tool, drive the seal into the cylinder block until it is flush with the outer surface; driving it in past flush may result in an oil leak. The remainder of installation follows the reverse order of removal.

Related Chrysler PT Cruiser Parts
 Chrysler PT Cruiser Cylinder Head Gasket
 Chrysler PT Cruiser Crankshaft Timing Gear
 Chrysler PT Cruiser Cylinder Head
 Chrysler PT Cruiser Crankshaft Pulley
 Chrysler PT Cruiser Dipstick
 Chrysler PT Cruiser Dipstick Tube
 Chrysler PT Cruiser Crankcase Breather Hose
 Chrysler PT Cruiser Crankshaft
 Chrysler PT Cruiser Crankshaft Thrust Washer Set
 Chrysler PT Cruiser Cylinder Head Bolts
 Chrysler PT Cruiser Differential Bearing