My Garage
My Account
Cart
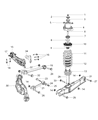
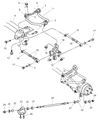
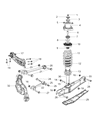
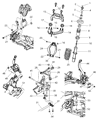
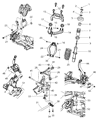
Genuine Chrysler Sebring Control Arm
Suspension Arm- Select Vehicle by Model
- Select Vehicle by VIN
Select Vehicle by Model
orMake
Model
Year
Select Vehicle by VIN
For the most accurate results, select vehicle by your VIN (Vehicle Identification Number).
51 Control Arms found


Chrysler Sebring Rear Lower Control Arm
Part Number: 5085418AD$102.55 MSRP: $156.00You Save: $53.45 (35%)


Chrysler Sebring Suspension Control Arm
Part Number: 5085408AC$602.80 MSRP: $919.00You Save: $316.20 (35%)


Chrysler Sebring Suspension Control Arm
Part Number: 5085407AC$602.80 MSRP: $919.00You Save: $316.20 (35%)


Chrysler Sebring Suspension Control Arm
Part Number: MB864727$67.98 MSRP: $86.50You Save: $18.52 (22%)


Chrysler Sebring Rear Control Arm
Part Number: 4895276AC$189.69 MSRP: $321.00You Save: $131.31 (41%)

Chrysler Sebring Suspension Control Arm
Part Number: 4782975AE$115.88 MSRP: $174.00You Save: $58.12 (34%)
Chrysler Sebring Rear Lower Control Arm
Part Number: 5085418AC$69.21 MSRP: $156.00You Save: $86.79 (56%)Chrysler Sebring Suspension Control Arm
Part Number: 4895277AC$211.50 MSRP: $315.00You Save: $103.50 (33%)
Chrysler Sebring Suspension Control Arm
Part Number: 4782975AB$115.88 MSRP: $174.00You Save: $58.12 (34%)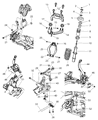

Chrysler Sebring Suspension Control Arm
Part Number: 4764409AC$115.88 MSRP: $174.00You Save: $58.12 (34%)Chrysler Sebring Suspension Control Arm
Part Number: 4616922$233.68 MSRP: $280.00You Save: $46.32 (17%)

Chrysler Sebring Rear-Lower Control Arm
Part Number: MR369664$24.86 MSRP: $71.60You Save: $46.74 (66%)Chrysler Sebring Suspension Control Arm
Part Number: 4782974AC$106.26 MSRP: $160.00You Save: $53.74 (34%)Chrysler Sebring Suspension Control Arm
Part Number: 4764500AD$148.90 MSRP: $220.00You Save: $71.10 (33%)Chrysler Sebring Suspension Control Arm Front Right Upper, Upper
Part Number: 4782974AE$120.64 MSRP: $160.00You Save: $39.36 (25%)
| Page 1 of 3 |Next >
1-20 of 51 Results
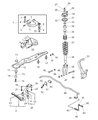
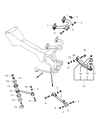
Chrysler Sebring Control Arm
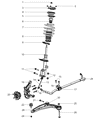
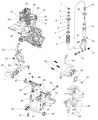
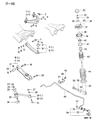
Chrysler Sebring vehicles are fitted with a Control Arm which helps in movement of the suspension system while establishing a link between the frame of the vehicle and the wheels. This component enables wheels to swivel in order to adapt to any irregularities on the road thus providing with proper alignment of the wheels thus improving on the handling of the car. Different types of Control Arms used in Chrysler Sebring models are stamped metal used as the conventional style, cast iron or aluminum to enhance strength and reduce heaviness. Though stamped steel Control Arms have durability, the material allows rusting which makes the Control Arm weak. However, newer designs have been developed to accommodate higher performance levels, and therefore incorporate heavy duty materials such as DOM tubular steel or aluminum. These hi-performance Control Arms are designed for extreme driving and tuning, and bring the optimal of control and balance on the Chrysler Sebring cars.
Looking for affordable and high-quality auto parts? Then you have already arrived at the proper online shop. We offer all Chrysler Sebring Control Arm at great affordable prices. Moreover, all genuine Chrysler Sebring Control Arm come with a manufacturer's warranty. In the long run, you would realize you have saved a lot of trouble and money with OEM parts from here.
Chrysler Sebring Control Arm Parts Questions & Experts Answers
- Q: How to replace the control arm on Chrysler Sebring?A:Push down the locking nuts holding the front wheels, lift the vehicle by its front, and place it on stable jackstands while you take off both wheels. Unscrew the balljoint-nut that connects to the control arm. Use an Allen wrench to turn the ballstud when needed. To remove the balljoint, we must use the right tool, but when taking out the assembly, keep the knuckle together with the control arm. Yanking the knuckle apart risks hurting the joint inside the driveaxle. Move the single linkage cables connecting the stabilizer bar from both ends of the bar. Lift the bar up and off the path. Take off the control arm-to-subframe holding bolts. Then, disconnect the control arm. Look at the control arm to see if it's straight, and replace it if not. Check all bushings for damage, changed bushings can break the whole control arm. Hang the control arm onto the subframe. Bolt in the vertical and front mounting parts, but don't tighten them yet. Make sure the crossmember has the rear bushing oriented correctly. Place the control arm back to the balljoint, tighten the new nut, and then bolt the front and rear control arm mountings into place. Finish by adding the front tire and wheel bolts, let the car down, screw on the bolt, and ask a mechanic to check the vehicle alignment to keep the wheels straight.

Related Chrysler Sebring Parts
 Chrysler Sebring Shift Cable
 Chrysler Sebring Coil Spring Insulator
 Chrysler Sebring Rear Crossmember
 Chrysler Sebring Axle Beam
 Chrysler Sebring Control Arm Bushing
 Chrysler Sebring Ball Joint
 Chrysler Sebring Front Cross-Member
 Chrysler Sebring Leaf Spring Bushing
 Chrysler Sebring Bump Stop
 Chrysler Sebring Control Arm Bracket
 Chrysler Sebring Trailing Arm