My Garage
My Account
Cart
Genuine Dodge Avenger Engine Mount
Engine Motor Mount- Select Vehicle by Model
- Select Vehicle by VIN
Select Vehicle by Model
orMake
Model
Year
Select Vehicle by VIN
For the most accurate results, select vehicle by your VIN (Vehicle Identification Number).
37 Engine Mounts found


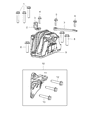


Dodge Avenger INSULATORPKG-Engine Mount
Part Number: 68083790AB$121.82 MSRP: $180.00You Save: $58.18 (33%)


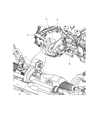
Dodge Avenger Engine Mount Bracket
Part Number: 5184322AE$108.96 MSRP: $164.00You Save: $55.04 (34%)

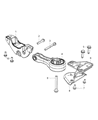
Dodge Avenger INSULATORPKG-Engine Mount
Part Number: 68083790AA$121.82 MSRP: $180.00You Save: $58.18 (33%)

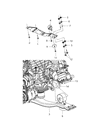
Dodge Avenger Engine Mount Bracket
Part Number: 5090607AA$100.52 MSRP: $152.00You Save: $51.48 (34%)


Dodge Avenger INSULATORPKG-Engine Mount
Part Number: 68171485AA$121.82 MSRP: $180.00You Save: $58.18 (33%)


| Page 1 of 2 |Next >
1-20 of 37 Results
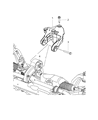
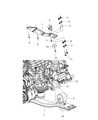
Dodge Avenger Engine Mount
The Engine Mount in Dodge Avenger vehicles serves two primary functions: it helps to reduce noises and vibration of the engine and accommodates and locate the engine and transaxle in the chassis. This is important in creating comfort while on the other hand, it is equally important to ensure that the position of the engine is correct in order to ensure safety and to avoid damaging the components. Dodge Avenger Engine Mounts undergo the traditional metal and rubber arrangement with some models substituting the rubber parts with fluid filled hydraulic ones for even superior vibration damping. The latest ones are the electronic active mounts that change their stiffness according to the engine revolutions in order to achieve the premier result. These Engine Mounts are subject to failure over time through chemical erosion, heat and exposure to fluids and in this way, their efficiency and possible malfunction can be detected by a simple visual inspection and some tests.
Looking for affordable and high-quality auto parts? Then you have already arrived at the proper online shop. We offer all Dodge Avenger Engine Mount at great affordable prices. Moreover, all genuine Dodge Avenger Engine Mount come with a manufacturer's warranty. In the long run, you would realize you have saved a lot of trouble and money with OEM parts from here.
Dodge Avenger Engine Mount Parts Questions & Experts Answers
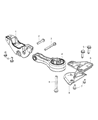
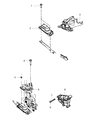
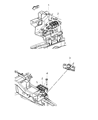
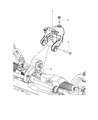
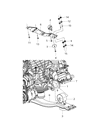
- Q: How to Check and Replace the Engine Mounts in a 3.5L V6 Engine on Dodge Avenger?A:There are four powertrain mounts, the front mount connects the transaxle to the crossmember; the left mount secures the driver's side of the engine to the subframe; the right engine mount attaches the engine block to the passenger's side of the subframe; and a rear mount links the engine block to the subframe. To check the mounts, the engine must be raised slightly to relieve weight from them. Begin by raising the vehicle and securely supporting it on jackstands, then remove the front wheels and tires. Position two jacks, one under the Crankshaft Pulley and the other under the transaxle bellhousing, using a block of wood to protect the components while raising the engine/transaxle just enough to relieve the mounts. Inspect the mounts for any cracks, hardening, or separation from the metal plates, and check for movement between the mount plates and the engine or subframe, tightening any loose fasteners as necessary. Applying rubber preservative can help slow deterioration. For the front mount, raise the vehicle, remove the crossmember-to-mount bolts, and the through bolt to take out the mount, reversing the process for installation. For the left mount, disconnect the negative battery cable, raise the vehicle, remove the middle engine splash shield and air filter housing, support the transaxle, and then remove the mounting bolts to replace the mount, ensuring to tighten the bolts to the specified torque. For the right mount, raise the vehicle, remove the power steering fluid reservoir, support the engine, and take out the engine mount bracket and the mount itself, replacing it with a new one and tightening the bolts. For the rear mount, access the top rear of the engine compartment to remove the mounting bracket-to-block bolts, raise the vehicle, and take out the mount assembly, replacing it with a new one and securing it to the subframe and engine block with the appropriate torque.


