My Garage
My Account
Cart
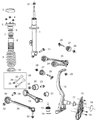
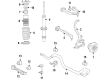
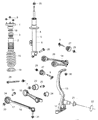
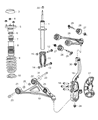
Genuine Dodge Challenger Control Arm
Suspension Arm- Select Vehicle by Model
- Select Vehicle by VIN
Select Vehicle by Model
orMake
Model
Year
Select Vehicle by VIN
For the most accurate results, select vehicle by your VIN (Vehicle Identification Number).
24 Control Arms found


Dodge Challenger Front Lower Control Arm
Part Number: 68079723AB$211.50 MSRP: $317.00You Save: $105.50 (34%)


Dodge Challenger Front Upper Control Arm
Part Number: 68045130AE$257.57 MSRP: $390.00You Save: $132.43 (34%)


Dodge Challenger Front Lower Control Arm
Part Number: 68002123AC$218.43 MSRP: $329.00You Save: $110.57 (34%)
Dodge Challenger Front Upper Control Arm
Part Number: 68045131AE$211.50 MSRP: $317.00You Save: $105.50 (34%)

Dodge Challenger Front Lower Control Arm
Part Number: 5168282AB$545.60 MSRP: $833.00You Save: $287.40 (35%)


Dodge Challenger Drivestar Front Lower Control Arms
Part Number: 5168389AA$216.00 MSRP: $324.00You Save: $108.00 (34%)
Dodge Challenger Front Lower Control Arm
Part Number: 5168283AB$545.60 MSRP: $833.00You Save: $287.40 (35%)


Dodge Challenger Front Lower Control Arm
Part Number: 5168389AB$216.00 MSRP: $324.00You Save: $108.00 (34%)


Dodge Challenger Suspension Control Arm Front
Part Number: 68079723AA$211.50 MSRP: $317.00You Save: $105.50 (34%)


Dodge Challenger Lower Control Arm
Part Number: 4782561AE$239.73 MSRP: $361.00You Save: $121.27 (34%)


Dodge Challenger Front Upper Control Arm
Part Number: 4895668AB$401.50 MSRP: $615.00You Save: $213.50 (35%)


Dodge Challenger Front Upper Control Arm
Part Number: 4895669AB$401.50 MSRP: $615.00You Save: $213.50 (35%)


Dodge Challenger Upper Control Arm
Part Number: 4782665AC$128.25 MSRP: $190.00You Save: $61.75 (33%)
Dodge Challenger Front Upper Control Arm
Part Number: 68045130AC$257.57 MSRP: $390.00You Save: $132.43 (34%)Dodge Challenger Front Upper Control Arm
Part Number: 68045131AC$211.50 MSRP: $317.00You Save: $105.50 (34%)


Dodge Challenger Upper Control Arm
Part Number: 4895668AC$398.20 MSRP: $610.00You Save: $211.80 (35%)
Dodge Challenger Suspension Control Arm
Part Number: 68002123AB$148.59 MSRP: $329.00You Save: $180.41 (55%)
| Page 1 of 2 |Next >
1-20 of 24 Results
Dodge Challenger Control Arm
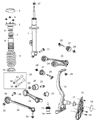
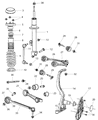
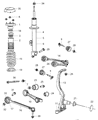
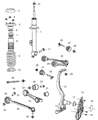
The Dodge Challenger Control Arm is the element of the automobile chassis used in suspension system to link the front wheel assemblies to the frame of the automobile. It involves vertical movement in order to negotiate the road surface irregularities and for this it uses bushings and shock absorbers which in essence work by converting shocks and vibrations into heat. The Control Arm also links with ball joints to allow proper manoeuvring of the vehicle on the road as well as on uneven terrains. An A-arm or 'A' frame is the conventional design of Control Arm or wishbone used in Dodge Challenger vehicles but the triangular wishbone design may also be used. The A-arm is usually used as the lower link in the suspension while, the wishbone enables greater wheel placements without the need for other links. Concerning MacPherson strut suspensions, the Control Arm is placed in a direction perpendicular to the vehicle's axis with the use of a radius rod to eliminate particular motion. In general, the Control Arm is an essential component that provides stability as well as comfort when driving the Dodge Challenger.
Looking for affordable and high-quality auto parts? Then you have already arrived at the proper online shop. We offer all Dodge Challenger Control Arm at great affordable prices. Moreover, all genuine Dodge Challenger Control Arm come with a manufacturer's warranty. In the long run, you would realize you have saved a lot of trouble and money with OEM parts from here.
Dodge Challenger Control Arm Parts Questions & Experts Answers
- Q: How to remove and install the upper control arm on Dodge Challenger?A:To access the upper control arm there is required a tool to separate the balljoint from the Steering Knuckle. The right upper control arm holds the engine compartment fuse and relay box so to gain access to it release the tabs that retain the fuse and relay box to the mounting brackets. As for the left upper control arm, the coolant expansion tank has to be moved aside. After that, it is necessary to take off the upper fasteners for positioning the Shock Absorber thus it is possible to have access to the facteners of the control arm. Next, remove the upper control arm mounting nuts which are on either side of the shock tower at the front part of the car. Before removing the wheel, turn the wheel lug nuts to a lesser degree of tight, further elevate the front of the car and place it on jackstands under the frame rails. Where the brake hose and the brake line fitting can be seen, the ABS wheel speed sensor harness should be unbolted from the frame bracket. Unscrew the nut of the upper balljoint stud slightly but do not remove it (P125) then, there is need to use a balljoint removal tool together with steady hand to pull apart the balljoint from the steering knuckle with the nut still on the ballstud to avoid sudden detachment. Take care to rotate and fix the steering knuckle out of the way, and pull the shock absorber further out. Torque the control arm mounting flag bolts and take the upper arm off its frame brackets. For installation raise the lower control arm with a floor jack to normal ride height before tightening the upper control arm mounting nuts at the shock tower. Removal of the balljoint is done in the reverse manner to installation process which entails applying new balljoint stud nut and tightening all the bolts up to torqued values. Last, the wheel and the lug nuts are to be fitted, the car is then rested and the lug nuts are tightened to the right torque while the front end alignment is checked and adjusted if required.


