My Garage
My Account
Cart
Genuine Dodge Challenger Ball Joint
Control Arm Joint- Select Vehicle by Model
- Select Vehicle by VIN
Select Vehicle by Model
orMake
Model
Year
Select Vehicle by VIN
For the most accurate results, select vehicle by your VIN (Vehicle Identification Number).
1 Ball Joint found


Dodge Challenger Ball Joint
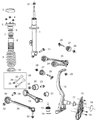
Inside of the Suspension System, Ball Joint is one of the most important components of Dodge Challenger vehicles that plays vital role of connecting steering knuckles and control arms in a way that they could rotate flexibly and control the alignment properly. These elements are useful in facilitating free movement that is needed in steering and suspension but at the same time, they prevent any translations which would not be desirable. In the course of their models, Dodge Challenger has adopted many Ball Joints such as load-carrying Ball Joints with wear indicator, and follower Ball Joints that necessitate torque check. Built from steel and commonly pre-lubricated for life, modern Dodge Challenger Ball Joints are developed to require as few service intervals as possible and for the parts to have a long service life. The sheath made of rubber like material shields the journal from contamination and also enables relative motion of the lubricant, certain of them possess springs in inside in an effort to decrease vibration. Converting from the original kingpin designs to the current Ball Joints has enhanced on-road manners, stability, riding quality which in turn leads to enhanced tire durability and general vehicle performance.
Looking for affordable and high-quality auto parts? Then you have already arrived at the proper online shop. We offer all Dodge Challenger Ball Joint at great affordable prices. Moreover, all genuine Dodge Challenger Ball Joint come with a manufacturer's warranty. In the long run, you would realize you have saved a lot of trouble and money with OEM parts from here.
Dodge Challenger Ball Joint Parts Questions & Experts Answers
- Q: How to Inspect and Replace Ball Joints in Control Arms on Dodge Challenger?A:Inspect the Control Arm balljoints for looseness whenever either is separated from the Steering Knuckle by attempting to turn the ballstud in its socket with your fingers; if it is loose or can be turned, replace the balljoint. To check the upper balljoint and tension strut balljoint, loosen the front wheel lug nuts, raise the front of the vehicle securely on jackstands, and remove the wheel. Then, raise the lower control arm with a floor jack to simulate normal ride height. Use a large prybar inserted between the upper control arm or tension strut and the steering knuckle to pry the upper control arm or tension strut away from the knuckle, noting that up to 0.059-inch movement is allowed, which can be checked with a dial indicator. If accurate measurement is not possible, have the balljoint checked at an automotive repair shop. If replacement is necessary, replace the upper control arm or tension strut, as the balljoint cannot be replaced separately. For the lower balljoint, raise the vehicle and support it securely on jackstands, then place a floor jack under the lower control arm near the outer end and raise it until it supports the vehicle's weight. Insert the prybar against the lower control arm or tension strut and pry the steering knuckle up to check for wear, again noting that up to 0.059-inch movement is allowed. If replacement is indicated, remove the steering knuckle or tension strut, as the balljoint is press fit in the steering knuckle and tension strut, requiring a special press tool and receiver cup for removal and installation. These tools can often be rented from equipment rental yards or auto parts stores, or the vehicle can be taken to an automotive machine shop or qualified repair facility for balljoint replacement.

