My Garage
My Account
Cart
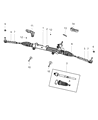
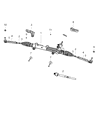
Genuine Dodge Challenger Tie Rod End
Steering Rod End- Select Vehicle by Model
- Select Vehicle by VIN
Select Vehicle by Model
orMake
Model
Year
Select Vehicle by VIN
For the most accurate results, select vehicle by your VIN (Vehicle Identification Number).
9 Tie Rod Ends found


Dodge Challenger Outer End Tie Rod
Part Number: 68382397AB$108.00 MSRP: $163.00You Save: $55.00 (34%)


Dodge Challenger Outer End Tie Rod
Part Number: 68382397AA$108.00 MSRP: $163.00You Save: $55.00 (34%)


Dodge Challenger Outer End Tie Rod
Part Number: 68395027AA$140.63 MSRP: $211.00You Save: $70.37 (34%)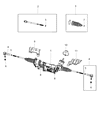
Dodge Challenger Outer End Tie Rod
Part Number: 68395025AB$134.11 MSRP: $296.00You Save: $161.89 (55%)Dodge Challenger Outer End Tie Rod
Part Number: 68395025AA$134.11 MSRP: $296.00You Save: $161.89 (55%)

Dodge Challenger Tie Rod End
The Tie Rod End is used in Dodge Challenger to attach the steering rack to the steering knuckles hence it is component in the steering system of the vehicle. Its surprisingly important for cars stability and as well allows for the degree of control over the direction taken. To offer this functionality, Dodge Challenger makes use of both inner and outer Tie Rod Ends and thus affords the vehicle good and reliable steering. Since the early models of Dodge Challenger, there might have been different styles of Tie Rod Ends that may have been used depending on the improvements that may have been made on the design and development. These variations may affect the general performance as well as the handing of the vehicle, however, differences are not elaborated.
Looking for affordable and high-quality auto parts? Then you have already arrived at the proper online shop. We offer all Dodge Challenger Tie Rod End at great affordable prices. Moreover, all genuine Dodge Challenger Tie Rod End come with a manufacturer's warranty. In the long run, you would realize you have saved a lot of trouble and money with OEM parts from here.
Dodge Challenger Tie Rod End Parts Questions & Experts Answers
- Q: How to remove and replace a tie rod end on Dodge Challenger?A:First, to be able to get to the tie-rod end you need to take off the wheel by following some basic steps hence loosening the wheel lug nuts, lifting the front part of the automobile through the jack, and setting it on the jackstands while engaging the parking brake. After that, turn the adjustment nut of the tie-rod end counterclockwise while the tie-rod is hold with the wrench. Make sure, that the toed in setting can be replicated after the reassembly and mark the position of the tie-rod end corresponded with the threaded portion. LTI200: Unscrew the nut on the tie-rod end ballstud but do not remove it and use puller to remove the tie-rod end from the Steering Knuckle arm but while so doing ensure that the nut is still on the ballstud so as to avoid violent action. If replacing the tie-rod end unscrew it and screw in the new tie-rod end in the predetermined position on the tie-rod. For installation, you affix the tie-rod end to the steering knuckle arm, and after this you fit the nut on the ballstud to the tightness recommended by the manufacturer and finally put the wheel. Get down and increase the lug nuts to the appropriate torque. On vehicles with electrical power assist the steering gear calibrate must be done then front end alignment should be done and also corrected if it is inefficient.

