My Garage
My Account
Cart
Genuine Dodge Challenger Hood
Engine Hood- Select Vehicle by Model
- Select Vehicle by VIN
Select Vehicle by Model
orMake
Model
Year
Select Vehicle by VIN
For the most accurate results, select vehicle by your VIN (Vehicle Identification Number).
23 Hoods found


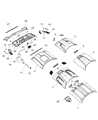


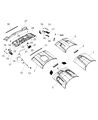
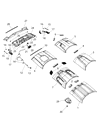
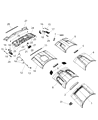
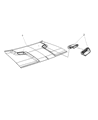
Dodge Challenger Hood Panel Assembly
Part Number: 68044225AB$807.95 MSRP: $1195.00You Save: $387.05 (33%)


| Page 1 of 2 |Next >
1-20 of 23 Results
Dodge Challenger Hood
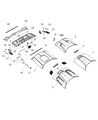
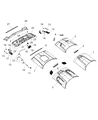
The Dodge Challenger Hood shields your engine from the weather while letting your muscle car make a bold first impression. This Hood functions as a hinged cover that lifts open for easy checks and is locked down for airflow over the nose to improve aerodynamics. Throughout the years, Dodge offered steel and aluminum options for strength, subsequently introducing lightweight fiberglass designs on select Challenger trims to reduce weight and enhance performance. Various steel options provide maximum strength, aluminum lightens the weight, while the gelcoat fiberglass option accepts custom color and won't rust. Every Hood also has programmed crumple zones to absorb collision energy and protect occupants. Classic Challenger owners should confirm the exact year and model so the Hood aligns with fenders and latch points, choose reliable materials to avoid early wear, and balance a budget-friendly price before labor. By choosing the right functional Hood, all Dodge Challengers will not just look aggressive but also manage running cool with the help of functional performance features, headed with a purpose-built Dodge design.
Looking for affordable and high-quality auto parts? Then you have already arrived at the proper online shop. We offer all Dodge Challenger Hood at great affordable prices. Moreover, all genuine Dodge Challenger Hood come with a manufacturer's warranty. In the long run, you would realize you have saved a lot of trouble and money with OEM parts from here.
Dodge Challenger Hood Parts Questions & Experts Answers
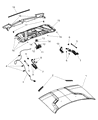
- Q: How should the hood be removed and installed properly on Dodge Challenger?A:The hood is heavy and somewhat awkward to remove and install, so at least two people should perform this procedure. Begin by using blankets or pads to cover the cowl area of the body and Fenders to protect the paint. Have a grease pencil, marking paint, or a scribe handy to make marks or scribe a line around the Hood Hinge for proper alignment during installation. If equipped, disconnect any cables, wires, or windshield washer hoses that may interfere with the hood's removal, as well as the hood support struts, using a small screwdriver to remove the ball and socket retainer from the strut. With the support struts removed, have an assistant hold the hood open. Support one side of the hood while your assistant supports the other, and simultaneously remove the hinge-to-hood nuts, using your shoulder to support the hood while removing the bolts. Lift off the hood, ensuring to mark the hinge bolts to the fender area if replacing the hood hinge for correct alignment during reinstallation. The installation process is the reverse of removal. The air induction bezels are held in place by plastic clips, which can be released with a flat trim tool to remove the bezel trim plates; to install, line up the bezel with the opening and press it into place. For adjustment, the fore-and-aft and side-to-side positioning of the hood can be modified by moving the hinge plate slot after loosening the bolts or nuts. Mark around each hinge plate to determine the amount of movement, then loosen the bolts or nuts and adjust the hood into the correct alignment, tightening the hinge bolts afterward. If necessary, the Hood Latch can be adjusted up-and-down and side-to-side on the radiator support to ensure the hood closes securely and flush with the fenders; mark around the latch mounting bolts, loosen them, reposition the latch, and retighten the bolts, checking the fit afterward. Finally, adjust the hood bumpers on the radiator support to ensure the hood is flush with the fenders when closed, and periodically lubricate the hood latch assembly and hinges with white lithium-base grease to prevent binding and wear.


