My Garage
My Account
Cart
Genuine Dodge Challenger Timing Chain
Engine Timing Chain- Select Vehicle by Model
- Select Vehicle by VIN
Select Vehicle by Model
orMake
Model
Year
Select Vehicle by VIN
For the most accurate results, select vehicle by your VIN (Vehicle Identification Number).
3 Timing Chains found


Dodge Challenger Chain-Timing Secondary
Part Number: 5184352AF$147.32 MSRP: $259.00You Save: $111.68 (44%)

Dodge Challenger Chain-Timing Primary
Part Number: 5184355AF$35.18 MSRP: $50.85You Save: $15.67 (31%)
Dodge Challenger Timing Chain
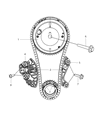
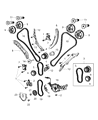
The timing chain in the Dodge Challenger cars is responsible for a proper synchronization of the camshaft and crankshaft to maintain the valve timing during four-stroke cycle of the engine. This mechanism is usually made from steel and it is much stronger than the rubber timing belts and seldom requires replacement. But, it can stretch over period of time with negative consequenses like low horsepower and high rate of fuel consumption. Some Dodge Challenger models prefer the use of timing chain in their vehicles particularly in engines having high displacement where lubricant is very essential for smooth running. For pushrod engines, there run small chain drive since it can take torque reversal more willingly than gear drives and hence much noise and wear. Altogether, it is significant to emphasize that Timing Chain is an essential part of the car's effective functioning and that both Dodge challengers operate in the optimal way thanks to this component.
Looking for affordable and high-quality auto parts? Then you have already arrived at the proper online shop. We offer all Dodge Challenger Timing Chain at great affordable prices. Moreover, all genuine Dodge Challenger Timing Chain come with a manufacturer's warranty. In the long run, you would realize you have saved a lot of trouble and money with OEM parts from here.
Dodge Challenger Timing Chain Parts Questions & Experts Answers
- Q: What special tools are necessary to complete the timing chain replacement procedure in 2.7L V6 engine on Dodge Challenger?A:Extra equipment is required to perform this process, and it is advised that one read through the whole process then gather these tools. Because timing chain entails a lot of effort to be used when being accessed and replaced, and more so because the water pump is located close to this part, then the water pump should be checked thoroughly and replaced if need be. The 2.7L engine employs three timing chains with one primary timing chain linking with the crankshaft sprocket, water pump, and two timing chains linking the two intake camshaft sprockets and two secondary timing chains link the intake and exhaust camshaft events appropriately. First remove the negative battery terminal, release fuel pressure and drain the cooling system. Take out the cooling fan assembly, coolant reservoir, radiator, accessory drive belts, Crankshaft Pulley, upper Intake Manifold, valve covers, spark plugs and place the engine so that number one piston is at the top of the compression process. Loosen the air conditioning compressor, get rid of the water outlet housing, idler pulley, and timing chain cover as well as check for slant of the bolts by drawing on paper. Turn the engine so that the timing mark on the flywheel is lined up with the mark on the crankshaft, take out the primary timing chain tensioner and the nuts and bolts from the primary camshaft sprocket. Gently remove the primary sprockets from the camshaft hubs taking the necessary note of the left and right camshaft sprockets' features. Take off the Primary timing chain guides and tensioner arm, and then the primary timing chain out. Wear check the camshaft, water pump and crankshaft sprockets, and replace them if they are worn out. If removed, fit the crankshaft sprocket aligning the oil pump housing mark and fit the upper chain guards. Proper positioning of the main timing chain involves setting the star mark on the sprocket with the light colored links on the NEW chain, before lowering it and the sprocket into place. Put in the correct camshaft sprocket and timing chain, so that links of the colored varieties connect to their marks. Position and secure the lower chain guide and tensioner arm, bleed the tensioner of oil, set it and bolt it back into position with a new lower tensioner O-ring gasket. Ensure that camshaft sprocket retaining bolts are tightened, ensure that the timing chain is pulled and the timing marks aligned before releasing the tensioner. Remove the old sealant from the timing chain cover, apply some RTV sealant on the cover and vice tighten the bolts in the right torque. The remainder of the installation procedure is the reverse of the removal procedure; refilling of the cooling system is also done. In case the crankshaft sprocket has to be removed, few tools and equipment that are necessary are a three jaw puller, propane torch or installation tool, and a machinist ruler or dial caliper. After the removal of the first timing chain, adopt the puller to get off the crankshaft sprocket. To install sprocket, it is recommended to use sprocket installing tool though one can heat the sprocket hub with the propane torch and must align it to the maximum extent that the distance between end of the crank shaft and face of the sprocket should equal 1.537 +.020 or -.020 inch.


