My Garage
My Account
Cart
Genuine Dodge Durango Engine Cooling Fan
Radiator Fan- Select Vehicle by Model
- Select Vehicle by VIN
Select Vehicle by Model
orMake
Model
Year
Select Vehicle by VIN
For the most accurate results, select vehicle by your VIN (Vehicle Identification Number).
18 Engine Cooling Fans found


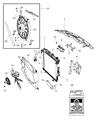
Dodge Durango Radiator Cooling Fan Module
Part Number: 52014787AC$573.10 MSRP: $869.00You Save: $295.90 (35%)


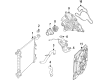
Dodge Durango Radiator Cooling Fan Module
Part Number: 55037992AD$505.50 MSRP: $727.00You Save: $221.50 (31%)


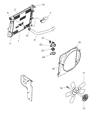
Dodge Durango Radiator Cooling Module
Part Number: 68482591AC$341.00 MSRP: $517.00You Save: $176.00 (35%)


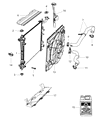
Dodge Durango Fan ASSY.-Radiator Cooling
Part Number: 68367518AA$1049.77 MSRP: $1555.00You Save: $505.23 (33%)


Dodge Durango Engine Cooling Fan
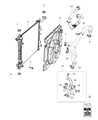
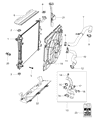
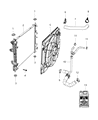
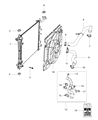
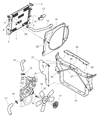
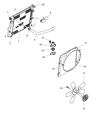
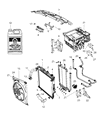
The Engine Cooling Fan in a Dodge Durango SUV forces air through the radiator when the speed of the vehicle cannot control the heat from the coolant. The Engine Cooling Fan activates in traffic and pulls airflow across the fins, while ram air does the job at highway speeds. Older Durango models incorporated an engine-driven mechanical clutch fan, while newer SUV models use a fixed Engine Cooling Fan in a molded shroud that is electric. The system is controlled by temperature sensors, is activated only when necessary, reduces noise and fuel consumption of Dodge engines. Mechanical fans cannot decouple, as they always draw power while running. In contrast, the current Dodge system supplies continuous cooling with ignition on while the Durango is idling during towing or trail crawls. The assembly of any Engine Cooling Fan includes blades, a motor or clutch, and a specially shaped shroud to channel air through the unit so that the surface area of the radiator gets full flow. The Engine Cooling Fan regulates temperature, which protects gaskets, oil and performance and extends the working life of any Dodge Durango.
Looking for affordable and high-quality auto parts? Then you have already arrived at the proper online shop. We offer all Dodge Durango Engine Cooling Fan at great affordable prices. Moreover, all genuine Dodge Durango Engine Cooling Fan come with a manufacturer's warranty. In the long run, you would realize you have saved a lot of trouble and money with OEM parts from here.
Dodge Durango Engine Cooling Fan Parts Questions & Experts Answers
- Q: How to check and replace the Cooling Fan Assembly and Engine Cooling Fan on Dodge Durango?A:Problems with a bad fan clutch are usually the fan making noise all the time, getting spongy or shaky, plus you might spot silicone fluid escaping from the clutch. By hand, move the fan side to side to find out if the bearing moves too much. After that, push the blades by hand; the fan should swivel easily. Check the fan clutch if you see fluid dripping from its components, see a twisted bi-metal spring, or spot grease coming from the cooling fan's bearing. Begin by turning on your engine and letting it heat up like you normally would. When the engine is up to its regular working temperature, turn off the engine and push the fan manually - you should feel a normal amount of turning force. If that turning is too easy, replace the fan clutch. To test the condenser fan for Durango models, unplug the motor connector and join one motor wire to the battery directly, through a connection with a fuse. The other motor wire requires another fuse to ground it. If the fan motor does not work, change it. When the air conditioner works fine, but the fan doesn't turn on as it should or the engine gets too hot, the fan relay could be damaged, and it's best to leave any control circuit checks to a professional. Check that the fan relay located in the fuse/relay box works correctly. Then test all connections leading to the fan motor. When everything looks normal, the engine coolant temperature sensor or Powertrain Control Module may be causing the issue, which a trained auto repair shop must identify. When replacing cooling fan parts on reverse-direction engines, get sure to only install fans and clutches labeled REVERSE to prevent engine overheating. When restoring the cooling fan/viscous fan clutch assembly, keep it upright as you store it to avoid fluid problems. First, take out a portion of your car's coolant, then remove any air filter housing and top radiator pipe. Hold the water pump pulley still with a special pin spanner wrench, then remove the fan clutch nut by turning it counterclockwise. With care, drop the fan system from the shroud into place, keeping the radiator fins safe, and unfasten both sides of the shroud to pull out the combined fan system. Take off the two fan clutch bolts on the performance bench, then reinstall it the opposite way, making sure you close the fan bolts and tighten the clutch nut tightly. Before you can replace the condenser cooling fan on a Durango, have an expert vent the AC system, disconnect the battery's negative terminal, uncover the radiator support, disconnect the power from both the fan and high-pressure AC switch, and move the wiring out of the way. First, disconnect the air conditioners lines connected to the condenser. To avoid contamination, cover them with tapes or plugs. Remove the four bolts holding the condenser/radiator bracket above it. Next, loosen one hex bolt holding the condenser and pull it out. Refrain from moving the radiator forward until needing more space below it. Once both are free, lift up the entire condenser/fan assembly out of the engine bay. Pull out the fan and shroud from the condenser, keeping track of each screw so you can put everything back correctly. Professional technicians need to pump your engine's air conditioners, fix any leaks they find, and fill it again.

Related Dodge Durango Parts
 Dodge Durango Engine Control Module
 Dodge Durango Exhaust Manifold
 Dodge Durango Engine Mount
 Dodge Durango Engine Cover
 Dodge Durango Exhaust Pipe
 Dodge Durango Exhaust Manifold Gasket
 Dodge Durango Engine Mount Bracket
 Dodge Durango Evaporator
 Dodge Durango Exhaust Clamp
 Dodge Durango Exhaust Heat Shield
 Dodge Durango Exhaust Manifold Clamp
 Dodge Durango Exhaust Nut
Browse by Year
2025 Engine Cooling Fan 2024 Engine Cooling Fan 2023 Engine Cooling Fan 2022 Engine Cooling Fan 2021 Engine Cooling Fan 2020 Engine Cooling Fan 2019 Engine Cooling Fan 2018 Engine Cooling Fan 2017 Engine Cooling Fan 2016 Engine Cooling Fan 2015 Engine Cooling Fan 2014 Engine Cooling Fan 2013 Engine Cooling Fan 2012 Engine Cooling Fan 2011 Engine Cooling Fan 2009 Engine Cooling Fan 2008 Engine Cooling Fan 2007 Engine Cooling Fan 2006 Engine Cooling Fan 2005 Engine Cooling Fan 2004 Engine Cooling Fan 2003 Engine Cooling Fan 2002 Engine Cooling Fan 2001 Engine Cooling Fan 2000 Engine Cooling Fan 1999 Engine Cooling Fan 1998 Engine Cooling Fan