My Garage
My Account
Cart
Genuine Dodge Neon Hood
Engine Hood- Select Vehicle by Model
- Select Vehicle by VIN
Select Vehicle by Model
orMake
Model
Year
Select Vehicle by VIN
For the most accurate results, select vehicle by your VIN (Vehicle Identification Number).
4 Hoods found


Dodge Neon Hood
The Dodge Neon Hood protects the engine bay from the weather and provides a smooth surface for air to flow over the car. The Hood in Neon series is easily lifted for quick checks and repairs, but it is designed to crumple on impact. Throughout the years, Neon models have utilized three main material styles: traditional steel for rugged strength, lighter aluminum for better mileage, and gelcoat fiberglass for the light feel. The steel and aluminum versions typically come in a primed finish, which is prepared so that the new Hood can be color-matched to the remainder of the Dodge body while the fiberglass Hood can stay in its glossy coat or accept custom paint. The unique design of every Hood means that they are cut to fit exactly between matching Dodge fenders and grille for clean lines that keep wind noise down. When looking for a replacement Hood for the Dodge Neon, drivers consider material longevity, finish, and price to achieve engine protection with Dodge style.
Looking for affordable and high-quality auto parts? Then you have already arrived at the proper online shop. We offer all Dodge Neon Hood at great affordable prices. Moreover, all genuine Dodge Neon Hood come with a manufacturer's warranty. In the long run, you would realize you have saved a lot of trouble and money with OEM parts from here.
Dodge Neon Hood Parts Questions & Experts Answers
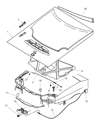
- Q: How to properly remove and install a hood on Dodge Neon?A:Use blankets or pads to cover the cowl area of the body and both Fenders to protect the body and paint when lifting off the hood. Open the hood and support it on the prop rod. Scribe alignment marks around the bolt heads to ensure proper alignment during installation, using a permanent-type felt-tip marker or a marking pen to outline the hinge plate and bolt heads. Disconnect any hoses or electrical wire harnesses that may interfere with removal, detaching the washer hose before proceeding. Have an assistant support one side of the hood while you support the other, and simultaneously remove the hood-to-hinge bolts before lifting off the hood. Installation follows the reverse order of removal. Adjust the hood by moving it in relation to the hinge plate after loosening the bolts, ensuring a 5/32-inch gap to the front fenders and that it is flush with the top surface. Scribe or trace a line around the entire hinge plate to judge the amount of movement, then loosen the bolts and make small adjustments to achieve correct alignment, tightening the hinge bolts and carefully lowering the hood to check the alignment. Adjust the hood bumpers on the radiator supports so the hood is flush with the fenders when closed by screwing the bumpers in or out. The latch assembly can also be adjusted up and down and side to side after loosening the bolts. Periodically lubricate the hood latch assembly and hinges with white lithium-based grease to prevent sticking and wear.


