My Garage
My Account
Cart
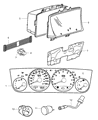
Genuine Dodge Neon Instrument Cluster
Speedometer Instrument Cluster- Select Vehicle by Model
- Select Vehicle by VIN
Select Vehicle by Model
orMake
Model
Year
Select Vehicle by VIN
For the most accurate results, select vehicle by your VIN (Vehicle Identification Number).
14 Instrument Clusters found


Dodge Neon Instrument Cluster
The Instrument Cluster of Dodge Neon vehicles is an important parts situated on the dashboard behind the steering wheel that delivers important information to the driver concerning the performance of the vehical and or the driving conditions prevailing at a given time. This cluster consists of speedometer, tachometer, fuel gauge and other lights and symbols for notifying the driver of the car's engine status, external lights, and seat belt among others. In the previous years, Dodge Neon has had a variety of Instrument Clusters where many of them differ in design and performance. Nevertheless, the main purpose always stays beside the driver giving information, new achievements have appeared in gauge increase and remanufactured clusters as replacements. The protection of the Instrument Cluster is important in order to make sure that the driver has an idea on the status of the automobile, therefore, the Instrument Cluster is an essential part of the Dodge Neon Vehicle.
Looking for affordable and high-quality auto parts? Then you have already arrived at the proper online shop. We offer all Dodge Neon Instrument Cluster at great affordable prices. Moreover, all genuine Dodge Neon Instrument Cluster come with a manufacturer's warranty. In the long run, you would realize you have saved a lot of trouble and money with OEM parts from here.
Dodge Neon Instrument Cluster Parts Questions & Experts Answers
- Q: How to Safely Remove the Instrument Cluster on Dodge Neon?A:It is recommended to both front seats for more working space and in order to prevent damage on this stage. Start by removing it from the ground terminal with the negative cable moving it in a way that it cannot touch the terminal. Then, taking off the A pillar trim, then instrument panel top ashtray, or top cover, finally the instrument cluster ring or bezel. Move to the next to take off the dashboard trim panels and others such as the glovebox as well as the Steering Column Covers. Set the steering wheel in the straight ahead position and remove the electrical connectors to the ignition switch, turn signal switch, immobilizer (if equipped) and the clock-spring of the air bag. Secure the position of the universal joint to the steering gear input shaft, then take out the pin from the steering shaft joint-by pulling the clip, followed by the removal of the nut and the pin. Take out the nuts securing the steering column and the instrument panel as well as the floor console. Pull the Data Link Connector out of the instrument panel, as well as the bolts of center support mounting and the A-pillar-to-instrument panel-there are two of them on each side. Remove the right side of the antenna and two harness connectors that are present at the pillar A. Screw out two screws in the unit, disconnect two wires-electrical and vacuum, and then raise the unit as you turn it 90 degrees to get it out of the opening. Unscrew the two bolts in the top of the brake pedal/instrument panel support. With help, pry up on the instrument panel, pull it backward as well as remove it from the car. For installation, reverse all the steps which are involved in its removal and make sure that the instrument panel is positioned vertically by fixing two bolts or pins of half an inch in the two pilot holes in the pillars.


