My Garage
My Account
Cart
Genuine Dodge Neon Rocker Arm
Engine Rocker Arm- Select Vehicle by Model
- Select Vehicle by VIN
Select Vehicle by Model
orMake
Model
Year
Select Vehicle by VIN
For the most accurate results, select vehicle by your VIN (Vehicle Identification Number).
4 Rocker Arms found


Dodge Neon Rocker Arm
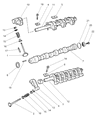
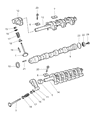
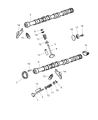
The Rocker Arm is a very essential component of the Dodge Neon's engine which helps deliver the movement that originates from the pushrod to the intake and exhaust valves. Usually made of stamped steel or aluminum The Rocker Arm is the component which translates up and down movement of the pushrod into the required amount of pressure to address the valves. Where engines rev very high, aluminum is great because of the technology, but for the heavy-weight engines, cast iron or forged carbon steel is used. Some Dodge Neon models can come outfitted with various kinds of Rocker Arms known as the conventional and the roller types. Roller rockers employ the use of needle bearings that minimize the contact of the moving parts and thus wear, this is more efficient as compared to other roller designs that employ metal to metal contact. Normally, the rocker ratio in Dodge Neon engines should vary between 1.5:1 and 1.8:1 so as to increase camshaw lift as well as the general efficiency of the car. The bearings of the fulcrum can also be improved in high RPM versions in order to handle stress and increase the life-span of the employable Dodge Neon engine power.
Looking for affordable and high-quality auto parts? Then you have already arrived at the proper online shop. We offer all Dodge Neon Rocker Arm at great affordable prices. Moreover, all genuine Dodge Neon Rocker Arm come with a manufacturer's warranty. In the long run, you would realize you have saved a lot of trouble and money with OEM parts from here.
Dodge Neon Rocker Arm Parts Questions & Experts Answers
- Q: How to remove and install Rocker Arm on Dodge Neon?A:Position the number one piston at Top Dead Center and disconnect the cable from the negative battery terminal. Remove the valve cover and mark the front rocker arm shaft as the intake and the rear as the exhaust before loosening the rocker arm shaft bolts a quarter turn at a time until the spring pressure is relieved, ensuring the bolts remain in place to prevent the assembly from falling apart when lifted off the Cylinder Head. Lift the rocker arms and shaft assemblies from the cylinder head and set them on the workbench, taking care not to intermix the unique intake and exhaust parts. Inspect the rocker arm assemblies and disassemble the rocker arm shaft components, marking all parts for reassembly in their original locations. To maintain order, consider using lengths of wire to hold the parts in the sequence they were removed, marking each wire to indicate the front of the engine. Visually check the rocker arms for wear, including the shaft bore and roller for any score marks, pitting, or signs of overheating, and replace any worn or damaged components. Before installation, ensure each Lash Adjuster is at least partially full of oil, and when reassembling, return all parts to their original locations. On the intake rocker arm shaft, confirm that the plastic spacers are correctly positioned, and prior to installing the rocker arm shaft, rotate the crankshaft to position the crankshaft timing sprocket at the three notches BTDC. Install the rocker arm assemblies with the notch in each rocker arm shaft facing the Timing Belt end of the engine and facing up, then tighten the rocker arm bolts in sequence to the specified torque.


