My Garage
My Account
Cart
Genuine Dodge Neon Timing Belt
Engine Timing Belt- Select Vehicle by Model
- Select Vehicle by VIN
Select Vehicle by Model
orMake
Model
Year
Select Vehicle by VIN
For the most accurate results, select vehicle by your VIN (Vehicle Identification Number).
6 Timing Belts found


Dodge Neon Timing Belt
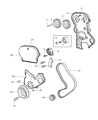
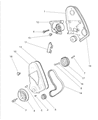
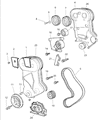
The Timing Belt in Dodge Neon vehicles plays the amazing role of making sure that the crankshaft and the camshaft are working as a team, the engine valves to be open and close at the right time as the piston. This synchronization is done by a fiber reinforced rubber belt that is turned by the crankshaft and transfers the operation of the camshaft(s) with the aid of tensioner and idler pulleys. There have been many Dodge Neon models over the years, and most of them use timing belt driven engines, which are preferred due to their low cost, low noise and vibration, and less friction as compared to earlier gear based systems. Though, the concept remains simple, there have been improvements which have seen newer belts have curved teeth to make them stronger and less noisy. Moreover, the timing belt ought to be inspected and replaced on a regular basis, this is because an improper timing belt can cause severe problems to the engine especially in interference engines.
Looking for affordable and high-quality auto parts? Then you have already arrived at the proper online shop. We offer all Dodge Neon Timing Belt at great affordable prices. Moreover, all genuine Dodge Neon Timing Belt come with a manufacturer's warranty. In the long run, you would realize you have saved a lot of trouble and money with OEM parts from here.
Dodge Neon Timing Belt Parts Questions & Experts Answers
- Q: What steps should be followed when removing and installing a timing belt on Dodge Neon?A:When removing the timing belt, ensure the engine is cool and position the number one piston at Top Dead Center. Disconnect the negative battery terminal and remove the accessory drive belts and spark plugs. Set the parking brake, block the rear wheels, and securely raise the front of the vehicle on jack stands. Remove the right inner fender splash shield if equipped, then loosen the large bolt in the center of the crankshaft damper pulley using a screwdriver or bar to keep it stationary. Install a 3-jaw puller to remove the damper pulley, ensuring to use the proper insert to protect the crankshaft threads. Drain the engine coolant, remove the ground strap from the Engine Mount bracket, and take out the power steering pump and bracket without disconnecting the fluid lines. Support the engine with a floor jack under the Oil Pan, then remove the right engine mount and engine mount bracket. Remove the timing belt cover and ensure the camshaft sprocket timing marks are aligned before releasing tension on the timing belt. Carefully slip the timing belt off the sprockets, keeping it away from oil or water if planning to reuse it. Inspect the timing belt and related components for wear or damage, replacing as necessary. For installation, compress the tensioner pin for hydraulic tensioners before installation, confirm the alignment of the camshaft sprocket timing marks, and position the crankshaft timing sprocket correctly. Install the timing belt, ensuring proper tension and alignment of the marks, and recheck the tensioner settings. After reinstalling all components in reverse order, start the engine and conduct a road test.


