My Garage
My Account
Cart
Genuine Jeep Liberty Timing Belt
Engine Timing Belt- Select Vehicle by Model
- Select Vehicle by VIN
Select Vehicle by Model
orMake
Model
Year
Select Vehicle by VIN
For the most accurate results, select vehicle by your VIN (Vehicle Identification Number).
7 Timing Belts found


Jeep Liberty Timing Belt
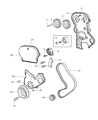
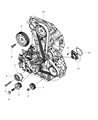
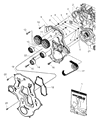
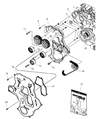
The Timing Belt in Jeep Liberty cars plays an extremely important function of ensuring that the crankshaft and camshaft are in harmony in terms of their operation to ensure that engine valves are opened and closed at specific times. This is made possible by a belt that has a tensioner as well as an idler pulleys that ensures that the engine times its operation to perfection. Year after year, Jeep Liberty models have mainly incorporated rubber timing belts which are strengthened with fibers, these belts are relatively cheaper, quite friendly to the ears due to their low friction rates as compared on older types of gears. Although today's belt display variations with curved teeth to increase durability and reduce the noise being made, it is nevertheless important to periodically examine and replace worn belts to avoid potential harm to the engine due to belt failure. As for Jeep Liberty's owners it is crucial to follow the manufacturer's recommended intervals of the replacement in order to preserve the engine parts and their functionality.
Looking for affordable and high-quality auto parts? Then you have already arrived at the proper online shop. We offer all Jeep Liberty Timing Belt at great affordable prices. Moreover, all genuine Jeep Liberty Timing Belt come with a manufacturer's warranty. In the long run, you would realize you have saved a lot of trouble and money with OEM parts from here.
Jeep Liberty Timing Belt Parts Questions & Experts Answers
- Q: How to remove and install the timing belt in 4.0L V6 engine on Jeep Liberty?A:Cooled before starting this process. Caution: This is not a liberal engine; if the belt is ruined or installed erroneously, the engine will be heavily ravaged. During this particular procedure, do not rotate the crankshaft or the Camshafts individually because certain valve problems may arise. There are several special tools required in doing these procedures therefore ensure that you get the special tools before starting. Detach the cable from negative terminal of the battery, remove the air filter housing and the coolant recovery bottle/washer fluid reservoir. Some of the preliminary steps include the following:The removal of cooling fan shroud fasteners,Disconnect the electric fan's time-related electrical connector, Taking off the fan shroud Second, take out the fan/viscous van drive assembly, put the number one piston at TDC on the compression stroke and eliminate the drivebelts, drivebelt tensioner. Take out all the mounting nuts/bolts of the air conditioning compressor and then fasten the compressor aside using wire. Take out the accessory drive bracket bolts and the bracket assembled with the idler pulleys on the side of the front of the engine. Take out all the bolts in the power steering pump and set the power steering pump and the bracket. Take off the Crankshaft Pulley and such kinds and sizes of bolts, that have to be mounted into the front timing belt cover. Lift the vehicle and place it on jackstands; disconnect the oil cooler hose by loosening the mounting bolt, and tie the hose aside. Be certain that the number one piston is still at TDC on the compression stroke by with the timing marks on a three timing belt sprockets. Take off the hydraulic tensioner mounting bolts and tensioner on the side of the rear cover, unscrew the arrow bolt and loosely push the pulley and the timing belt away before tightening the bolt again. Ensure the timing belt has get an arrow drawn on it that faces outward in case that is the same belt to be used again. Pull the timing belt off the sprockets and examine the tensioner and the belt to see whether or not it is cracked, peeled or worn which should alert one that it needs to be replaced. Before starting the engine, turn the crankshaft at least 2 times around manually speaking of sheer strength. Any sign of resistance, treat the situation as a problem and try to find out why resistance is being felt. Put the hydraulic timing belt tensioner into a vise, then tighten it to admit the 3mm Allen key for poppin' the plunger out. Put the belt on the crankshaft sprocket first and make sure it is tight on the tension side; next put the belt on the left camshaft sprocket, then the water pump pulley, and lastly the right camshaft sprocket and timing belt tensioner so long as the timing marks stay in place. Fit the tensioner to the side of the rear cover, then tighten the associated bolts to the grade four torque.Now that you have reached this step, and the belt is installed, press on the tensioner pulley downwards, extract the pin that holds the tensioner, and create space that will make the plunger to 'lock' against the pulley bracket. Turn the crankshaft slowly clockwise for two full revolutions and you will find the number one piston at TDC of the compression stroke. If such resistance is realised excess, find out whether there is contact between the pistons and valves. Make sure that all the timing marks are well lined up, tighten the tensioner bolt to the recommended torque and inspect the timing belt for any sign of deflection. If the belt looks too slack, change the tensioner spring. The installation of the other units is in an opposite sequence from the removal process.

Related Jeep Liberty Parts
 Jeep Liberty Cylinder Head Gasket
 Jeep Liberty Camshaft
 Jeep Liberty Crankshaft
 Jeep Liberty Lash Adjuster
 Jeep Liberty Cylinder Head
 Jeep Liberty Timing Cover Gasket
 Jeep Liberty Timing Chain
 Jeep Liberty Cam Gear
 Jeep Liberty Camshaft Seal
 Jeep Liberty Cylinder Head Bolts
 Jeep Liberty Crankshaft Thrust Washer Set