Make sure this part fits

Chrysler 5184380AF Engine Intake Camshaft

2011-2017 Chrysler 5184380AF

Customer Questions & Expert Answers (14)
5184380AF Mopar Engine Intake Camshaft Product Photo 1 of 3
  • Part Description
    Camshaft-Intake
  • Replaced By
    5184380AH
  • Manufacturer
    Mopar
Make sure this part fits
$338.80 MSRP: $520.00
You Save: $181.20 (35%)
1
ADD TO CART
  • Related Parts
  • Specifications
  • Fitment
  • Q&A
  • Product Specifications

    BrandGenuine Chrysler
    Manufacturer Part Number5184380AF
    Part DescriptionCamshaft-Intake
    Item Dimensions24.9 x 6.1 x 6.0 inches
    Item Weight5.20 Pounds
    ConditionNew
    Fitment TypeDirect Replacement
    ManufacturerMopar
    SKU5184380AF
    WarrantyThis genuine Mopar part is guaranteed by Mopar's factory warranty.
    Shipping & ReturnShipping Policy Return Policy
    Warning: California's Proposition 65
  • Vehicle Fitment

    Year Make Model Engine Important vehicle option details
    2011-2017 Chrysler 2006 Cyl 3.6LC AWD, C FWD, Limited, Limited Convertible, Limited Sedan, LX, LX Sedan, S AWD, S Convertible, S FWD, S Sedan, Touring Convertible, Touring Sedan
    2011-2017 Chrysler 3006 Cyl 3.6LBase AWD, Base RWD, C AWD, C John Varvatos AWD, C John Varvatos RWD, C Luxury Series AWD, C Luxury Series RWD, C Platinum AWD, C Platinum RWD, C RWD, Limited AWD, Limited RWD, S AWD, S Luxury Series RWD, S RWD, S V6 AWD, S V6 RWD
    2011-2016 Chrysler Town & Country6 Cyl 3.6LGold, Limited, Limited Platinum, LX, S, Touring, Touring L, Touring-L
  • Customer Questions & Expert Answers

    Q:
    Please cross check for fit. Posted by MoparPartsGiant Specialist
    A:
    You can Select Your Vehicle to check if 5184380AF fits your vehicle.
    Posted by MoparPartsGiant Specialist
    Installation and Repair Tips
    Q:
    How to remove and install Camshaft in four cylinder engine on Chrysler 200? Posted by Customer
    A:
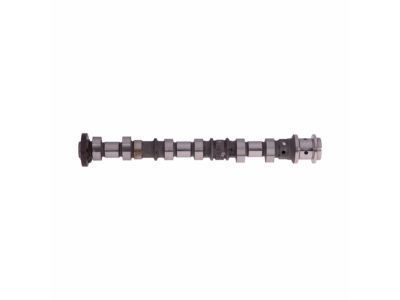
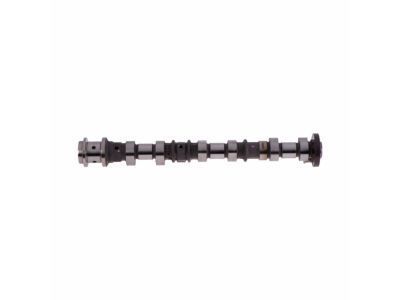
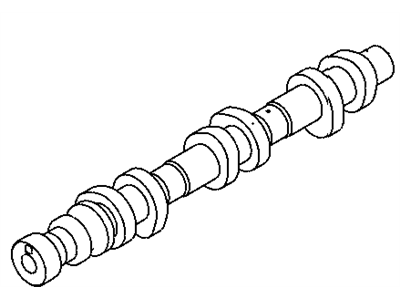
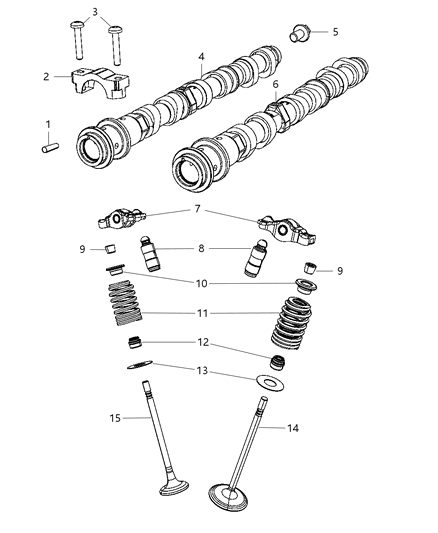
    It is quite involved when it comes to the timing system and one wrong move and the engine is toast. This operation should be tried only by experienced personnel and, if in doubt, seek advice from someone more knowledgeable. Make certain of all work before starting the engine by checking entry twice. In particular, the timing chain can be unbolted from the camshafts only with the help of special tools; if such tools are not available, the timing chain cover has to be removed first. The starting point is the removal of the engine cover, the process of the negative battery cable removal, the loosening of the lugnuts of the right front wheel, lifting of the car securely on jackstands and finally the removal of the right front wheel and the drivebelt splash shield. Engines should be de-oiled, de-cooled, and have the drivebelt and air filter housing assembly dismantled. Remove the ignition coils, s take out the spark plugs and then put numbers on the ignition coils so that they may be placed in their right positions later on. Take off the valve cover, turn the crankshaft until the no. 1 piston is at the top dead center, and align the timing marks, which are to be marked on the camshaft phasers to the timing chains for reassembly. Take out the timing chain tensioner plug, raise the plunger ratchet, and fit the special locking tool to the two camshaft phasers. Remove the front camshaft bearing cap and, pulling up on it, lift the intake camshaft first, as well as the exhaust camshaft. Disassemble the gearbox and exhaust camshaft, and then discard half of the bearing and then unfasten the bolt and phaser from the end of the camshaft. Take some time to mark the lifters in case they are reinstalled to the cylinder head improperly, and then, take them off. For 2015 and later models, refer to the Mopar special tool for the procedure, remove the brake vacuum pump and the timing chain cover. Make sure that the special valve spring compressor tool is properly placed on the cylinder head and tighten the compressor assemblies just to compact the valve springs. It is necessary to install match marks on camshaft bearing caps and then remove these caps and the camshaft in reverse sequence, be very lightly while extracting the camshaft from the engine. Check the bearing surfaces of the camshaft for signs of wear and measure the camshaft lobe thickness and replace the camshaft if required. When the engine is not running; turning the crankshaft by hand through at least 720 degrees should be felt with resistance. For the 2014 and earlier models, the phaser should be slid over the camshafts and the bolt should then be installed and torqued, before the lifters are dipped in clean engine oil and the camshaft bearing journals glided with oil, and finally the timing chain should be placed over the phaser sprocket of the exhaust. The camshaft bearing caps have to be installed in the right order, bolt tightened uniformly to the bolt sequence, confirm to timing mark and finally withdrawal the tools from the timing chain tensioner and cover. Turn the engine over slowly two times, verify the tappets, put a thread sealant on the timing chain tensioner plug and screw it well. Finally, for the models of 2015 and later, lightly coat the surfaces in contact with the camshaft with clean engine oil, fit the camshaft, apply RTV sealant to the contacted surfaces, lubricate the bearing journals, and tighten, the bearing cap bolts in sequence. Lastly, release the valve spring compressor assemblies and remove the special tool, fit the timing chain and sprocket and do the reverse of the above procedure and finally fill the engine with the oil.
    Posted by MoparPartsGiant Specialist
    Q:
    How to remove and install Camshaft in four cylinder engine on Dodge Avenger? Posted by Customer
    A:
    If you work on getting the timing right for 2014 or older cars, you need years of experience because minor mistakes could hurt your engine badly. First, take off the engine cover and unplug the negative battery cable. Turn the right front wheel's lug nuts loose. Then lift the car, take off the right front wheel, and the moisture shield beneath the drivebelt. Start by removing both oil and coolant from your engine. Then take off the drivebelt and the cover of the air filter. Unplug the ignition coils from the engine, take out the spark plugs, and keep track of where they go for easy reinstalling. Take off the valve cover, turn the crank to get the number 1 piston at highest point, make sure marks on cam phasers line up perfectly, and note location before removing them for reinstallation. Push the tensioner lever up before using a special tool to lock it there. Slide a second locking device between the camshaft phasers, then use this device to hold both phasers in place while you separate them. Take off the bolts holding the camshaft bearing caps, reverse their order when removing them. Then, remove the front cap, pick up the intake camshaft from above, and follow by lifting the exhaust one. Release the end bolt and phaser from the journal of the exhaust camshaft before taking off the lower half of the bearing. Put a label on each lifter so you know which one belongs where, and check the camshaft bearing areas for damage. If necessary, replace the cylinder head. Make sure to change the camshaft when the height of its lobe measures more than 0.005 inch different from the factory specs. Pull the crank handle back and forth twice to turn the crankshaft. Make sure engine starts without a fight. Fit the phasers onto the camshaft grooves, keeping the markings lined up, then put on the bolts. Soak the lifters in clean engine oil, and put them back where they started. Also apply oil to the oil channels as you place it in. Place the timing chain onto the exhaust phaser sprocket, making sure all parts align correctly, then add the exhaust camshaft, followed by the intake camshaft. Put the camshaft bearing caps in their right spots, making sure they go in the right way. Tighten the bolts step by step. After checking engine timing marks fit together, take off the tools, turn engine two full times, then recheck the valve adjustment. Before closing up, apply thread sealant to the timing chain tensioner plug and mount it tightly. Finish reinstalling in the opposite order of removal.
    Posted by MoparPartsGiant Specialist
    Q:
    How to remove and install the Camshaft and Lash Adjuster in the V8 engine on Dodge Challenger? Posted by Customer
    A:
    Some engines above are provided with Multiple Displacement System (MOS) utilizing a particular camshaft, and the camshaft should be replaced with the intended camshaft type MOS. If the camshaft is replaced, all Lash Adjusters must also be replaced because they will have worn when the camshaft was worn and will continue to wear as the new camshaft wears. First, drain off the fuel system pressure and then, detach the connection of the negative terminal of the battery. On 2015 and later models with an Intelligent Battery Sensor (IBS), this connector should first be disconnected. Pull the coolant, next you remove the timing chain cover, timing chain and sprockets, cylinder heads and radiator. The Lash Adjuster rail mounting bolts to be detached from the engine block as well the Lash Adjusters which ought to be labeled so that the position of each of them may be ascertained. The Lash Adjusters might require a special tool for the removal, though, they can also be removed by a magnet or fingertips. It is recommended not to use pliers, in case of it, if the Lash Adjusters are to be changed, as this will cause their damage. For the 6.4L engines with the MOS, this may require correct deactivating roller Lash Adjusters in some cylinder. Before you uninstall the camshaft, use a dial indicator to gauge the endplay so as to document the movement. Loosen and take out the camshaft thrust plate, to take out camshaft, support it around the block area. Post extraction, degrease the camshaft and check bearings for wear or damage of journals because if the journals are worn or damaged then the camshaft and bearings may have to be replaced. The bearing journals and cam lobe heights should be measured to determine whether or not they have worn out excessively. It is also possible to check the camshaft lobes for discoloration and wear and the Lash Adjusters are to be cleaned. However, if new Lash Adjusters are used, the new camshaft has to be used likewise: do not reinstall used Lash Adjusters where the original camshaft has been removed. Grease the camshaft bearing journals and lobes and then gently push the camshaft into the engine. Fit in the camshaft thrust plate along with the timing chain in a correct manner so that the correct timing mark is achieved. Clean the Lash Adjusters with clean engine oil and re-installation of the Lash Adjusters in their rightful positions, and after that one fits the Lash Adjuster rail and tightens the mounting bolts. Perform what is known as the reverse of the removal steps, replenish the oil and filter, the cooling system, and after turning on the engine to check for oil pressure and leakage. If new components are added, it is necessary to idle the engine at about 2000 RPM for 15 to 20 minutes in order to seat them, and the oil and new filter after 500 miles.
    Posted by MoparPartsGiant Specialist
    Q:
    How to remove Camshaft and Camshaft Bearing in 3.3L and 3.8L engine on Dodge Grand Caravan? Posted by Customer
    A:
    This procedure is for the 3.3/3.8 liter engine only and the engine must be taken out of the car and placed in an engine stand for the second half of the work. To confirm camshaft lobe lift with the cylinder head installed remove the valve cover(s), and with the number one piston at TDC on the compression stroke, Place the wide end of a dial indicator over the engine above the plunger and use the thin end to push the plunger up until it fits over the pushrod then zero the indicator, turn the crank slowly clockwise till the needle stops and goes down, this note the maximum cam lobe lift. Do this for the other rocker arms and remaining valves but make certain that each piston is at TDC on the compression stroke. If the lobe lift is lower than the specifications laid down then it is apparent that cam lobe wear has happened, in which case a replacement of the camshaft becomes necessary. Remove the cylinder head and then with the help of the micrometer measure the lobe height and base circle and then find the lobe lift by subtracting the value of base circle from the value of lobe height. For removal, take off the timing chain, sprockets, lifters as well as the push rods Next, take off the camshaft thrust plate, and the you use a long bolt to act as a handle to pull out the camshaft gently while supporting the bearings not to be damaged. Check the journals for wear, pitting or seizure etc. wash the same and by using micrometer find out whether the size has been increased due to excessive wear or out of round condition. Check the camshaft lobes for any signs of colour change, roughness, or dimensional change; if the lobes are in healthy condition and lobe lift measurements are within the limit, the camshaft can be reused. Lay obverses of bearings with block and using a small hole gauge and micrometer check inside diameter and calculate the oil clearance this must indicate that it is a new bearing. Again camshaft bearing replacement involves some specific tools and hence the block should be taken to auto machine shop for handling.
    Posted by MoparPartsGiant Specialist
    Q:
    How to lubricate and install the camshaft in 3.3L and 3.8L engine on Dodge Grand Caravan? Posted by Customer
    A:
    It separately applies to 3.3L/3.8L V6 engines only. Start with molybase grease or engine assembly lube to the camshaft bearing journals as well as the cam lobes and make sure that cam lobes and journals are richly coated. After that, slide the camshaft in the engine, so that it supports it at the block nearby but do not scratch the bearings. Last but not the least; fit the thrust plate and bolts and then torque the bolts to the recommended value.
    Posted by MoparPartsGiant Specialist
    Q:
    How to replace the camshafts, timing chains, and phasers in 3.6L V6 engine on Jeep Grand Cherokee? Posted by Customer
    A:
    Care is needed here, due to the sophisticated timing system; the wrong move often results in terrible damage to the engine; only professionals should try this and if you are in doubt, do contact a professional. Quite as importantly, any work accomplished should be checked again before the engine is run. To make sure that the magnetic timing wheels on the camshafts do not accidentally encounter magnets or magnetic fields, the valve covers must be taken off; in this case, the wheels must be replaced. Each of the camshafts' timing chain can be easily removed when using the right tools; however, it is only possible to do it if, at least, the timing chain cover and the chains are removed. First remove the negative battery terminal and then drain the engine oil and coolant, after that remove the drive belt, air filter housing, resonator and last but the intake manifold. Pull all wires and vacuum hoses off the cylinder heads, color-code them to install them back again, and then take off the ignition coils along with the spark plugs; color-code the coils too. Once you have lifted the valve covers turn the crankshaft until the #1 piston is on the exhaust stroke and the camshaft phaser marks line up. Locate the camshaft phasers to the timing chains for future installation then using a specific tool to hold the tensioner the camshaft phaser lock tool is inserted. The oil control valves need to be loosened and then detached from the camshafts, the intake and exhaust phaser needs to be unscrewed from the camshafts with the phaser lock still engaged. Turn both camshafts anti-clockwise until they are in a position that is believed to be mid-way, remove the sheer bolts and the caps and lift the camshafts upwards. Use and remove the rocker arms and hydraulic lash adjusters, clean the camshaft bearing surface and lobes, if there is any damage MARK 10 and replace all defective parts. For build to be installed, the hydraulic lash adjusters should be dipped in clean engine oil, while both the rocker arm contact points should be greased appropriately; the installation of camshafts on the cylinder head should also be done at the right angle. Move to the next step and tighten the bearing caps, check their alignment and then fit the phasers and oil control valves; all the assemblies should be rightly tightened. Last and final step is to turn the engine for alignment marks and other reassembly and installation process, which will be in the reverse order or removal.
    Posted by MoparPartsGiant Specialist
    Q:
    How to inspect and replace camshafts in 3.7L V6 and 4.7L V8 engine on Ram 1500? Posted by Customer
    A:
    Take out the negative battery cable. Take off the valve cover(s). Turn the engine in a clockwise direction with a socket and ratchet until "V6" or "V8" marks are at 12 o'clock position on the camshaft sprockets. Put alignment marks on both camshaft sprockets by putting it on chain links of two timing chains. At the end of their torque specs, loosen and re-torque cam sprocket bolts by hand. Put a wedge in behind the secondary chain and tensioner to hold it in place.Set retaining bolts aside that were used for holding on camshaft sprockets. Unbolt the sprocket from its hub without disconnecting any other part of this unit.Remove chains that have been tied to either side of such metal rings.Ensure you have memorized signs depicted on those covers.Loose all screws that hold caps down.Remove cylinders' heads; thereby removing shafts.Check if they are still in good condition after long usage.Comply with measurements for outside diameter specified by manufacturer.Measure run out as well as play.You should compare lobe heights if necessary.Start installing assembly oils into cylinder head cavity prior to pushing camshafts there.Thus, bearing caps must be screwed together and tightened accordingly.Put teeth of this gear near driving chain unit while fixing one's position against pin over camshaft hub.Wipe clean or apply lubrication oil before securing camshaft cog bolts.Finally, remove wedges from timing chains sensors.Set up CMP sensors.Attach valve covers.Secure negative cables again to their proper locations.
    Posted by MoparPartsGiant Specialist
    Q:
    How to inspect, remove, and reinstall the camshaft, camshaft bearing, and lash adjuster in the 4.0L and 4.2L V6 engine on Jeep Wrangler? Posted by Customer
    A:
    One of the best indicators of camshaft wear can be gotten without even having to pull the camshaft, and that is through the measurement of lobe lift. For the particularity of lifting only, some particular protocols have to be followed in the removal process. Start with the detaching of the radiator, fan, and the fan shroud. On air conditioning mounted models, loosen with a screwdriver the condenser assembly so that it comes off but the refrigerant lines need not be disconnected; to get the battery case out of the way may be necessary. Subsequently, release the distributor, if you wish, you can take out the front bumper or grille to free the camshaft and pull it out from the frontal part of the engine. Disconnect the spark plug wires and take them off and take off the cylinder head. The valve Lash Adjusters have to be removed by using magnetic pick-up tool or by a special Lash Adjuster removal tool and must be stored apart for re-use in the same bores. Disconnect the timing chain and sprockets, and with some force, pull the camshaft out and if need be, temporarily put the sprocket bolt back in to act more as a handle while holding the cam to avoid scratching the bearings. Check out the Lash Adjusters to the following specifications Depending on the location of the camshaft bearing, replacement is very tricky and demands special tools, so it is recommended that the engine block be taken to automotive machine shop for the job. If the camshaft is wearing on the timing chain cover side then examine camshaft thrust pin and spring and also observe the RTV oil pressure relief hole on rear cam journal. Before inserting the camshaft into the engine, the camshaft journals and lobes must be lubricated using moly-base grease or engine assembly lube, the camshaft must be supported near the block to avoid damaging the bearings. As for removal, the installation procedure is the reverse and before starting and running the engine change the oil and filler.
    Posted by MoparPartsGiant Specialist
    Q:
    How to disconnect and remove components from the engine before reinstalling the camshaft and related parts in 3.6L V6 engine on Jeep Wrangler? Posted by Customer
    A:
    Remove the one end of the cable and strip the other end of all the connections, dispose of the engine oil and the coolant and lastly, remove the drivebelt. Remove the air filter housing and resonator; the intake manifolds, and then exhaust from the cylinder head(s). Remove all wires and vacuum hoses from the cylinder heads and it is advisable to label all them for simplification of the reconnection process. Remove the ignition coils and spark plugs, while Tagging the ignition coils in order for easy identification. Firstly, you have to unscrew the valve covers, where there are the magnetic timing wheels, and under no circumstances should these wheels touch magnets or any magnetic field: if they do, then they have to be replaced. Turn the crankshaft to the right to set the #1 piston on the exhaust top dead centre with camshaft phaser arrow and scribe lines in order positions. Position the camshaft phasers as they will be replaced on the timing chains. Place a special tool into the tensioner to 'loc-k' the pawl off the rack and then use the chain holding tool, sliding it between the cylinder head and the chain guide. Insert the camshaft phaser lock tool across the two camshaft phasers, may turn the intake camshaft to fit during installation. Pull off each oil control valve from the phaser end of the camshaft; the intake and the exhaust phaser have to be slid forward until they are off the camshafts but still have the phaser lock in place. Turn both of the camshafts anti-clockwise about 30 degrees BTDC to align them to a standard position and then slacken the camshaft bearing cap bolts in a sequence which is reverse to that adopted prior to tightening them. Take off the camshaft bearing caps and raise the camshafts out of the cylinder head while both the rocker arms and hydraulic lash adjusters are to be marked for assembly. The condemnable parts are the camshaft bearing surfaces where there is any sign of damage and the camshaft lobe heights and within each type of lobe there is no considerable disparity. Rocker arms and shafts should be inspected for wear and any worn out parts should be replaced as well. It is advisable to favor an auto electrician with at least two spins of the crankshaft before engaging the starter motor with the engine off, and feel for resistance. Give the hydraulic lash adjusters a bath in clean engine oil before fitting them and, on assembling, put some grease on the rocks on the rocker arm. Apply some oil on the camshaft bearing journals and lobes and then put them back into the cylinder head in the right orientation. Fit the camshaft bearing caps and torque them in a crisscross pattern and while tightening make sure that the alignment holes are in neutral. In this step place both the intake and exhaust phaser on the camshafts and make sure that they are aligned properly before installing the oil control valves and finaly screw the bolts. Take off the chain holding tool and push with pressure the tensioner plunger to prevent the camshafts from rotating. Tip the engine two full revolutions and check the alignment marks and complete the installation procedures in the reverse of the removal process.
    Posted by MoparPartsGiant Specialist
    Q:
    What should be done if Camshaft lobe height variations exceed 0.010 inch (0.254 mm) for the 2013 Dodge Challenger? Posted by Customer
    A:
    The camshaft must be replaced.
    Posted by MoparPartsGiant Specialist
    Q:
    What is the first step in the procedure for the Camshaft on the 2014 Dodge Challenger? Posted by Customer
    A:
    Begin by disconnecting the negative battery cable, ensuring that on 2015 and later models with an Intelligent Battery Sensor, the IBS connector is disconnected first.
    Posted by MoparPartsGiant Specialist
    Q:
    What lubricant should be applied during installation of the Camshaft for the 2013 Jeep Grand Cherokee? Posted by Customer
    A:
    Apply moly-based engine assembly lubricant to the camshaft lobes and journals.
    Posted by MoparPartsGiant Specialist
    See Complete Installation and Repair Tips
    Q:
    What does it mean when it says "replaced by" with a different part number. Which part number was replaced or is the newer one ? Posted by Customer: 2015 Dodge Journey
    A:
    5184380AH is the newest part number
    Posted by MoparPartsGiant Specialist 5/8/2025

Genuine Mopar Part 5184380AF, the Right Choice

To ensure reliability, purchase Mopar part # 5184380AF Engine Intake Camshaft. It is sometimes referred to as Camshaft. The OEM parts should be used when the Mopar owners want to maximize their driving experience. The high-tech factories that produce these parts utilize sophisticated technology specifically designed to meet stringent factory requirements. Additionally, they are thoroughly tested and can thus be used with reliability by Mopar owners. This part fits specific Chrysler 200, 300, and Town & Country models.

MoparPartsGiant.com is a leading supplier of genuine Mopar parts and accessories such as 5184380AF Engine Intake Camshaft. Wondering where to find exceptional quality and affordable OEM Mopar parts? You have already come to the right place. Our website boasts a huge selection of genuine Mopar parts at attractive prices. Further, all parts come with a manufacturer's warranty. For detailed Chrysler parts information, click here.

Why choose Mopar Parts Giant

  • Dedicated Service

    Your complete satisfaction is our #1 goal

  • Lowest Prices

    Best deals on genuine OE parts from dealerships

  • Fast Delivery

    Orders are processed and delivered promptly