Make sure this part fits

Chrysler 5184693AE Engine Intake Manifold

2011-2023 Chrysler 5184693AE

Customer Questions & Expert Answers (11)
5184693AE Mopar Engine Intake Manifold Product Photo 1 of 4
  • Part Description
    Manifold-Intake Manifold ; Plenum Intake Manifold
  • Replaces
    68621090AA
  • Manufacturer
    Mopar
Make sure this part fits
$366.30 MSRP: $560.00
You Save: $193.70 (35%)
1
ADD TO CART
  • Related Parts
  • Specifications
  • Fitment
  • Q&A
  • Product Specifications

    BrandGenuine Chrysler
    Manufacturer Part Number5184693AE
    Part DescriptionManifold-Intake Manifold ; Plenum Intake Manifold
    Other NamesIntake Manifold, Intake Plenum, Plenum
    Item Dimensions24.2 x 23.1 x 7.1 inches
    Item Weight10.80 Pounds
    ConditionNew
    Fitment TypeDirect Replacement
    Replaces68621090AA
    ManufacturerMopar
    SKU5184693AE
    WarrantyThis genuine Mopar part is guaranteed by Mopar's factory warranty.
    Shipping & ReturnShipping Policy Return Policy
    Warning: California's Proposition 65
  • Vehicle Fitment

    Year Make Model Engine Important vehicle option details
    2011-2014 Chrysler 2006 Cyl 3.6LLimited Convertible, Limited Sedan, LX Sedan, S Convertible, S Sedan, Touring Convertible, Touring Sedan
    2011-2023 Chrysler 3006 Cyl 3.6LBase AWD, Base RWD, C AWD, C John Varvatos AWD, C John Varvatos RWD, C Luxury Series AWD, C Luxury Series RWD, C Platinum AWD, C Platinum RWD, C RWD, Limited AWD, Limited RWD, S AWD, S Luxury Series RWD, S RWD, S V6 AWD, S V6 RWD, Touring AWD, Touring RWD
    2011-2016 Chrysler Town & Country6 Cyl 3.6LGold, Limited, Limited Platinum, LX, S, Touring, Touring L, Touring-L
  • Customer Questions & Expert Answers

    Q:
    Please cross check for fit. Posted by MoparPartsGiant Specialist
    A:
    You can Select Your Vehicle to check if 5184693AE fits your vehicle.
    Posted by MoparPartsGiant Specialist
    Installation and Repair Tips
    Q:
    How to remove and install the intake manifold in four cylinder engine on Chrysler 200? Posted by Customer
    A:
    On 2014 and earlier models, the intake manifold is mounted to the front side of the cylinder head, while on 2015 and later models, it is mounted at the rear. To begin removal, relieve the fuel system pressure and disconnect the negative battery cable. For 2014 and earlier models, remove the engine cover, air inlet resonator, ignition coil pack, and fuel rail assembly. Disconnect the oil temperature sensor and unplug the electrical connectors from the VVT solenoid, MAP sensor, and CMP sensor, moving the electrical harness out of the way. Disconnect the throttle body electrical connector, remove fasteners from the throttle body support bracket, and label then disconnect the vacuum lines to the manifold. If replacing the intake manifold, remove the throttle body; otherwise, it can remain attached. Remove the intake manifold fasteners and gasket. For 2015 and later models, raise the front of the vehicle and support it securely, then remove the front suspension subframe and right driveaxle. Unscrew the intake manifold lower bracket, remove the intake tube, and loosen the upper support bracket bolts. Remove the throttle body bracket and throttle body, cut through the fuel injector foam silencing pad, disconnect the VVAA solenoid electrical connectors, and remove the intake manifold silencer cover. Disconnect the fuel injector electrical connectors and various vacuum hoses, labeling them as necessary. Disconnect the MAP sensor electrical connector, release the wiring harness clips, and remove the intake manifold bolts and nuts. Inspect the intake manifold mating surface for warpage, and if necessary, resurface or replace it. Clean all gasket surfaces before installing the new manifold with a new gasket, tightening the fasteners gradually and evenly in the specified sequence, and complete the installation in reverse order of removal.
    Posted by MoparPartsGiant Specialist
    Q:
    How to remove and install the intake manifold in four cylinder engine on Dodge Avenger? Posted by Customer
    A:
    In 2014 and older models, the intake takes its place from the front side of the head, while it is shifted to the back for 2015 and newer models. Before removing the intake manifold, first lower fuel pressure within the system, and disconnect the negative battery terminal. First, slide off the engine cover by removing it from the ballstuds. Next, pull the air inlet resonator off its connectors. You can remove the ignition coil unit from the valve cover, and remove the fuel rail and other fuel system components at once. Pulling power from three key sensors, detach the wiring connections for the Variable Valve Timing solenoid, the Manifold Absolute Pressure sensor, and the intake Camshaft Position sensor, moving the cable connector from its place. Disconnect the throttle body electrical connector, remove the holding screws from the bracket linking the throttle body to transaxle, and loosen the bracket's final transaxle fixture. Step by step, free up the intake manifold by removing and labeling its wiring harness holder and putting off the vacuum lines. You can take the throttle body off before servicing or replacing the intake manifold, but you don't need to if all you're doing is working on the cylinder head. Take out the intake manifold by removing its bolts along with the washers, and then replace the manifold gaskets. Before installing the intake, run a straightedge and a feeler gauge over the mating surface to find warpage. If warping goes beyond allowed limits, you must either get the surface resurfaced or buy a new intake. Before installing, rinse all gasket contact areas. Place the foam pad correctly over the coolant transfer tube for 2015 and later models. With a fresh gasket in place, put the intake manifold onto the studs and snug down the fasteners step by step, from one end to the other, according to the torque chart. Installation is otherwise the reverse of removal.
    Posted by MoparPartsGiant Specialist
    Q:
    How to remove and install the engine cover and intake manifold in V8 engine on Dodge Challenger? Posted by Customer
    A:
    To remove the engine cover, first take off the oil cap and lift the cover off the four support grommets. Relieve the fuel system pressure and disconnect the cable from the negative terminal of the battery, ensuring that on 2015 and later models with an Intelligent Battery Sensor, the IBS connector is disconnected first. Next, remove the air filter housing and the intake air duct, followed by the ignition coils and, for 2005 models, the spark plug wires. Disconnect the brake booster vacuum hose, canister purge hose, and the PCV hose. As a precaution, remove the fuel rails and injectors. For 2010 and earlier 5.7L engines, remove the EGR pipe from the intake manifold. Disconnect the electrical connectors from the MAP sensor and the throttle body. Loosen the intake manifold bolts starting with the outer bolts and working inward in 1/4-turn increments until they can be removed by hand, then take off the intake manifold, checking for and disconnecting anything still attached. When installing, ensure the mating surfaces of the cylinder heads and intake manifold are perfectly clean, avoiding harsh chemicals on the plastic manifold. Check the O-rings on the intake manifold for damage; if they are fine, they can be reused, otherwise, install new ones ensuring they seat properly. Carefully set the manifold in place without disturbing the rubber seals or moving it after contact with the cylinder heads to prevent vacuum and oil leaks. Install the intake manifold bolts and tighten them following the recommended sequence to the specified torque. The remaining installation steps follow the reverse order of removal, and after starting the engine, check for vacuum leaks at the intake manifold joints.
    Posted by MoparPartsGiant Specialist
    Q:
    How to properly install an intake manifold in 3.5L V6 engine on Dodge Challenger? Posted by Customer
    A:
    First step of refueling involves, reducing the pressure on fuel system and then unhook the negative end of the car battery. Second, unbolt and take out the air filter housing, mark all the hoses and electrical connectors connected to the intake manifold and throttle body, and the bolt that passes through the EGR pipe and secured to the upper intake manifold. After that, unbolt the brackets from the throttle body and the right side of the upper intake manifold, then unbolt the upper intake manifold from the outer bolt and work towards the inside, then lift up the upper intake manifold from the engine. Scrub the contact surfaces of the lower intake manifold and the upper manifold and check condition of the rubber O-ring gasket, if it is still used it will be adequate. Place the gasket into the groove in the upper intake manifold and then, put the upper intake manifold in position on the lower intake manifold tighten the bolts on the circular pattern starting with the center bolts. For the lower intake manifold, have the cooling system drained, pull off the upper intake manifold, further disconnection of hose that may hinder the process of pulling off of the lower intake manifold, further removal of the fuel rail and injectors. Then, drain the coolant and fix the heater hoses and the coolant hoses, then unscrew the remaining manifold mounting bolts/nuts in turns until you can unscrew them manually, and in avoiding prying between the manifold and the heads to avoid damaging gasket sealing surfaces. Flipping the manifold over, then, specify the heater supply tube and replace the O-ring with 'a new one.' Taking much care gently scrape off any remaining gasket debris as well as the sealants, from the manifold and heads before cleaning the joints. Rear cylinder head water passages should be sealed with an RTV before fitting in new gaskets and add the intake manifold gaskets to the cylinder heads and again apply RTV sealant to the manifold side of the gaskets round the water passages. Locate the manifold into position whilst incorporating the gaskets and aligning the manifold over the ports of the cylinder heads, put the fuel rail with injectors onto the lower manifold, afterwards attach the manifold mounting bolts. Tightening sequence-tighten nuts/bolts in several steps to the desired torque with the help of step by step sequence with the help of torque wrench. Last finish bottom up then put coolant in the radiator and crank the car up and look for any fuel, vacuum, or coolant leaks.
    Posted by MoparPartsGiant Specialist
    Q:
    How to remove and install the upper and lower intake manifolds in 2.7L V6 engine on Dodge Challenger? Posted by Customer
    A:
    To start, turn off the fuel pump, unplug the cable from the battery negative terminal and then wait for about fifteen minutes. Then, the air intake duct has to be taken off as well as the filter housing. Remove the upper intake manifold vacuum hoses and electrical connectors and unbolt and remove the vacuum and electrical connectors from the throttle body and the electronic throttle control system. Remove the EGR Pipe from the upper intake manifold which is followed by the removal of the upper Intake manifold support brackets. Relax the upper intake manifold bolts in the reverse order you tightened them and pull off the upper intake manifold including the foam insulator pad. Thoroughly wash and inspect the sealing surfaces of the upper intake manifold to the lower intake manifold, and if the existing gaskets supplied have damage to them then they should be replaced, however in most cases the gaskets that have been removed will not have any damage and can therefore be reused. The upper intake manifold has to be placed back onto the lower intake manifold and secured by tightened bolts in the proper sequence and using the appropriate torque to get them tightened. To get to the lower intake manifold first you must take off the upper intake manifold after that disconnect any of the hoses that may hinder you when removing the lower intake manifold. Disconnect the fuel rail and the injectors from the lower intake manifold, then 1/4 turn each of the lower intake manifold mounting bolts or nuts starting from the reverse sequence of how they were tighten to allow them to be unscrewed. Sometimes some force may be required to tear the gasket and separate the manifold from the cylinder heads, but do not pry between the manifold and the heads because the gasket sealing surfaces are easily damaged. Clean and inspect the sealing surfaces of the lower intake manifold to the cylinder head; gaskets if bad should be replaced, if not they can be reused. Align the second lower intake manifold to the engine with correct fit of gasket and manifold over the cylinder head. The fuel rail and injectors are inserted to the cylinder heads and lower manifold, and the fuel rail retaining bolts must be loosely put for the proper gasket orientation of the remaining lower intake manifold bolts. Torque the bolts gradually to the measured torque level and then reverse the process of removing them, and start the engine to note any signs of fuel leaks, vacuum leak and coolants leak.
    Posted by MoparPartsGiant Specialist
    Q:
    How to remove and install the intake manifold and ensure proper sealing in 5.7L,6.1L V8 and 6.4L V8 hemi engine on Jeep Grand Cherokee? Posted by Customer
    A:
    To remove the components begin by taking off the cowl cover then the cowl support brace and the windshield wiper motor support bracket. Subsequently, remove the pressure off the fuel system and unplug the connection of the negative terminal of the battery. Then, it is necessary to remove air filter housing, intake air duct and the ignition coils. Take off the brake booster vacuum hose and the PCV hose, the fuel rails and injectors. Remove the electrical connectors from IAT, MAP, TPS & ECT sensors. Remove the intake manifold bolts with 1/4 turn increments starting from outside and moving inwards till the bolts can be easily removed from the manufacturer and then the intake manifold should be removed and it should be ensured that all attachable things still attached to it are disconnected. In installation, the surfaces of the cylinder heads and intake manifold have to be clean for mating. On the intake manifold, examine O-rings for wear or deterioration; if they don't appear to be damaged or have become brittle, they may be reused; however, if they must be replaced ensure that they properly in position. In this procedure be very gentle when positioning the manifold so as not to shift the rubber seals whereby in case they are pushed out of their correct position, vacuum or oil leaks may occur. Place all the intake manifold bolts and tighten it in the sequence mentioned above up to the recommended torque of the bolts. The final steps of installation are, in fact, the steps in removal, and after starting the vehicle and bringing it up to operating temperature, search out vacuum leaks in the joints of the intake manifold.
    Posted by MoparPartsGiant Specialist
    Q:
    How to remove and install the lower intake manifold in 3.6L V6 engine on Jeep Grand Cherokee? Posted by Customer
    A:
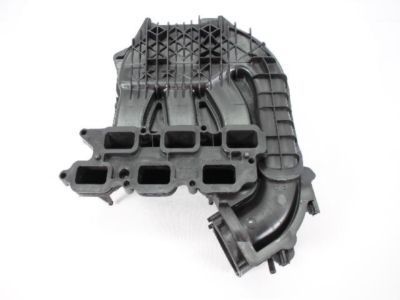
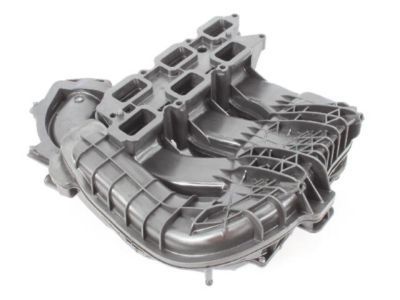
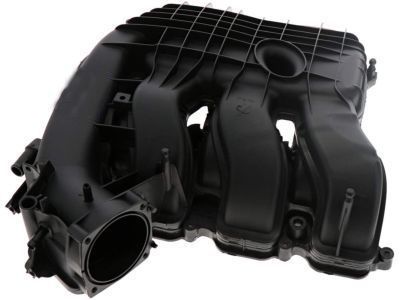
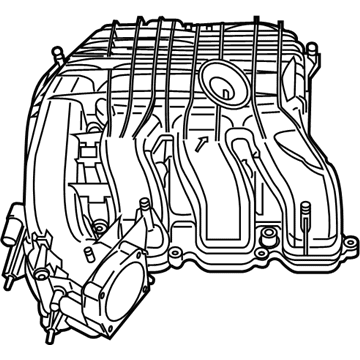
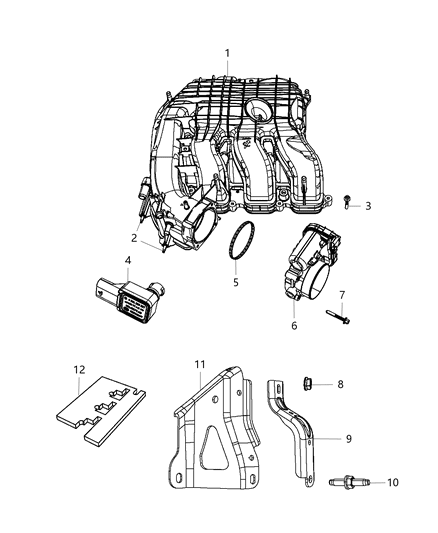
    To remove the lower intake manifold the following steps should be followed; switch off the engine and then relieve the fuel system pressure and then disarm the vehicle by disconnecting the cable from the battery negative terminal. If so equipped, then pull off the engine cover. Next, pull off the upper radiator hose retainer from the upper intake manifold, then disconnect the intake resonator by means of unbolting the resonator hose clamp and pulling out the resonator clip and disconnecting the resonator. Pull the harness connector from the MAP sensor, from the ETC, the PCV valve hose, the vapor purge hose and the brake booster hoses. Take out the wiring harness retainers from the upper intake support bracket, and the one from the stud bolt. Next, unbolt the nuts and stud bolt to give the upper intake manifold bracket so that it can be taken out, and the nut from bracket side of the heater core return tube. Take out all the support bracket to upper manifold nuts, and then slightly unscrew the manifold bolts but do not pull them out completely, remove the upper intake manifold. Remove the six upper-to-lower intake manifold seals and block the intake ports to avoid contamination of the engine. If necessary, unscrew the insulator of the front valve cover. In regard to the lower intake manifold, you will need to remove the fuel line that supplies fuel to the fuel rail, then remove the fuel injectors with the fuel rail still in place, we should note at this point that the lower intake manifold can be removed with the injectors and fuel rail still in place, however, it is recommended that caution is taken not to damage the injectors. Slide the wiring harness retainer off the end of the manifold and set the harness aside; then, remove the lower intake manifold bolts, and separate the manifold from the cylinder heads; discard the six manifold-to-cylinder head seals. When fitting the lower intake manifold it is necessary to ensure that the gasket surfaces of cylinder heads, cylinder block and intake manifold are as clean as possible; to do this gasket dissolving agents should be used. When all sealant and old gasket material must be removed with gasket scraper, and clean them up with lacquer thinner or acetone, and any gasket material that falls into the intake ports or lifter valley must be vacuumed down. If taken off, replace with the fuel injectors and fuel rail, and new intake manifold gaskets to the manifold without leaving rags or towels in the manifold ports. Slowly position the lower intake manifold and fix it to its proper position by engaging the mounting bolts on hand, then, tighten the bolts in a gradual manner to the recommended torque value following a sequencing pattern that has been recommended. The upper unit is installed, though it is advisable to inspect the condition of the rubbers fitted in each intake runner and replace if worn. If the insulator was removed, the mounting pins of the same shall be placed back in then also position the upper intake manifold on the lower intake manifold while threading the bolts up to the specified torque then tightening in sequence. These involve performing the reversal of the removal procedures, and if the cooling system was drained, refilling the system, engaging the engine and inspecting the system for leaks and adequate operations.
    Posted by MoparPartsGiant Specialist
    Q:
    What is the process for removing the lower Intake Manifold for the 2011 Chrysler 200? Posted by Customer
    A:
    First, remove the upper intake manifold, then label and detach any remaining hoses that may interfere with the removal. Remove the fuel rail and injectors, loosen the lower intake manifold mounting bolts in 1/4-turn increments until they can be removed by hand, and be cautious not to pry between the manifold and the heads to avoid damaging the gasket sealing surfaces.
    Posted by MoparPartsGiant Specialist
    Q:
    What is the procedure for installing a new Intake Manifold for the 2017 Dodge Grand Caravan? Posted by Customer
    A:
    If replacing either manifold, transfer the studs from the old manifold to the new one. For a SOHC engine, apply a thin coat of gasket sealant to the manifold sides of the new gaskets and place them in position on the manifolds.
    Posted by MoparPartsGiant Specialist
    Q:
    What components, including the Intake Manifold, should be removed after the cables for the 2014 Jeep Grand Cherokee? Posted by Customer
    A:
    Remove the ignition coils and fuel rails, followed by the throttle body and mounting bracket.
    Posted by MoparPartsGiant Specialist
    See Complete Installation and Repair Tips

Genuine Mopar Part 5184693AE, the Right Choice

To ensure reliability, purchase Mopar part # 5184693AE Engine Intake Manifold. It is sometimes referred to as Intake Manifold. The OEM parts should be used when the Mopar owners want to maximize their driving experience. The high-tech factories that produce these parts utilize sophisticated technology specifically designed to meet stringent factory requirements. Additionally, they are thoroughly tested and can thus be used with reliability by Mopar owners. This part fits specific Chrysler 200, 300, and Town & Country models.

MoparPartsGiant.com is a leading supplier of genuine Mopar parts and accessories such as 5184693AE Engine Intake Manifold. Wondering where to find exceptional quality and affordable OEM Mopar parts? You have already come to the right place. Our website boasts a huge selection of genuine Mopar parts at attractive prices. Further, all parts come with a manufacturer's warranty. For detailed Chrysler parts information, click here.

Why choose Mopar Parts Giant

  • Dedicated Service

    Your complete satisfaction is our #1 goal

  • Lowest Prices

    Best deals on genuine OE parts from dealerships

  • Fast Delivery

    Orders are processed and delivered promptly