My Garage
My Account
Cart
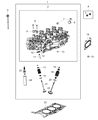
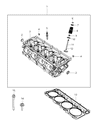
Genuine 2013 Dodge Challenger Cylinder Head
Head- Select Vehicle by Model
- Select Vehicle by VIN
Select Vehicle by Model
orMake
Model
Year
Select Vehicle by VIN
For the most accurate results, select vehicle by your VIN (Vehicle Identification Number).
11 Cylinder Heads found


2013 Dodge Challenger Engine Cylinder Head
Part Number: RL141353AA$981.05 MSRP: $1190.00You Save: $208.95 (18%)Product Specifications- Other Name: Head Assembly Engine Cylinder
- Replaced by: 68141353AC
- Item Weight: 36.60 Pounds
- Item Dimensions: 9.6 x 12.6 x 20.6 inches
- Condition: New
- Fitment Type: Direct Replacement
- SKU: RL141353AA
- Warranty: This genuine part is guaranteed by Mopar's factory warranty.


2013 Dodge Challenger Cylinder Head
Part Number: R8225256AA$437.65 MSRP: $527.00You Save: $89.35 (17%)Product Specifications- Other Name: Head Cylinder Right
- Item Weight: 40.00 Pounds
- Item Dimensions: 20.8 x 12.8 x 9.7 inches
- Condition: New
- Fitment Type: Direct Replacement
- SKU: R8225256AA
- Warranty: This genuine part is guaranteed by Mopar's factory warranty.


2013 Dodge Challenger Engine Cylinder Head
Part Number: RL141352AB$1005.25 MSRP: $1215.00You Save: $209.75 (18%)Product Specifications- Other Name: Head Assembly Engine Cylinder Warning: Cylinder Heads Are Shipped Without Oil Gallery Bolts/Plugs, Bolt/Plug Kit 68154699AA Must Be Used Or Trouble Codes Will Be Set.
- Replaced by: 68141352AD
- Item Weight: 34.30 Pounds
- Item Dimensions: 20.4 x 12.5 x 10.2 inches
- Condition: New
- SKU: RL141352AB
- Warranty: This genuine part is guaranteed by Mopar's factory warranty.


2013 Dodge Challenger Cylinder Head
Part Number: R8225257AA$437.65 MSRP: $527.00You Save: $89.35 (17%)Product Specifications- Other Name: Head Cylinder Left
- Item Weight: 40.10 Pounds
- Item Dimensions: 35.7 x 12.2 x 14.4 inches
- Condition: New
- Fitment Type: Direct Replacement
- SKU: R8225257AA
- Warranty: This genuine part is guaranteed by Mopar's factory warranty.


2013 Dodge Challenger Engine Cylinder Head
Part Number: 68086556AA$1062.45 MSRP: $1285.00You Save: $222.55 (18%)Product Specifications- Other Name: Head Assembly Engine Cylinder
- Replaced by: 68280511AD
- Item Weight: 40.80 Pounds
- Item Dimensions: 24.6 x 12.3 x 9.4 inches
- Condition: New
- Fitment Type: Direct Replacement
- SKU: 68086556AA
- Warranty: This genuine part is guaranteed by Mopar's factory warranty.
2013 Dodge Challenger Head-Head Assembly
Part Number: RL086556AA$1062.45 MSRP: $1285.00You Save: $222.55 (18%)Product Specifications- Other Name: Head Assembly Engine Cylinder
- Replaced by: 68280511AD
- Item Weight: 40.00 Pounds
- Item Dimensions: 23.7 x 12.0 x 9.5 inches
- Condition: New
- Fitment Type: Direct Replacement
- SKU: RL086556AA
- Warranty: This genuine part is guaranteed by Mopar's factory warranty.

2013 Dodge Challenger Cylinder Head
Part Number: RL021608DE$243.41 MSRP: $284.00You Save: $40.59 (15%)Product Specifications- Other Name: Head Cylinder Right
- Replaced by: 53021608DF
- Item Weight: 49.00 Pounds
- Item Dimensions: 9.5 x 19.4 x 18.9 inches
- Condition: New
- SKU: RL021608DE
- Warranty: This genuine part is guaranteed by Mopar's factory warranty.
2013 Dodge Challenger Engine Cylinder Head
Part Number: RL086555AA$452.31 MSRP: $525.00You Save: $72.69 (14%)Product Specifications- Other Name: Head Assembly Engine Cylinder
- Replaced by: 68280510AD
- Item Weight: 48.80 Pounds
- Item Dimensions: 24.7 x 12.4 x 9.6 inches
- Condition: New
- SKU: RL086555AA
- Warranty: This genuine part is guaranteed by Mopar's factory warranty.
2013 Dodge Challenger Cylinder Head
Part Number: 68086555AA$452.31 MSRP: $525.00You Save: $72.69 (14%)Product Specifications- Other Name: Head Assembly Engine Cylinder
- Replaced by: 68280510AD
- Item Weight: 40.70 Pounds
- Item Dimensions: 23.9 x 12.0 x 9.4 inches
- Condition: New
- SKU: 68086555AA
- Warranty: This genuine part is guaranteed by Mopar's factory warranty.
 Product Specifications
- Other Name: Head Cylinder Warning: Cylinder Heads Are Shipped Without Oil Gallery Bolts/Plugs, Bolt/Plug Kit 68154699AA Must Be Used Or Trouble Codes Will Be Set.; Cylinder Head
- Condition: New
- Fitment Type: Direct Replacement
- SKU: 5184451AK
- Warranty: This genuine part is guaranteed by Mopar's factory warranty.
 Product Specifications
- Other Name: Head Cylinder Left
- Replaced by: 53021609DF
- Item Weight: 35.60 Pounds
- Item Dimensions: 24.6 x 12.3 x 9.5 inches
- Condition: New
- Fitment Type: Direct Replacement
- SKU: RL021609DE
- Warranty: This genuine part is guaranteed by Mopar's factory warranty.
2013 Dodge Challenger Cylinder Head
On our website, we proudly offer genuine 2013 Dodge Challenger Cylinder Head at the market's great competitive prices. We are confident that choosing brand new OEM 2013 Dodge Challenger Cylinder Head from our site will save you both trouble and money.
2013 Dodge Challenger Cylinder Head Parts Questions & Experts Answers
- Q: How to remove and install Cylinder Head in 2.7L V6 engine on 2013 Dodge Challenger?A: As provide in this procedure, the engine must be cool before proceeding to this part of the task. First, first, the main timing chain and sprockets should be pulled out but be careful not to disturb crankshaft alignment marks. Subsequently, the camshafts have to be taken out of the cylinder head together with the rocker arms and hydraulic lash adjusters and have to be labeled according to the valve they belong to in order to be reinstalled later on in the same place. cut out the lower intake manifold and the exhaust manifold(s). Any remaining parts that are fastened on the cylinder head must be disconnected; including coolant fittings, ground straps cables, hoses, wires or brackets, water outlet housing should be detached by removing the heater supply bolts. Loosen the cylinder head bolts in a increment of 1/4 turn with the breaker bar in cooperation with the right sized socket in the reverse sequence of the lightening sequence in order to avoid warping or cracking the head and then go ahead and remove the bolts. You will remove the cylinder head including the exhaust manifold bolted to it-use a pry-bar if required. Before servicing it is advisable to dismantle all the external components of the cylinder head so as to clean them as well as assess their condition at an automotive machine shop. Also on engine installation, it is critical to guarantee that the mating surfaces of the cylinder head and block are devoid of any grime, carbon accumulation and old gasket material, a gasket scraper should be employed, and in addition, clean the surface with acetone or lacquer thinner. The cylinders should be packed with clean shop rag to eliminate finer material landing in the cylinder, and in case this occurs, use a vacuum cleaner to remove the substance. Practical: 22 Inspect block and head mating for damage Use file for slight damaged and consider machining if they are severely damaged for effective functioning. Nuke the threads in the head bolt holes with a tap which has the right thread as you make the clearance and clean them by blowing with compressed air. When all the bolts have been washed and dried, place each of them on a metal ruler or a straightedge; the thinned parts should be indicative of bolts that have stretched and must be changed. It is recommendable to replace the head bolts with new ones since they are manufactured to suit the engine. Check the cylinder head for warpage, this can be done via use of a precision straightedge along with feeler gauges, if it is warping then it should be machined. Replace those components which were removed from the head, place the new cylinder head gasket over the dowel pins of the block then put the head over the dowel and ensure the gasket is not shifted. Before tightening the head bolts, it will be necessary to lubricate the threaded parts and the hardened washers with clean engine oil: the chamfered surface of the washers should be positioned towards the heads of the bolts. Replace the bolts in the thread holes and just spin each of them, tighten all the bolts in stages as specified are outlined below. A few of these are the lash adjusters and the rocker arms, the camshafts, and finally the primary timing chain and its sprockets. Last but not the least, fill the cooling system to the required levels, replace the engine oil and the filter, switch on the engine and look for signs of oil or coolant leaks.
Related 2013 Dodge Challenger Parts
 2013 Dodge Challenger Cylinder Head Gasket
 2013 Dodge Challenger Rocker Arm
 2013 Dodge Challenger Camshaft
 2013 Dodge Challenger Timing Cover
 2013 Dodge Challenger Spool Valve