My Garage
My Account
Cart
Genuine Dodge Ramcharger Piston Ring Set
Piston Ring- Select Vehicle by Model
- Select Vehicle by VIN
Select Vehicle by Model
orMake
Model
Year
Select Vehicle by VIN
For the most accurate results, select vehicle by your VIN (Vehicle Identification Number).
5 Piston Ring Sets found


Dodge Ramcharger Piston Ring Set
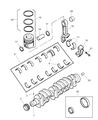
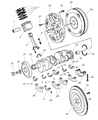
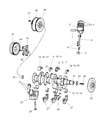
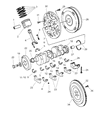
The Dodge Ramcharger Piston Ring Set ensures that combustion pressure is sealed tightly for smooth power from fuel explosions. Located in a groove between the piston and the cylinder wall, a Piston Ring Set uses spring tension and the precision facing of the metal ring to prevent the escape of gases from the combustion chamber. It also works to return excess oil to the sump and to conduct heat into the block. The early Dodge Ramcharger models relied on thicker cast iron rings that had higher friction but were more durable. Later engines found in the Ramcharger applied thinner steel or ductile iron Piston Ring Set that had a plasma moly or chromium coating for reduced drag and better conformity in the bore. The modern 1 mm top and 2 mm second rings of a contemporary Piston Ring Set limit mechanical loss while still permitting use of a third oil-control ring whose task is to scrape and meter lubrication. Dodge's evolution of powerplants hasn't changed the fact that the Piston Ring Set keeps every Dodge cylinder sealed and every Ramcharger ride responsive, balancing tight compression, efficient oil control and long service life.
Looking for affordable and high-quality auto parts? Then you have already arrived at the proper online shop. We offer all Dodge Ramcharger Piston Ring Set at great affordable prices. Moreover, all genuine Dodge Ramcharger Piston Ring Set come with a manufacturer's warranty. In the long run, you would realize you have saved a lot of trouble and money with OEM parts from here.
Dodge Ramcharger Piston Ring Set Parts Questions & Experts Answers
- Q: How to check and install piston ring set end gaps before engine assembly on Dodge Ramcharger?A:Before installing the new piston rings, check the ring end gaps. Lay out the piston/connecting rod assemblies and the new ring sets to match the rings with the same piston and cylinder during the end gap measurement and engine assembly. Insert the top ring into the first cylinder and square it up with the cylinder walls using the piston, ensuring the ring is at the bottom of the cylinder just below the lower limit of the ring travel. To measure the end gap, slip a feeler gauge between the ends of the ring and compare the measurement to the specifications. If the gap is larger or smaller than specified, double-check to ensure the correct rings are being used. If the gap is too small, it must be enlarged to prevent the ring ends from contacting each other during engine operation, which can cause serious damage. Increase the end gap by carefully filing the ring ends with a fine file, ensuring to file only from the outside in. Excess end gap is not critical unless it exceeds 0.040-inch. Repeat the procedure for each ring in the first cylinder and for each ring in the remaining cylinders, keeping rings, pistons, and cylinders matched. Once the ring end gaps have been checked and corrected, install the rings on the pistons, starting with the oil control ring, which consists of three components. Slip the spacer expander into the groove, then install the upper side rail without using a piston ring tool to avoid damage. Place one end of the side rail into the groove and slide a finger around the piston while pushing the rail into the groove, then install the lower side rail in the same manner. After installing the three oil ring components, ensure both the upper and lower side rails can turn smoothly in the ring groove. Next, install the middle ring using a piston ring installation tool, ensuring the mark faces up, and do not expand the ring more than necessary. Finally, install the top ring in the same manner and repeat the procedure for the remaining pistons and rings.


