My Garage
My Account
Cart
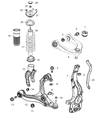
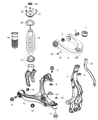
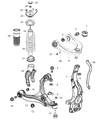
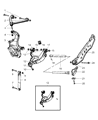
Genuine Dodge Durango Control Arm
Suspension Arm- Select Vehicle by Model
- Select Vehicle by VIN
Select Vehicle by Model
orMake
Model
Year
Select Vehicle by VIN
For the most accurate results, select vehicle by your VIN (Vehicle Identification Number).
69 Control Arms found


Dodge Durango Rear Lower Control Arm
Part Number: 52113275AC$124.08 MSRP: $184.00You Save: $59.92 (33%)


Dodge Durango Front Upper Control Arm
Part Number: 68282329AA$273.18 MSRP: $411.00You Save: $137.82 (34%)


Dodge Durango Front Upper Control Arm
Part Number: 68282328AA$288.79 MSRP: $437.00You Save: $148.21 (34%)


Dodge Durango Lower Control Arm Right
Part Number: 68282728AC$664.40 MSRP: $1010.00You Save: $345.60 (35%)


Dodge Durango Front Lower Control Arm
Part Number: 68282729AB$664.40 MSRP: $1010.00You Save: $345.60 (35%)


Dodge Durango Lower Control Arm
Part Number: 68282729AC$664.40 MSRP: $1010.00You Save: $345.60 (35%)


Dodge Durango Front Lower Control Arm
Part Number: 68282728AB$664.40 MSRP: $1010.00You Save: $345.60 (35%)


Dodge Durango Rear Lower Control Arm
Part Number: 52124811AG$464.20 MSRP: $704.00You Save: $239.80 (35%)


Dodge Durango Lower Control Arm Right
Part Number: 5168158AB$473.00 MSRP: $723.00You Save: $250.00 (35%)


Dodge Durango Front Upper Control Arm
Part Number: 68217808AA$178.88 MSRP: $265.00You Save: $86.12 (33%)


Dodge Durango Front Upper Control Arm
Part Number: 68217809AA$178.88 MSRP: $270.00You Save: $91.12 (34%)


Dodge Durango Front Upper Control Arm Left
Part Number: 68291037AB$229.69 MSRP: $347.00You Save: $117.31 (34%)


Dodge Durango Front Lower Control Arm
Part Number: 5168158AA$473.00 MSRP: $723.00You Save: $250.00 (35%)


Dodge Durango Control Arm Replaces
Part Number: 68022600AD$473.00 MSRP: $723.00You Save: $250.00 (35%)


Dodge Durango Front Upper Control Arm Right
Part Number: 68291036AB$229.69 MSRP: $347.00You Save: $117.31 (34%)


Dodge Durango Front Upper Control Arm
Part Number: 68046195AH$178.88 MSRP: $270.00You Save: $91.12 (34%)Dodge Durango Rear Lower Control Arm
Part Number: 52124810AG$518.40 MSRP: $794.00You Save: $275.60 (35%)
Dodge Durango Lower Control Arm Left
Part Number: 52855529AC$1005.40 MSRP: $1540.00You Save: $534.60 (35%)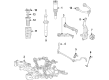
Dodge Durango Lower Control Arm
Part Number: 68282728AD$664.40 MSRP: $1010.00You Save: $345.60 (35%)Dodge Durango Lower Control Arm
Part Number: 68282729AD$682.52 MSRP: $1010.00You Save: $327.48 (33%)
| Page 1 of 4 |Next >
1-20 of 69 Results
Dodge Durango Control Arm
The Control Arm of Dodge Durango cars connects the frame of the car and the wheels of the car assists in the suspension system of the car and comprises shocks and springs. These arms revolve in relation to the inclinations of the road and make the wheels to suspend up and down. There are differences in control arm designs, but all of them have bushings in the areas where the control arm connects to the frame, and ball joints where it is connected to the knuckle or axle. Slightly later Durango models might have more rigid cast iron or aluminum control arms that are fat but lightweight. These components are effective for correct wheel alignment, safety, and rather uniform wear of the tire. Specially, performance control arms are also bought if one needs a stronger and more efficient arm for his car, especially if he would be using the car for high speed cruising or for rough terrains.
Looking for affordable and high-quality auto parts? Then you have already arrived at the proper online shop. We offer all Dodge Durango Control Arm at great affordable prices. Moreover, all genuine Dodge Durango Control Arm come with a manufacturer's warranty. In the long run, you would realize you have saved a lot of trouble and money with OEM parts from here.
Dodge Durango Control Arm Parts Questions & Experts Answers
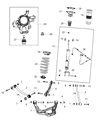
- Q: How to Replace a Front lower Control Arm on a Dodge Durango?A:Before you take off the wheel, loosen its lug nuts, lift up the car, and put jackstands under frame rails to hold it while you work. When using 4WD models, untighten the driveaxle/hub nut before lifting your vehicle. Take away the brake disc, then disconnect the wheel speed sensor. Set a floor jack on the end of the lower control arm, raise it into position, and take out the bolts securing the Shock Absorber to the control arm body. On Durango models, remove the torsion bar. Take off the link from the center bar that connects the control arm's end. For 4WD models, remove the driveaxle. Take note of how each control arm mounting fastener connects to the frame, then remove them. When you take out each cam-type adjuster, keep track of where it was originally located. Open the lower balljoint nut and disconnect the balljoint from the steering knuckle using our special tool made for this job. For proper installation, install everything first except the pivot bolt nuts, then lower the vehicle to regular drive height before tightening these nuts. When your car needs to reach normal ride height, slowly lift the bottom end of the control arm with a jack that's kept touching the ground. Put the tire in place and lockdown nuts. Raise the car off the ground, and screw in nuts securely. Readjust and balance front-end alignment after taking apart the front end. On Durango models, make sure you check and readjust ride height when you finish removing the bar.
- Q: How to Replace the rear Control Arms on a Dodge Durango?A:Service operations on the rear control arms of Durango models start by elevating the rear part and securely placing jackstands under it. The servicing process starts by disconnecting first the fasteners at the axle then moving to the fasteners at the frame to remove the upper control arm. The first step for the lower control arm involves removing the parking brake cable bracket from the left arm before removing fasteners at the axle and frame to extract the arm. All rubber bushings need inspection to check for any signs of wear or damage. Cracked and torn parts must be replaced. The reinstall process happens in the opposite direction of disassembly while following the set torque values for each fastener but these should remain untightened until the vehicle reaches its normal height.
- Q: How to Remove and Install a front upper Control Arm on Dodge Durango?A:To remove the wheel, start by loosening the lug nuts and raising the vehicle securely on jackstands. Then, loosen the nut on the upper balljoint stud and disconnect the balljoint from the steering knuckle using a balljoint removal tool. If you don't have the proper tool, a picklefork type separator can be used, but it may damage the balljoint boot. Next, remove the control arm mounting fasteners and pull the upper arm from its frame brackets. To install, reverse the removal steps and tighten all fasteners to the specified torque values. However, don't tighten the pivot bolt nuts until the vehicle is at normal ride height. If necessary, simulate normal ride height by raising the outer end of the lower control arm with a floor jack. Finally, install the wheel, lower the vehicle, and tighten the lug nuts. Remember to have the front end alignment checked and adjusted if needed.


Related Dodge Durango Parts
 Dodge Durango Shift Cable
 Dodge Durango Leaf Spring
 Dodge Durango Coil Spring Insulator
 Dodge Durango Axle Beam
 Dodge Durango Control Arm Bushing
 Dodge Durango Ball Joint
 Dodge Durango Front Cross-Member
 Dodge Durango Leaf Spring Bushing
 Dodge Durango Bump Stop
 Dodge Durango Rear Crossmember
Browse by Year
2025 Control Arm 2024 Control Arm 2023 Control Arm 2022 Control Arm 2021 Control Arm 2020 Control Arm 2019 Control Arm 2018 Control Arm 2017 Control Arm 2016 Control Arm 2015 Control Arm 2014 Control Arm 2013 Control Arm 2012 Control Arm 2011 Control Arm 2009 Control Arm 2008 Control Arm 2007 Control Arm 2006 Control Arm 2005 Control Arm 2004 Control Arm 2003 Control Arm 2002 Control Arm 2001 Control Arm 2000 Control Arm 1999 Control Arm 1998 Control Arm