My Garage
My Account
Cart
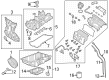
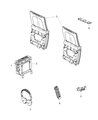
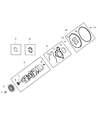
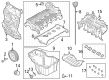
Genuine Dodge Harmonic Balancer
Engine Harmonic Balancer- Select Vehicle by Model
- Select Vehicle by VIN
Select Vehicle by Model
orMake
Model
Year
Select Vehicle by VIN
For the most accurate results, select vehicle by your VIN (Vehicle Identification Number).
93 Harmonic Balancers found


 Product Specifications
- Other Name: DAMPER Crankshaft


 Product Specifications
- Other Name: PULLEY Crankshaft; Crankshaft Pulley
- Replaces: 5037204AA


 Product Specifications
- Other Name: DAMPER Crankshaft; Crankshaft Damper, Vibration Damper


 Product Specifications
- Other Name: DAMPER Crankshaft


 Product Specifications
- Other Name: DAMPER-CRANKSHAFT; Crankshaft Damper, Vibration Damper
- Replaces: 53010831AB, 53010831AC, 5038731AF, 5038731AG, 5038731AE


 Product Specifications
- Other Name: DAMPER Crankshaft; Crankshaft Damper, Vibration Damper


 Product Specifications
- Other Name: DAMPER Crankshaft
- Replaced by: 53010831AD


 Product Specifications
- Other Name: DAMPER Crankshaft
- Replaced by: 53010831AD


 Product Specifications
- Other Name: DAMPER Crankshaft
- Replaces: 5184293AG, 5184293AC


 Product Specifications
- Other Name: DAMPER Crankshaft
- Replaced by: 5184293AH

 Product Specifications
- Other Name: PULLEY Crankshaft
- Replaced by: 5037204AB

 Product Specifications
- Other Name: Crankshaft Pulley, Pulley, Vibration Damper
- Replaces: 4893573AA

 Product Specifications
- Other Name: DAMPER-CRANKSHAFT
- Replaced by: 53010831AD
 Product Specifications
- Other Name: DAMPER-CRANKSHAFT
- Replaced by: 53010831AD
 Product Specifications
- Other Name: DAMPER-CRANKSHAFT
- Replaced by: 53010831AD
 Product Specifications
- Other Name: DAMPER Vibration


 Product Specifications
- Other Name: DAMPER Crankshaft; Crankshaft Pulley, Vibration Damper


 Product Specifications
- Other Name: DAMPER Crankshaft; Crankshaft Damper, Vibration Damper
- Replaces: 53022334AA


 Product Specifications
- Other Name: DAMPER Vibration; Vibration Damper

 Product Specifications
- Other Name: DAMPER-CRANKSHAFT; Crankshaft Pulley, Vibration Damper
- Replaces: 68590315AA, 68515818AA
| Page 1 of 5 |Next >
1-20 of 93 Results
Dodge Harmonic Balancer
Our website provides genuine Dodge Harmonic Balancers at competitive prices in the market. All of our OEM Dodge Harmonic Balancers come with the assurance of the manufacturer's warranty, a stress-free return policy, and speedy delivery service. So, you can shop with confidence.
Dodge Harmonic Balancer Parts Questions & Experts Answers
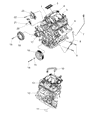
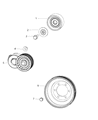
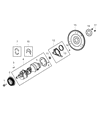
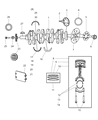
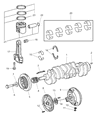
- Q: How to remove and install the front Crankshaft Seal and Harmonic Balancer in V8 engine on Dodge Challenger?A:Disconnect the cable from the negative terminal of the battery, ensuring that on 2015 and later models equipped with an Intelligent Battery Sensor, the IBS connector is disconnected first. Remove the engine drive belt, drain the coolant, detach the upper radiator hose, and take out the engine cooling fan. Remove the large vibration damper-to-crankshaft bolt, using a chain or strap wrench around the pulley to prevent the crankshaft from turning, and place a piece of rubber under the wrench to protect the vibration damper. It is advisable to place cardboard between the radiator and the vibration damper for protection during removal and installation. Use a proper puller to detach the vibration damper, ensuring it grips the hub only and does not contact the crankshaft threads. If removing the seal while the cover is still attached, carefully pry it out with a seal removal tool, taking care not to damage the area where the seal fits. Clean the bore, position the new seal with the lip facing inward, and apply a small amount of oil to ease installation. Drive the seal into the bore until fully seated, ensuring it bottoms against the cover flange. Check the damper surface for grooves; if present, replace the vibration damper. Lubricate the seal lips with engine oil, reinstall the vibration damper while aligning the Woodruff key, and use a special installation tool to press it onto the crankshaft. Install the vibration damper bolt, and complete the installation in reverse order, followed by refilling the cooling system.

Related Dodge Parts

Browse by Model
Avenger Harmonic Balancer Caliber Harmonic Balancer Caravan Harmonic Balancer Challenger Harmonic Balancer Charger Harmonic Balancer Colt Harmonic Balancer Conquest Harmonic Balancer D150 Harmonic Balancer D250 Harmonic Balancer D350 Harmonic Balancer Dakota Harmonic Balancer Dart Harmonic Balancer Daytona Harmonic Balancer Diplomat Harmonic Balancer Durango Harmonic Balancer Dynasty Harmonic Balancer Grand Caravan Harmonic Balancer Hornet Harmonic Balancer Intrepid Harmonic Balancer Journey Harmonic Balancer Magnum Harmonic Balancer Neon Harmonic Balancer Nitro Harmonic Balancer Raider Harmonic Balancer Ram 1500 Harmonic Balancer Ram 2500 Harmonic Balancer Ram 3500 Harmonic Balancer Ram 4500 Harmonic Balancer Ram 50 Harmonic Balancer Ram 5500 Harmonic Balancer Ram Van Harmonic Balancer Ram Wagon Harmonic Balancer Ramcharger Harmonic Balancer Shadow Harmonic Balancer Spirit Harmonic Balancer Sprinter 2500 Harmonic Balancer Sprinter 3500 Harmonic Balancer Stealth Harmonic Balancer Stratus Harmonic Balancer Viper Harmonic Balancer W150 Harmonic Balancer W250 Harmonic Balancer W350 Harmonic Balancer