My Garage
My Account
Cart
Genuine Dodge Neon Rack And Pinion
Steering Rack And Pinion- Select Vehicle by Model
- Select Vehicle by VIN
Select Vehicle by Model
orMake
Model
Year
Select Vehicle by VIN
For the most accurate results, select vehicle by your VIN (Vehicle Identification Number).
19 Rack And Pinions found


Dodge Neon Rack And Pinion
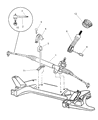
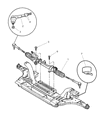
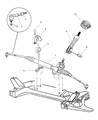
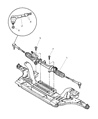
Steering Rack in Dodge Neon cars stands for the mechanism which connects the turning of the steering wheel to the movement of the wheels of the car, namely lateral movement. This setup referred to as rack and pinion has a pinion that is attached to the steering column whereas a rack is housed in a metal tube that turns the wheels as the steering wheel is turned. Most Dodge Neon cars employ a power assisted rack and pinion steering system, this makes it easy for the vehicle to turn with a help of hydraulics. These systems are not free from problems like leakage of the fluids or wear and tear of the gears, and hence give a stiff steering or very loose wheel. As a rule, straight gears are used whenthe efficiency of the processed signals is given priority, but, using helical gears can be done, which can negatively impact the wear of the gears. On the whole, the Steering Rack in Dodge Neon vehicles is an indispensable part to give an accurate feel of steering as well as handling.
Looking for affordable and high-quality auto parts? Then you have already arrived at the proper online shop. We offer all Dodge Neon Rack And Pinion at great affordable prices. Moreover, all genuine Dodge Neon Rack And Pinion come with a manufacturer's warranty. In the long run, you would realize you have saved a lot of trouble and money with OEM parts from here.
Dodge Neon Rack And Pinion Parts Questions & Experts Answers
- Q: How to remove and install Rack And Pinion on Dodge Neon?A:These models are made and bolted using net build front suspension alignment settings which are established during vehicle assembly through positioning of the front suspension crossmember to the master gauge holes on the under side. Special attention needs to be paid to a situation when the front crossmember is dismantled because, in this case, it has to be put back in the same position to provide the proper front end convergence. First, remove the negative terminal from the battery, followed by swivelling the wheels to the left most position and backing until you can engage the retaining pin into the coupler to lock the ignition key so as to prevent the steering column from turning. Temporarily marking the position of the steering coupler relative to the Rack And Pinion shaft so that correct reassembly will be possible. In the passenger compartment, it will be necessary to free the coupler of the Rack And Pinion, separate the coupler of the steering column shaft, cancel the fixing clip and free the coupler of the Rack And Pinion. Remove the front wheel, loosen the front wheel lug nuts, lift the car using jack and place jack stands before removing both of the wheels. Remove the nut from the Tie Rod End to the Steering Knuckle, remove the bolt at the engine torque strut to the crossmember and remove the electrical connector from the pressure switch but the bracket will remain connected to the hoses. Put a drain pan underneath the Rack And Pinion; disconnect the pressurized and return hoses of the housing and cover the ends to avoid leakage and contaminant. Locate a line to record the position of the front crossmember to under body, place the trans mixer jack at the center of the front cross member and unbolt two of the front and loosen the two at the rear. Lower the crossmember while it is supported and unbolt the four Rack And Pinion by removing the mounting bolts attaching it to the crossmember then sliding the Rack And Pinion forward to unlock but disconnecting the coupler from the shafts. The installation of the Rack And Pinion is done as follows; mount the Rack And Pinion on the crossmember then tightening the four mounting bolts provided and coupling of the coupler on the Rack And Pinion shaft with the aligning marks visible if the gear is being reused or aligning splines if a new assembly is being used. Lift up the crossmember in order to align the holes, then put in the bolts in a X-shaped pattern to force the crossmember into the marks which have been made when using the scribe. Once in line, do up the bolts, secure the power steering fluid, fix the electrical connection, the power steering fluid hose bracket and fix the tie-rod ends. Lastly, fit the wheels and lug nuts, fix the front wheels then lower the vehicle until the lug nuts tighten up, fit the Rack And Pinion coupler to the steering column shaft coupler then check the front end alignment and adjust it if it is off.

Related Dodge Neon Parts
 Dodge Neon Steering Knuckle
 Dodge Neon Control Arm
 Dodge Neon Wheel Bearing
 Dodge Neon Sway Bar Link
 Dodge Neon Power Steering Pump
 Dodge Neon Sway Bar Bushing
 Dodge Neon Tie Rod End
 Dodge Neon Wheel Hub
 Dodge Neon Wheel Stud
 Dodge Neon Ball Joint
 Dodge Neon Coil Spring Insulator
 Dodge Neon Steering Wheel