My Garage
My Account
Cart
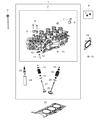
Genuine Chrysler Cylinder Head
Head- Select Vehicle by Model
- Select Vehicle by VIN
Select Vehicle by Model
orMake
Model
Year
Select Vehicle by VIN
For the most accurate results, select vehicle by your VIN (Vehicle Identification Number).
173 Cylinder Heads found


 Product Specifications
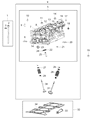
- Other Name: Head Cylinder With Valves; Cylinder Head
- Replaces: RL141352AD, RL141352AE, RL141352AC, RL141352AB, 68141352AC, 68141352AB, 68141352AE


 Product Specifications
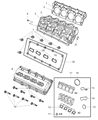
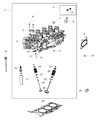
- Other Name: Head Cylinder With Valves; Cylinder Head
- Replaces: RL141353AC, RL141353AA, RL141353AB, 68196637AA, 68141353AB, 68141353AA


 Product Specifications
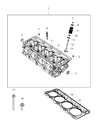
- Other Name: Head Cylinder Left; Cylinder Head
- Replaces: R5857034AB, R5857034AC, RL143397AB, 5143397AA


 Product Specifications
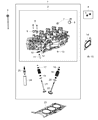
- Other Name: Head Assembly Engine Cylinder
- Replaced by: 68141353AC


 Product Specifications
- Other Name: Head Cylinder With Valves
- Replaced by: 68641999AA


 Product Specifications
- Other Name: Head-Engine Cylinder; Cylinder Head
- Replaces: 68280502AA, 68280502AC, 68280502AE, 68280502AD, 68280502AB


 Product Specifications
- Other Name: Cylinder Head


 Product Specifications
- Other Name: Head Cylinder With Valves
- Replaced by: 68141353AC


 Product Specifications
- Other Name: Head Cylinder Right; Cylinder Head
- Replaces: R6857034AB, 5143396AA, R6857034AC


 Product Specifications
- Other Name: Head Assembly Engine Cylinder Warning: Cylinder Heads Are Shipped Without Oil Gallery Bolts/Plugs, Bolt/Plug Kit 68154699AA Must Be Used Or Trouble Codes Will Be Set.
- Replaced by: 68141353AC

 Product Specifications
- Other Name: Head-Engine Cylinder
- Replaced by: 68280502AF
 Product Specifications
- Other Name: Head Cylinder With Valves; Cylinder Head
- Replaced by: 68641999AA

 Product Specifications
- Other Name: Head Assembly Engine Cylinder
- Replaced by: 68641995AA

 Product Specifications
- Other Name: Head Cylinder Left See Note
- Replaced by: 68247775AA
- Product Specifications
- Other Name: Head Cylinder Left
- Replaced by: 5143397AB
 Product Specifications
- Other Name: Head Cylinder Left
- Replaced by: 5143397AB

 Product Specifications
- Other Name: Cylinder Head


 Product Specifications
- Other Name: Head-Engine Cylinder; Cylinder Head
- Replaces: 68280503AD, 68280503AA, 68280503AB, 68280503AC, 68280503AE


| Page 1 of 9 |Next >
1-20 of 173 Results
Chrysler Cylinder Head
Our website has a huge selection of Chrysler Cylinder Heads at the optimal prices in the industry. If you need any genuine Chrysler Cylinder Heads, we ship them to your door step as we offer a fast delivery service. In addition, all OEM parts are backed by the manufacturer's warranty.
Chrysler Cylinder Head Parts Questions & Experts Answers
- Q: How to remove and install a cylinder head in 3.5L V6 engine on Chrysler 300?A:It is necessary to have the needed special tools before starting this process. Start the removal by releasing fuel system pressure, removing the negative terminal of the battery and emptying off cooling system. After removing upper and lower intake manifolds, ignition coils, spark plugs, exhaust manifold from cylinder head(s), valve cover(s), rocker arms, shafts (if equipped) and timing belt along with its covers; pay attention to timing belt rotation direction if belt is to be reused. Loosen camshaft sprocket bolt with a wrench while holding sprocket hex and remove the thrust plate for camshaft allowing it to slid back. Make cardboard template for putting all cylinder head bolts together accurately after removing rear timing belt cover bolts. Remove each cylinder head mounting bolt in reverse tightening sequence, then store them accordingly. Lift the heads off engine making sure all bolts are removed and place on wooden blocks. If camshaft requires removal this should be done with head off. For installation make sure mating surfaces are clean, clear cylinders of any debris and check for damage. Chase threads in head bolt holes then replace any stretched bolts. Place new gasket over dowel pins checking that it matches up with down spout hole location and place head onto block without disrupting gasket. Tighten bolts recommendedly reasecure camshaft sprocket thrust plate put on rear timinig belt cover bolts or complete remaining steps as they were throughout installation procedure but backwards.Turn it off by changing oil and filter replacing coolant running engine checking for leaks.
- Q: How to reassemble a cylinder head after valve servicing on Chrysler Laser?A:Regardless of whether the head was sent to an automotive machine shop for valve servicing, ensure it is clean before beginning reassembly. If the head was sent out for valve servicing, the valves and related components will already be in place. Lay all of the spring seats in position, then install new seals on each of the valve guides, pushing the seals down firmly over the valve guides. Install the valves carefully to avoid damaging the new valve stem oil seals, the valve springs, and the retainers, coating the valve stems with engine assembly lube or moly-base grease before inserting them into the guides and installing the springs with the painted side next to the retainer. Use a valve compressor tool to compress the spring and install the keepers, ensuring the retainer does not touch the seal. After releasing the compressor, check that the keepers are seated properly in the valve stem groove(s), using grease if necessary to hold the keepers in place until the compressor is released. Finally, double-check the installed valve spring height; if it was correct before disassembly, it should still be within the specified limits, measured from the bottom of the spring to the upper edge of the spring retainer.
- Q: What steps should be followed for the removal and installation of the cylinder head in 3.5L V6 engine on Chrysler Sebring?A:As with any other procedure, there are certain concomitant tools and it is only wise to read through the whole process then order for these tools. Begin with the removal of fuel System pressure and removing the negative battery cable from the remote ground terminal. Remove the coolant by pulling the cock so as to drain the cooling mechanism and then unbolt the air filter housing and the coolant recovery bottle. If the front bank cylinder head is being removed, then locate and remove the cooling fan and shroud assembly and then the alternator. Third, eliminate the upper intake manifold, the fuel rail and the lower intake manifold. For any reason it is necessary, the ignition coils and spark plugs have to be disconnected and the exhaust manifold has to be disconnected from the selected cylinder head to be taken out. Raise the vehicle and drain the power steering pump along with fluid line, remove the valve cover, rocker arms and shafts. Secure the engine with an engine hoist and then remove the crankshaft pulley, the timing belt covers, the Timing Belt and align the TDC, if the belt will be re-used, mark the direction of rotation. unscrew the bolt of camshaft while rotating the hex of camshaft sprocket with a wrench but carefully, camshaft two sprockets in addition to their bolts are unique. Take the camshaft thrust plate off the back of the head to move the camshaft back and out of the way to take the sprocket and bolt off. Remove the bolts fastening the rear timing belt cover to the cylinder head but leave all the other timing belt cover bolts undone. Carefully place a new head gasket on the head bananas and using a pen mark the cardboard with the position of the front of the engine and mark the cylinders and the bolt pattern on the cardboard for a precise storing of each cylinder bolt after removal. Turn each cylinder head mounting bolt a quarter turn counter clockwise and continue until they can be unscrewed by hand Turn the bolts in reverse order that they was tightened and place the bolts in the cardboard holder. Raise the head(s) up off the block, don't dirty the surfaces that are to be mated, and if there is significant resistance, check for some overlooked head bolts; if there isn't any, then try using a hammer and a piece of wood to break the gasket-seal. After removal it should be placed on wooden blocks so that the gasket surfaces are not damaged. If the camshaft has to be inspected or replaced, then it is possible only when the cylinder head is removed from the engine. For installation, make certain that both mating surfaces of each cylinder head and block are clean, the application of gasket scraper is required to remove all carbon and old gasket material, wipe off with lacquer thinner or acetone. Inspect the block and head mating surfaces and where there are slight nicks or scratches file them off but if there deep damages then you should machine the surface. Tap the holes in the head with a tap of the right thread size and check cleaned head bolts for stretch. Place the new gasket on the dowel pins in the block in the correct manner; gently place the head on the block on top of gasket. If you are changing the timing belt, securely snug down the timing belt bolts in the recommended sequence to the torque specifications, install the rear timing belt cover-to-cylinder head bolts and snug them down also. Now, the camshaft has to be slid back into the position in the cylinder head; the camshaft sprocket and new bolt installed and tightened by applying force on the hex on camshaft sprocket with a wrench on the camshaft bolt at the same time. The camshaft thrust plate has to be fitted at the back of the head and the bolts need to be tightened to the recommended torque; a new O-ring should be used. The remaining process of the installation is the inverse of the removal process. Last but not the least, drain the engine oil and filter, replace it with fresh oil and filter, fill up the cooling system, operate the engine and, inspect for any leaks.


Related Chrysler Parts
 Chrysler Rocker Arm
 Chrysler Cylinder Head Gasket
 Chrysler Camshaft
 Chrysler Timing Cover
 Chrysler Cylinder Head Bolts
 Chrysler Spool Valve
 Chrysler Rocker Arm Pivot
Browse by Model
200 Cylinder Head 300 Cylinder Head 300M Cylinder Head Aspen Cylinder Head Cirrus Cylinder Head Concorde Cylinder Head Crossfire Cylinder Head Executive Limousine Cylinder Head Executive Sedan Cylinder Head Grand Voyager Cylinder Head Imperial Cylinder Head Laser Cylinder Head LeBaron Cylinder Head LHS Cylinder Head New Yorker Cylinder Head Pacifica Cylinder Head Prowler Cylinder Head PT Cruiser Cylinder Head Sebring Cylinder Head TC Maserati Cylinder Head Town & Country Cylinder Head Voyager Cylinder Head